Updated: GAS Library - OnedriveApp
-
v1.2.1 (July 26, 2023)
A bug of “Send Email messages” was removed.
v1.2.1 (July 26, 2023)
A bug of “Send Email messages” was removed.
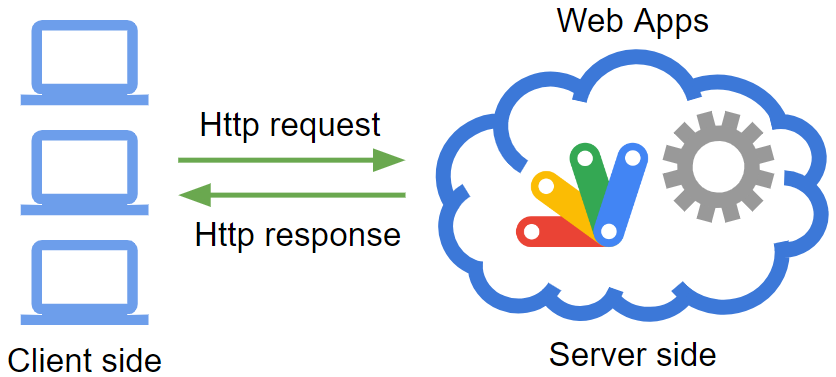
Here, I would like to introduce a report for understanding the flow of the request to Web Apps created by Google Apps Script. There might be a case that various applications using the Web Apps are created and the Web Apps are used as the webhook. In that case, it is considered that when you have understood the flow of requests to the Web Apps, your goal might be able to be smoothly achieved. In this report, I would like to introduce the information about it.
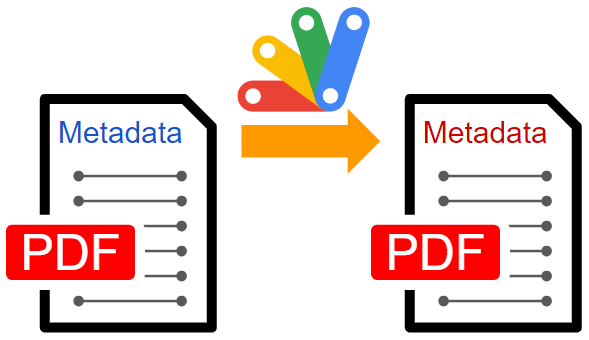
This is a sample script for managing the metadata of PDF data using Google Apps Script.
There might be a case in that you want to retrieve and update the metadata of PDF data using Google Apps Script. In this post, I would like to introduce achieving this.
This is a Class ManagePdfMetadata. This Class is used for managing the metadata of PDF files using Google Apps Script. And, in this Class, a Javascript library of pdf-lib is used for managing the PDF metadata. This Javascript library is loaded in this Class.
This is a sample script for checking the overwrapped cells of multiple ranges on Google Spreadsheet using Google Apps Script.
When applications are developed, there might be a case that it is required to confirm whether 2 ranges on Google Spreadsheet are overwrapped. In this post, I would like to introduce a sample script for achieving this.
getOverwrappedCellsThe following script is a method of getOverwrappedCells. This is the main script of this post. This method returns the information about the overwrapped cells by inputting an array including the Class Range object. For example, as the default response, when each cell in “range1” and “range2” is overwrapped, true is returned. When { responseType: "list" } is used, the cell coordinates of the overwrapped cells are returned as an array.
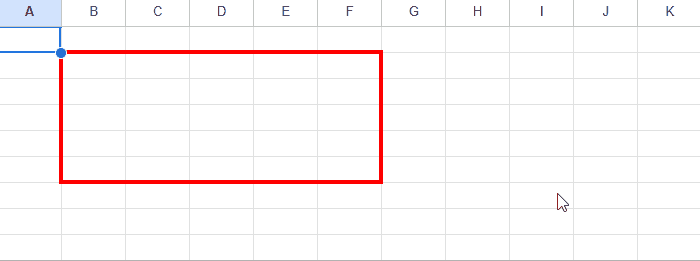
This is a sample script for automatically refreshing the basic filter on Google Spreadsheet using Google Apps Script.
A sample situation is as follows.
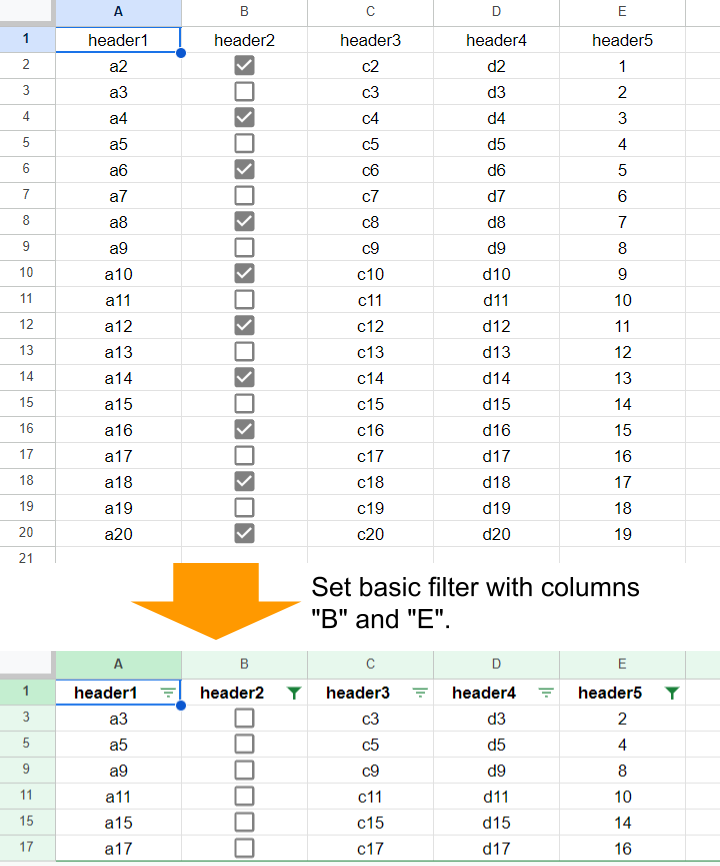
In this sample, the basic filter is set to columns “B” and “D”.
=MOD(E2,3)<>0 is used.For example, under the condition that the basic filter is set to columns “B” and “D”, even when a checkbox of “B3” is checked, unfortunately, the basic filter is not automatically refreshed. In this case, it is required to manually refresh it.
This is a Google Apps Script library for efficiently managing the time-driven triggers for executing Google Apps Script using Google Apps Script.

Google Apps Script can execute with not only the manual operation but also several triggers. The time-driven trigger is one of them, and this is one of a lot of important functions. When the time-driven trigger is used, Google Apps Script can be automatically executed at the time you set without launching the user’s PC.
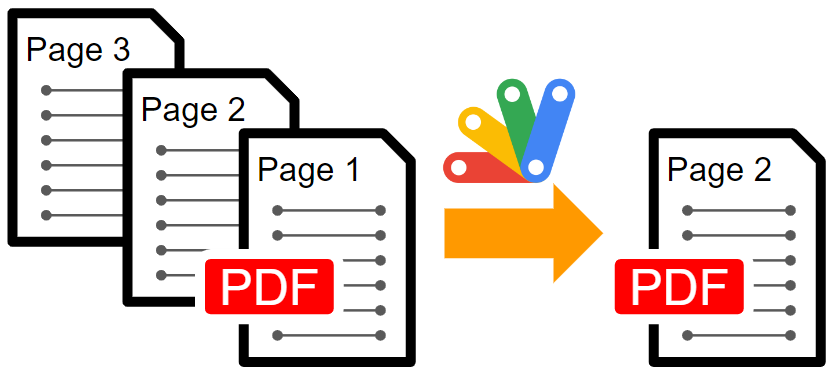
This is a sample script for exporting the specific pages from a PDF as a new PDF using Google Apps Script.
In this sample script, pdf-lib is used. In the current stage, it seems that this Javascript can be directly used with Google Apps Script.
async function myFunction() {
  // Retrieve PDF data.
  const fileId = "###"; // Please set a file ID of your a PDF file or a file ID of Google Docs files (Document, Spreadsheet, Slide).
  const pageNumbers = [2, 4]; // In this sample, 2 and 4 pages are exported as a PDF.

  const blob = DriveApp.getFileById(fileId).getBlob();

  // Merge PDFs.
  const cdnjs = "https://cdn.jsdelivr.net/npm/pdf-lib/dist/pdf-lib.min.js";
  eval(UrlFetchApp.fetch(cdnjs).getContentText()); // Load pdf-lib
  const setTimeout = function (f, t) {
    Utilities.sleep(t);
    return f();
  };
  const pdfDoc = await PDFLib.PDFDocument.create();
  const pdfData = await PDFLib.PDFDocument.load(
    new Uint8Array(blob.getBytes())
  );
  const pages = await pdfDoc.copyPages(
    pdfData,
    [...Array(pdfData.getPageCount())].map((_, i) => i)
  );
  pages.forEach((page, i) => {
    if (pageNumbers.includes(i + 1)) {
      pdfDoc.addPage(page);
    }
  });
  const bytes = await pdfDoc.save();

  // Create a PDF file.
  DriveApp.createFile(
    Utilities.newBlob([...new Int8Array(bytes)], MimeType.PDF, "sample.pdf")
  );
}
When this script is run, the specific pages (In this sample, 2 and 4 pages.) in pageNumbers of a PDF file of fileId are exported as a new PDF file.
This is a sample script for converting various images to PNG Format and JPEG format using Google Apps Script.
The flow of this sample script is as follows.
outputFormat is “JPEG”.Please set your file ID and output format.
This is a sample script for copying a Google Spreadsheet including a container-bound script by removing the container-bound script using Google Apps Script.
When you want to copy a Google Google Spreadsheet including a container-bound script by removing the container-bound script using Google Apps Script, this could be achieved by using “get” and “create” methods of Sheets API before. The sample script is as follows.
This is a sample script for notifying the new release of Google APIs and Google Apps Script with an email using Google Apps Script.
Recently, I published a sample script of “Retrieving Release Notes of Google Apps Script and Google APIs from RSS using Google Apps Script”. After this was published, I got an email that it wants to automatically notice the new release of Google APIs and Google Apps Script with an email. From this, I prepared a sample script as follows.
Registered Application Name: Workspace & Gemini AI Orchestration Engine
This web page serves as the official homepage and privacy compliance interface for the application "Workspace & Gemini AI Orchestration Engine". This specialized developer utility is designed to research, benchmark, and optimize advanced integrations between Google Workspace services, the Google Apps Script API, and Gemini AI models (via Google Vertex AI / Gemini API endpoints).
The application facilitates automated multi-agent scaffolding, programmatic script deployment, project resource management, and structural analysis of Google Apps Script projects. It allows developers and autonomous AI agents (operating via Model Context Protocol / MCP) to securely evaluate execution performance, implement high-performance batch requests, and test agent-to-agent (A2A) workflows within a controlled and structured environment.
Our application explicitly requests access to specific Google user accounts through OAuth scopes required strictly for interacting with the Google Apps Script API and Google Workspace endpoints. This access is utilized solely to execute user-initiated or agent-orchestrated programmatic operations—such as creating, modifying, deploying, or benchmarking script projects and executing automated workflows. No background automated extraction occurs without explicit session initiation.
Adhering to a strict Zero-Retention Model, this application does not store, log, or persist any personal data, OAuth tokens, script source codes, or Google account configurations on any external server, database, or persistent storage medium. All data processing and API responses are handled entirely in-memory or securely on the client side within the active session context, ensuring complete cryptographic transient isolation.
We maintain absolute data privacy. No data accessed via Google OAuth scopes is shared, sold, rented, or transferred to third-party entities, advertising networks, or data brokers. All data transmissions are strictly point-to-point, encrypted in transit using industry-standard protocols, and limited entirely to the direct channel between the execution environment and Google's official API gateways.
For inquiries regarding this developer application, technical benchmarks, or verification compliance, please refer to the official documentation and repositories linked on this homepage (tanaikech.github.io).