
Abstract
This document introduces a powerful integration of the gas-fakes CLI and a Gemini CLI extension, creating a secure and streamlined development workflow for Google Apps Script. This setup enables local testing of AI-generated scripts in a secure sandbox, preventing unintended access to your Google Drive, and provides a seamless transition to cloud deployment.
Introduction
The gas-fakes project by Bruce McPherson is a groundbreaking endeavor that recreates the Google Apps Script (GAS) execution environment on Node.js, enabling local testing and debugging. When Bruce invited me to join the project, I first started by understanding gas-fakes. The project enables local execution by converting GAS service calls (e.g., SpreadsheetApp.create()) into corresponding Google API requests.
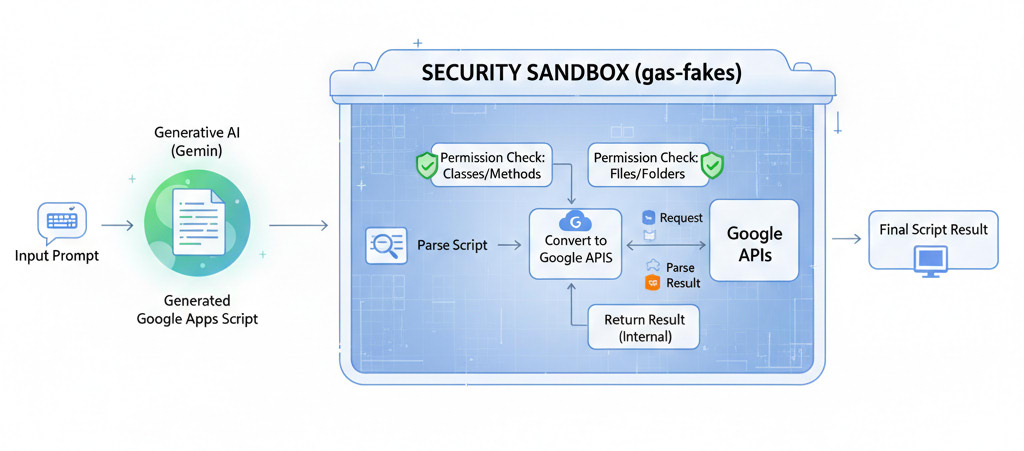
While amazed by this vast project, I realized its potential application to an idea I had previously attempted but failed to achieve: “a secure sandbox for Google Apps Script.” Through discussions with Bruce, I became convinced that this GAS sandbox was feasible. Although generative AI had not yet emerged at the time I attempted it before, we now live in an era where AI automatically generates scripts. For many users, ensuring a safe environment to execute AI-generated GAS is critically important. GAS services sometimes require broad permissions, such as access to a user’s entire Google Drive, posing a significant risk when running code from untrusted sources. I was confident that using gas-fakes as a sandbox would be a powerful solution to this security challenge by enabling fine-grained control, such as restricting script access to specific files only.
This sandbox concept was first realized and resulted in several articles. Ref, Ref, Ref At this stage, it was a simple implementation that executed GAS generated by the Gemini CLI in a gas-fakes sandbox within a specific directory.
As a next step, gas-fakes was implemented as an MCP (Model Context Protocol) server. Ref Ref This allowed users to interactively use gas-fakes as a tool from the Gemini CLI, but it was still limited to use within a specific directory.
Therefore, we developed gas-fakes as a CLI (Command Line Interface) tool so that it could be installed globally and used from anywhere. Ref Furthermore, with the advent of Gemini CLI extensions, we released the GAS Development Kit Extension, which integrates gas-fakes, Google’s official GAS development tool clasp, and workspace-developer into a single extension. Ref
With this extension, users can establish a consistent development workflow by simply installing gas-fakes and this extension. This allows them to execute GAS generated using the Gemini CLI in a local, secure sandbox and then transfer it to a GAS project on the cloud via clasp after testing. Here, we introduce the core components: the gas-fakes CLI and the GAS Development Kit Extension.
Workflow of sandbox
Repositories
Installation Guide
1. Install Gemini CLI
First, install the Gemini CLI using npm:
npm install -g @google/gemini-cli
Next, authorize the CLI by following the instructions in the official documentation.
2. Install Clasp
Install Clasp, the command-line tool for Google Apps Script:
npm install -g @google/clasp
Authorize Clasp by following the instructions in the official GitHub repository.
Note: While Clasp is recommended for a full development workflow, you can still use the gas-fakes sandbox without it.
3. Install gas-fakes
Install gas-fakes, the command-line tool for executing Google Apps Script locally:
npm install -g @mcpher/gas-fakes
For authorization instructions, see the Getting Started guide.
4. Install the GAS Development Kit Extension
Install the Gemini CLI extension for the GAS Development Kit:
gemini extensions install https://github.com/tanaikech/gas-development-kit-extension
This extension is lightweight, as it does not include the scripts for the Clasp and gas-fakes MCP servers, which are already implemented in their respective tools.
For managing Google Workspace, you can also install the ToolsForMCPServer-extension.
Verifying the Installation
gas-fakes CLI
To test your gas-fakes installation, run the following command in your terminal:
gas-fakes --help
This will display the help message, confirming that the gas-fakes CLI is installed correctly.
Next, run the following command to test the authorization:
gas-fakes -s "const rootFolder = DriveApp.getRootFolder(); const rootFolderName = rootFolder.getName(); console.log(rootFolderName);"
The gas-fakes CLI can directly accept the Google Apps Script as arguments. Of course, the filename can also be accepted. If the authorization is correct, the name of the root folder in your Google Drive will be displayed.
Gemini CLI Extension
This extension can be used in the terminal, both with and without VSCode.
1. Launch the Gemini CLI
Launch the Gemini CLI from your terminal:
gemini
2. Verify the Installed MCP Servers
Verify the servers with the following command in the Gemini CLI:
/mcp
If the gas-development-kit-extension was installed correctly, you will see the following response:
Configured MCP servers:

🟢 gas-fakes - Ready (1 tool)
  Tools:
  - run-gas-by-gas-fakes

🟢 clasp (from gas-development-kit-extension) - Ready (5 tools)
  Tools:
  - clone_project
  - create_project
  - list_projects
  - pull_files
  - push_files

🟢 workspace-developer (from gas-development-kit-extension) - Ready (2 tools)
  Tools:
  - fetch_workspace_docs
  - search_workspace_docs
The workspace-developer tool is from the Use Large Language Models (LLMs) to develop on Google Workspace guide.
This extension includes the following custom commands:
/devgas-update-gas: Update a Google Apps Script project on Google Drive usingclasp/devgas-test-gas: Test run Google Apps Script usinggas-fakes/devgas-load-gas: Load a Google Apps Script project from Google Drive usingclasp/devgas-create-new-gas: Create a new Google Apps Script project and push a script usingclasp
Usage Examples
1. Generate a Google Apps Script
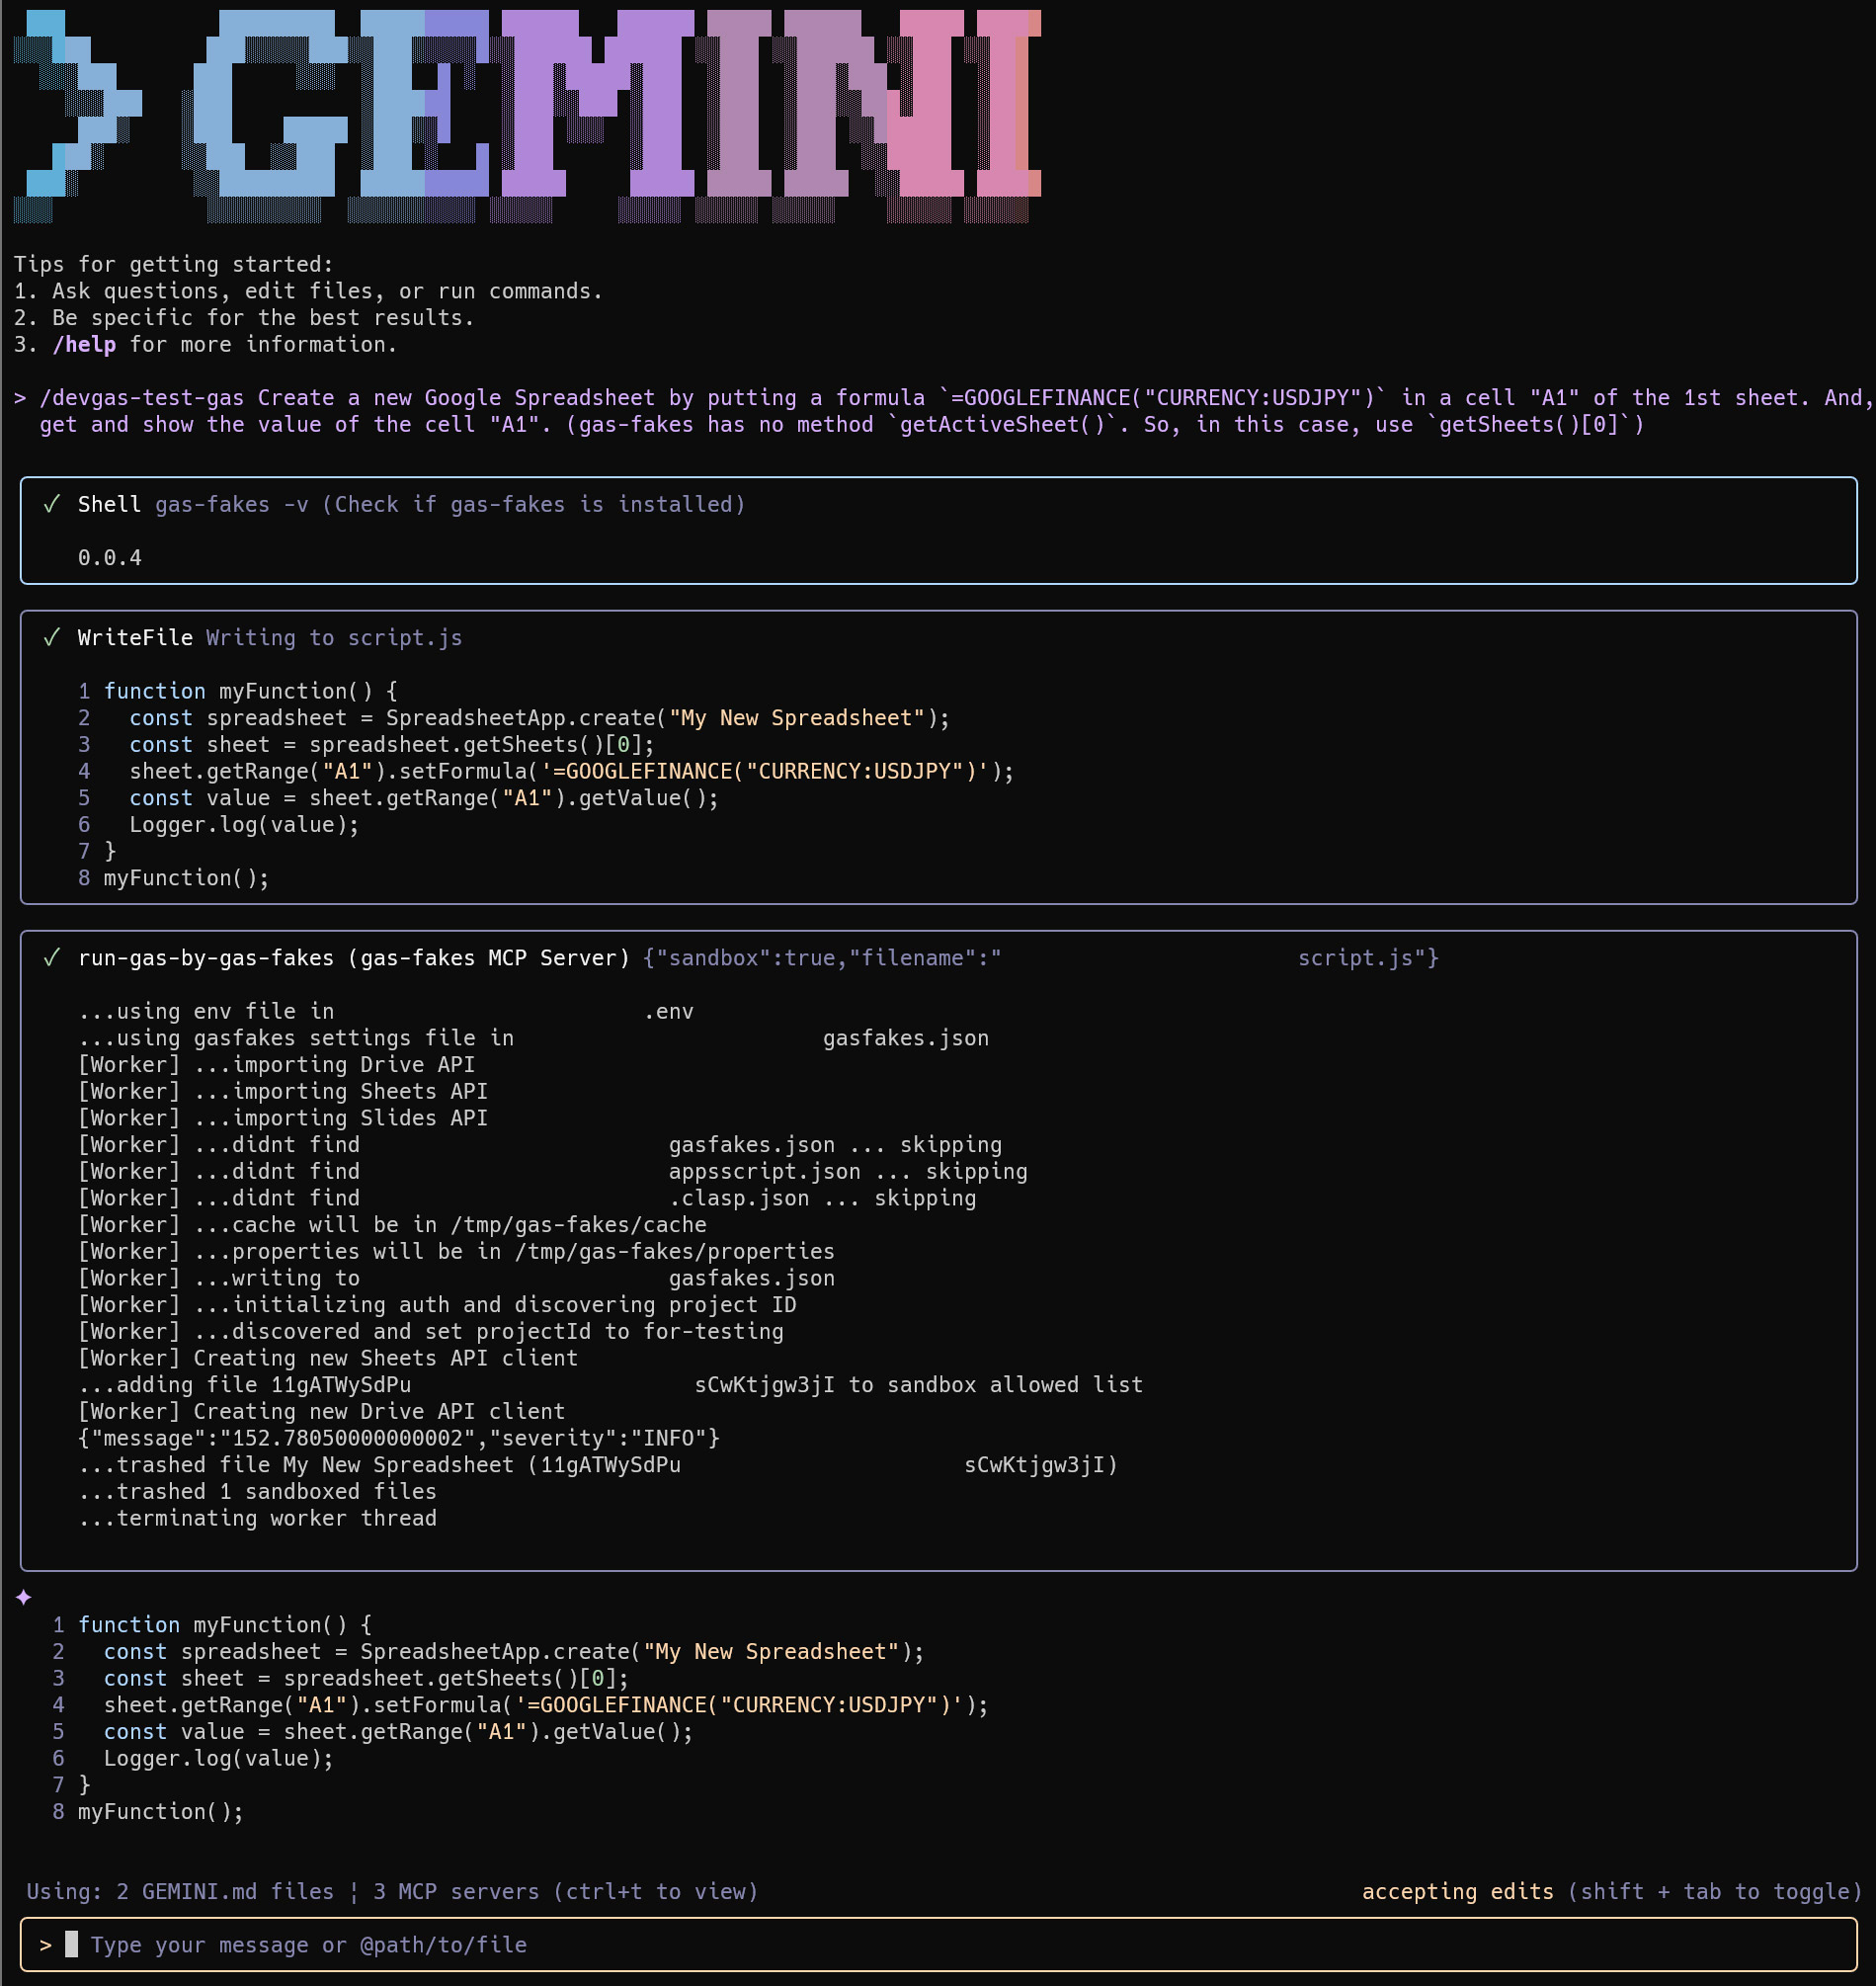
To generate and run a Google Apps Script, use the /devgas-test-gas custom command. This custom command runs Google Apps Script with detailed settings for generating the script for gas-fakes.
Prompt:
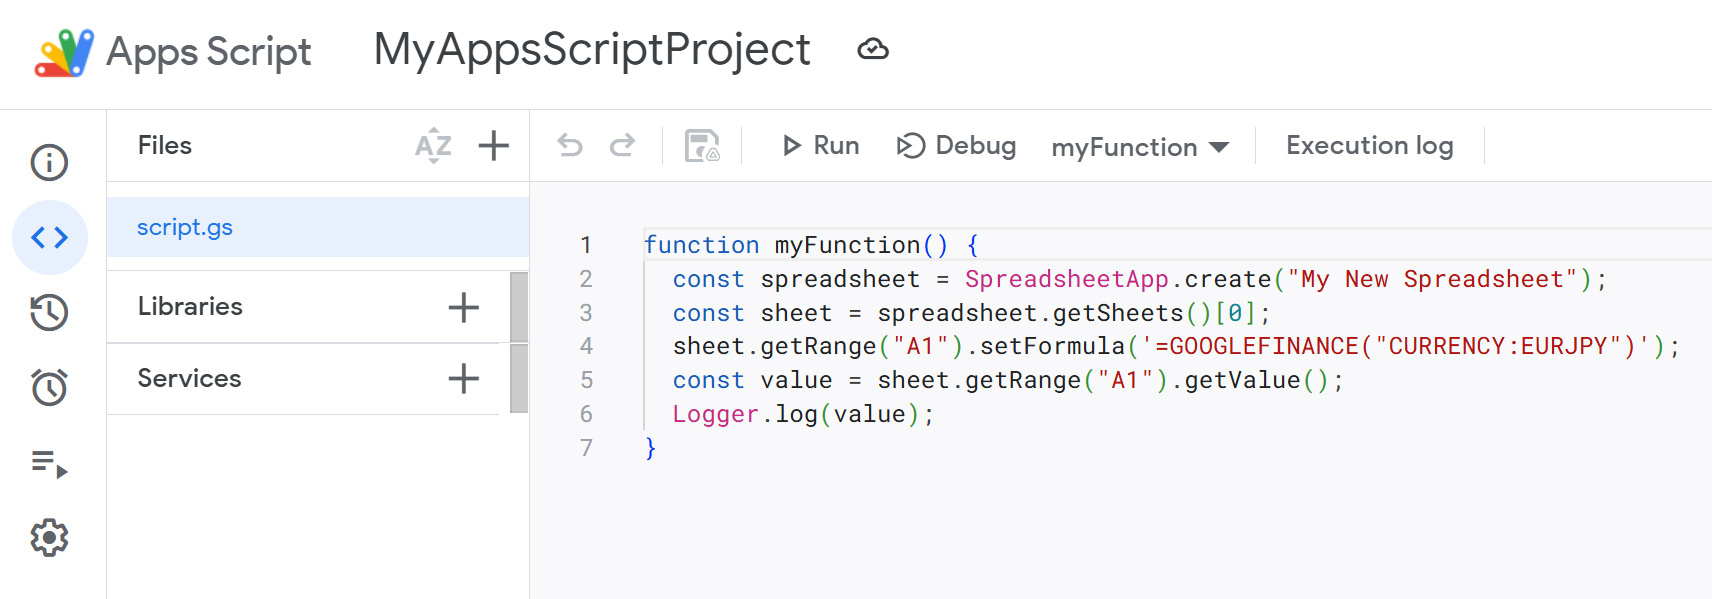
/devgas-test-gas Create a new Google Spreadsheet by putting a formula `=GOOGLEFINANCE("CURRENCY:USDJPY")` in cell "A1" of the first sheet. Then, get and show the value of cell "A1". (Note: `gas-fakes` has no `getActiveSheet()` method. In this case, use `getSheets()[0]`.)
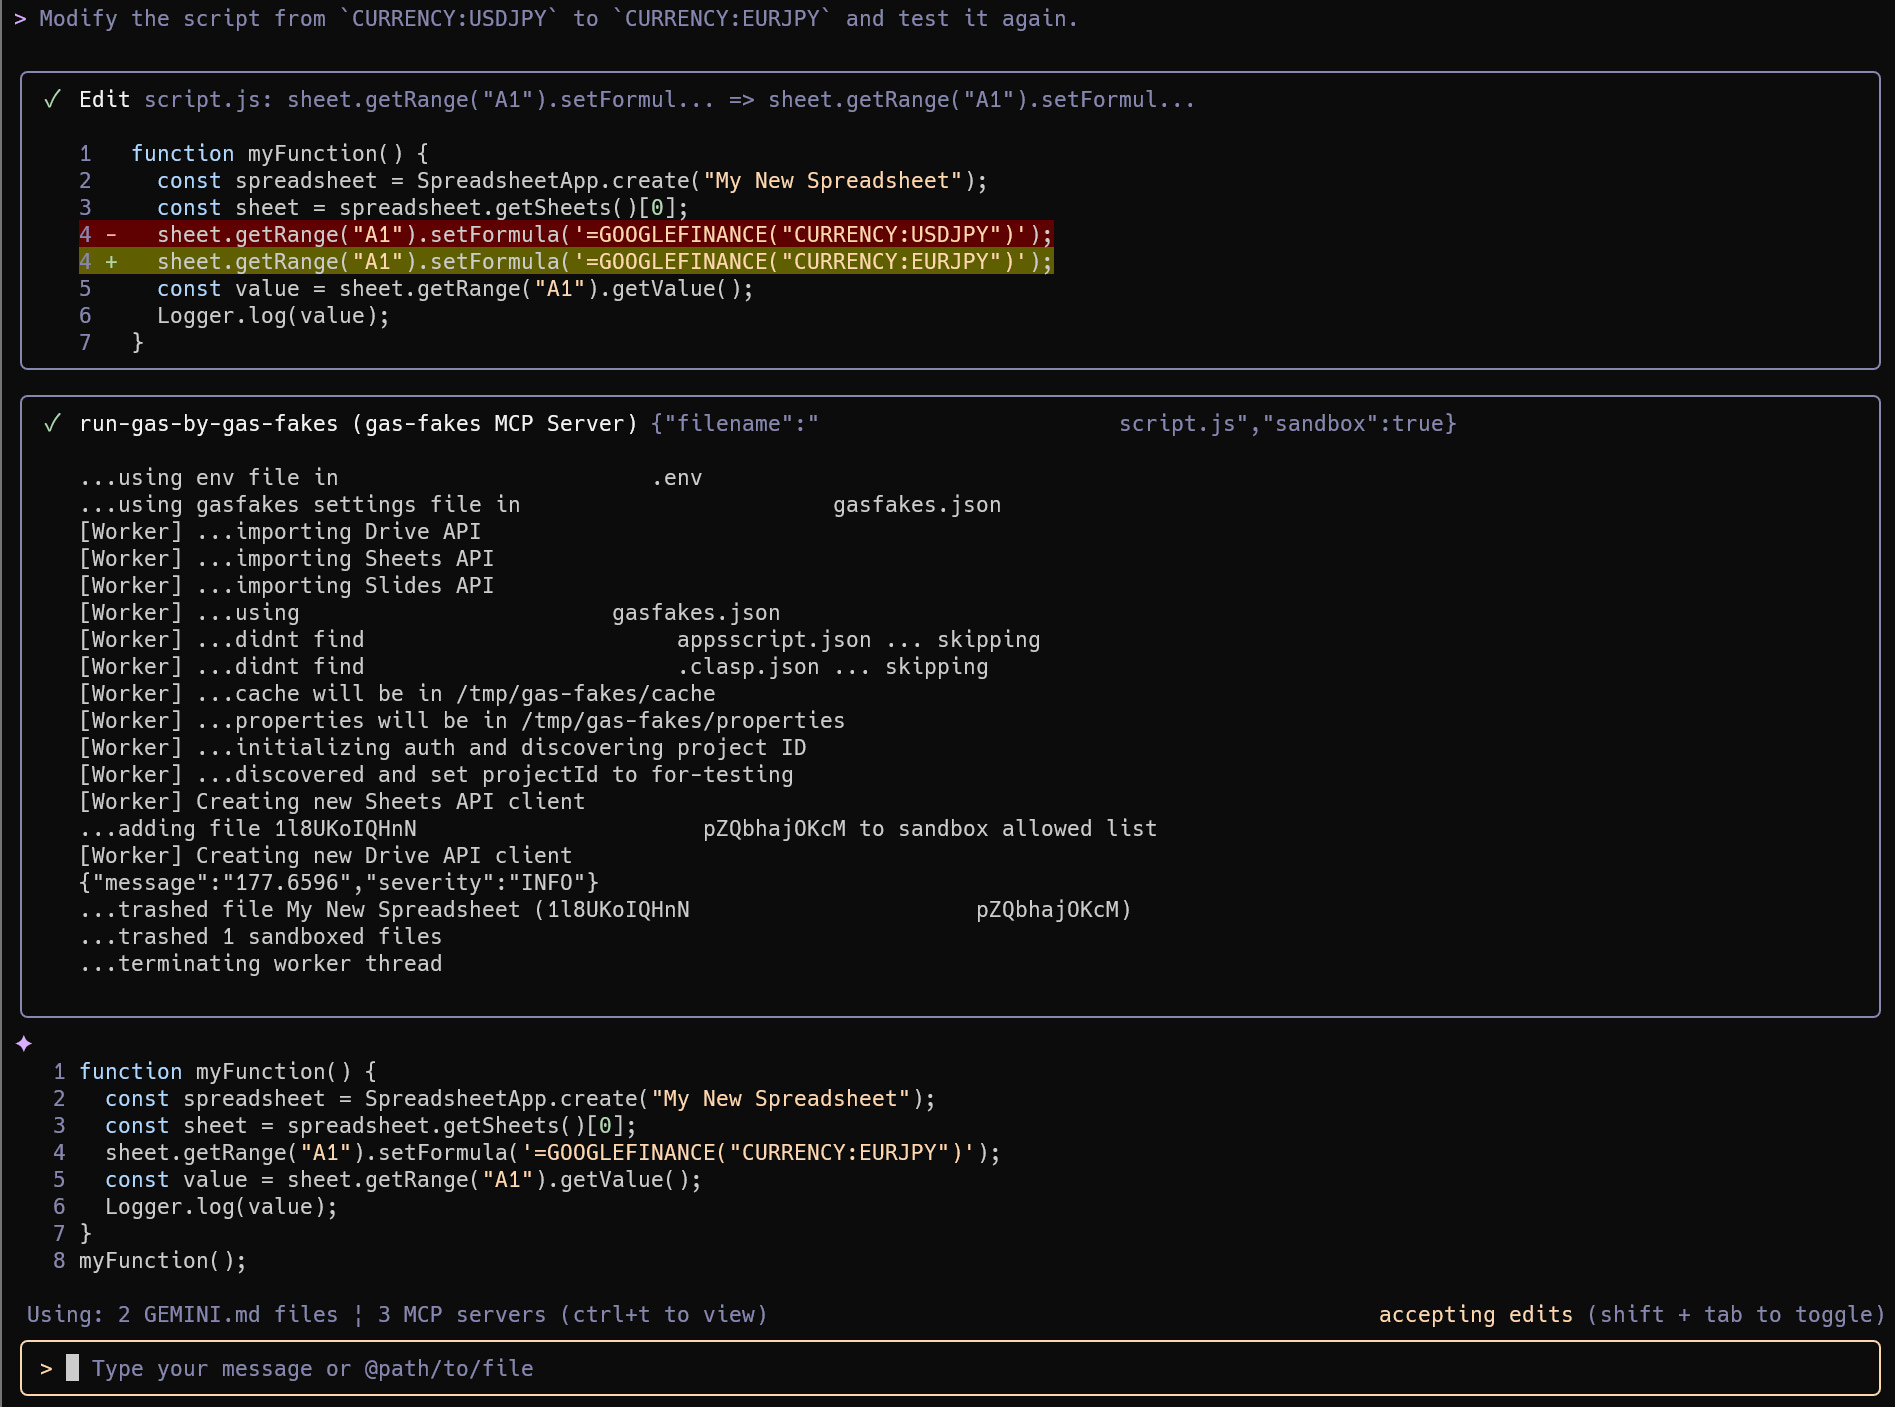
2. Modify a Google Apps Script
To modify the script, you can use a follow-up prompt. This example assumes that the previous prompt is in your history.
Prompt:
Modify the script from `CURRENCY:USDJPY` to `CURRENCY:EURJPY` and test it again.
3. Push a Google Apps Script to Google Drive
Note: This requires Clasp to be installed.
To save the generated script to Google Drive, use the following prompt:
Prompt:
/devgas-create-new-gas
or
/devgas-create-new-gas @script.js
@script.js is the filename of the script, which may be different in your case.
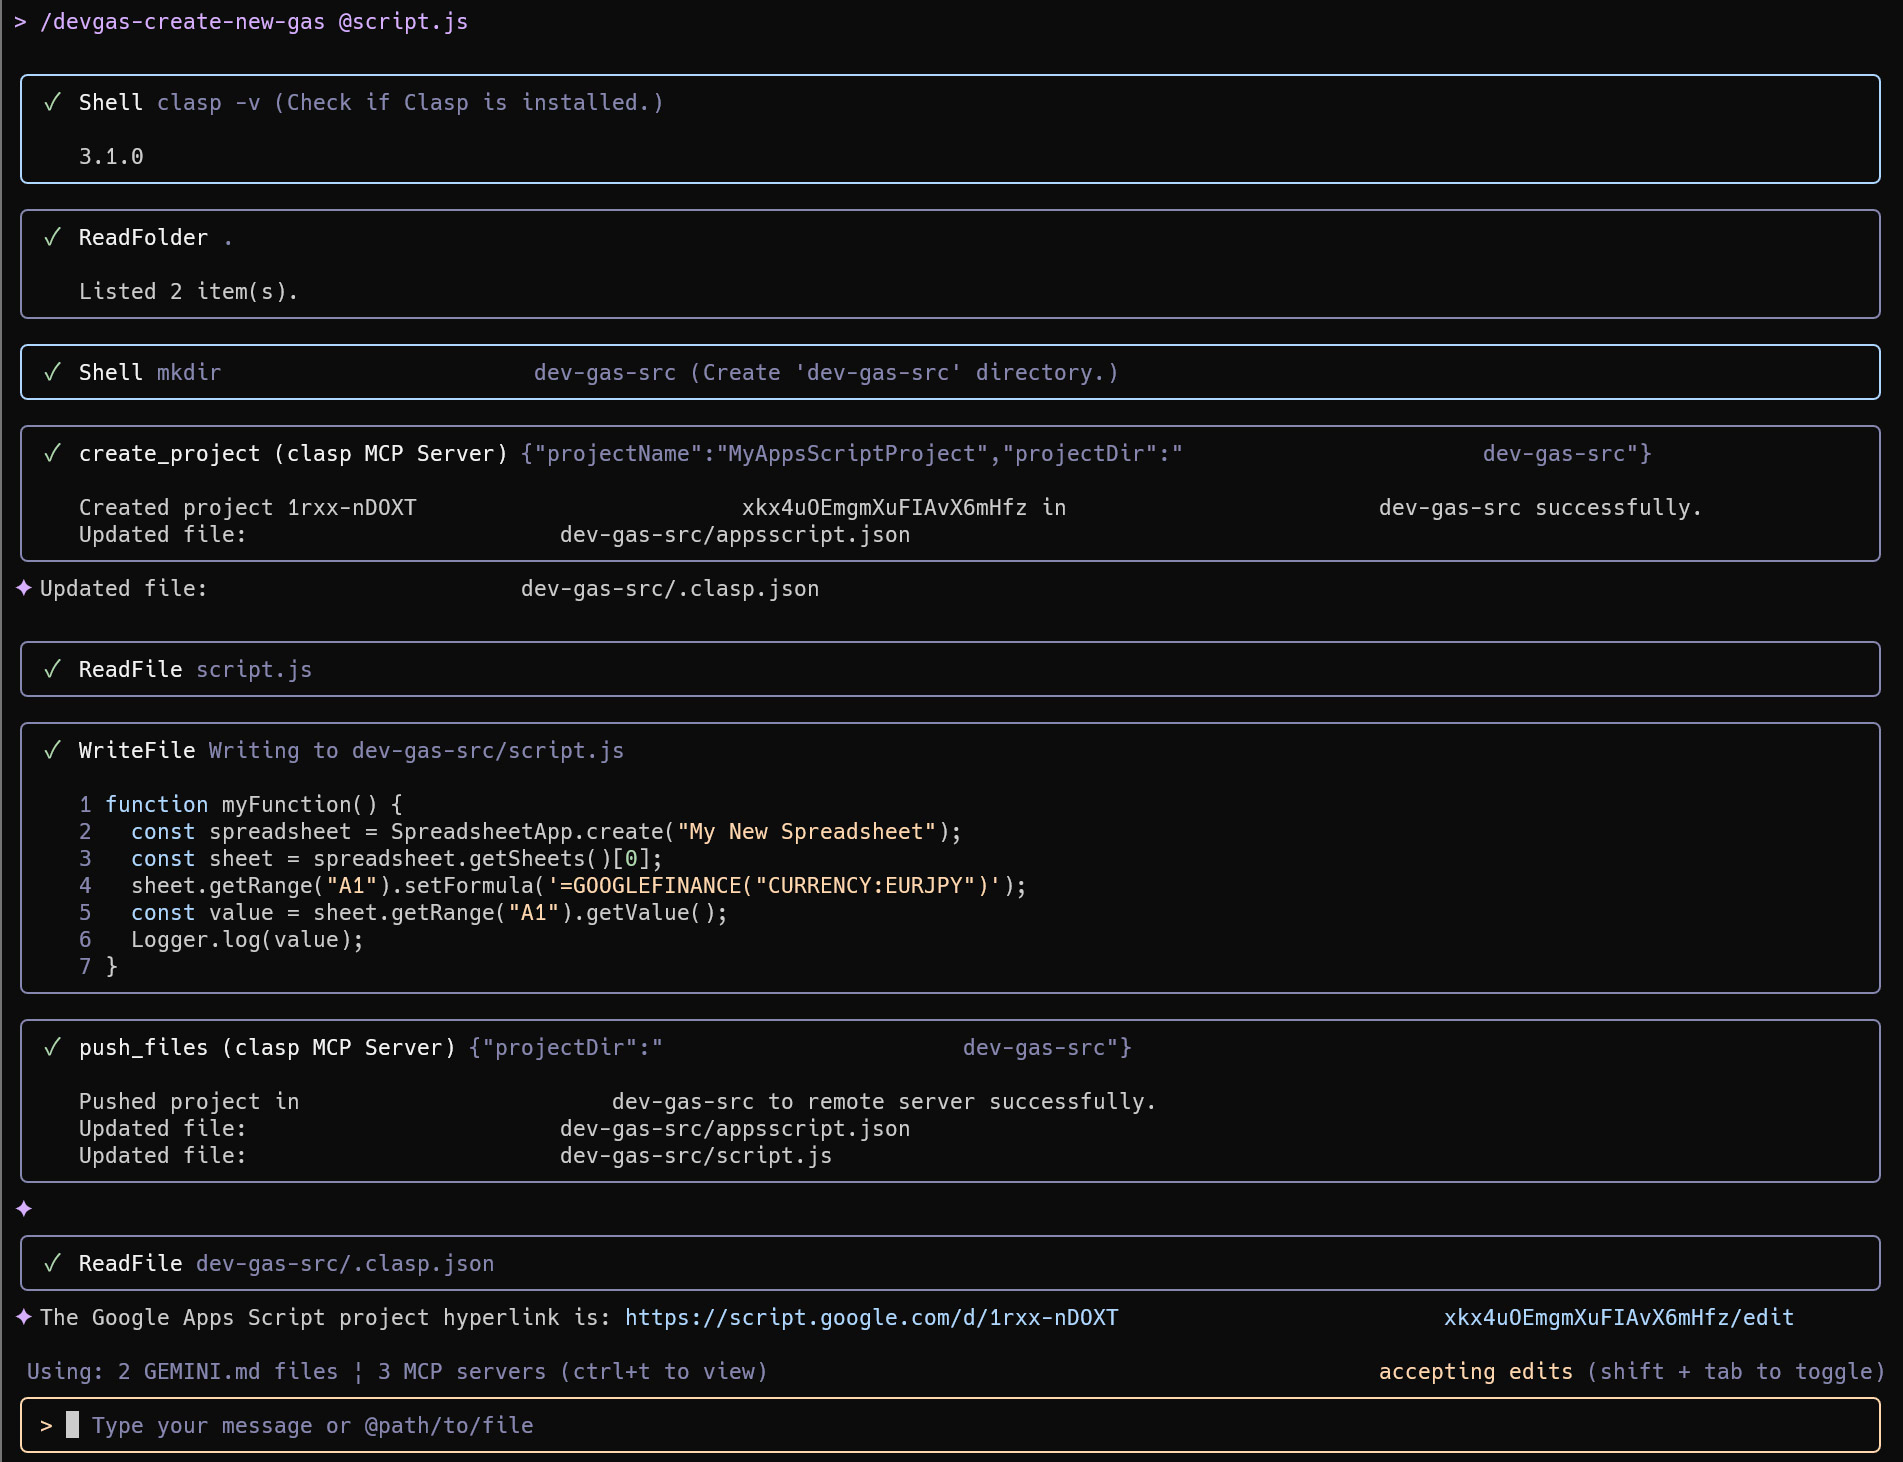
This will create a new Google Apps Script project in your Google Drive:
4. Get Values from Google Sheets
This example demonstrates how to retrieve values from a Google Spreadsheet. First, create a sample Google Spreadsheet in your Google Drive, put the text “ok” in cell “A1” of the first sheet, and copy the Spreadsheet ID.
Prompt:
Create and run a Google Apps Script as follows. Get a cell value from "A1" on the 1st sheet of the Google Spreadsheet. The Spreadsheet ID is "###".
or, you can also use a custom command /devgas-test-gas as follows.
/devgas-test-gas Create and run a Google Apps Script as follows. Get a cell value from "A1" on the 1st sheet of the Google Spreadsheet. The Spreadsheet ID is "###".
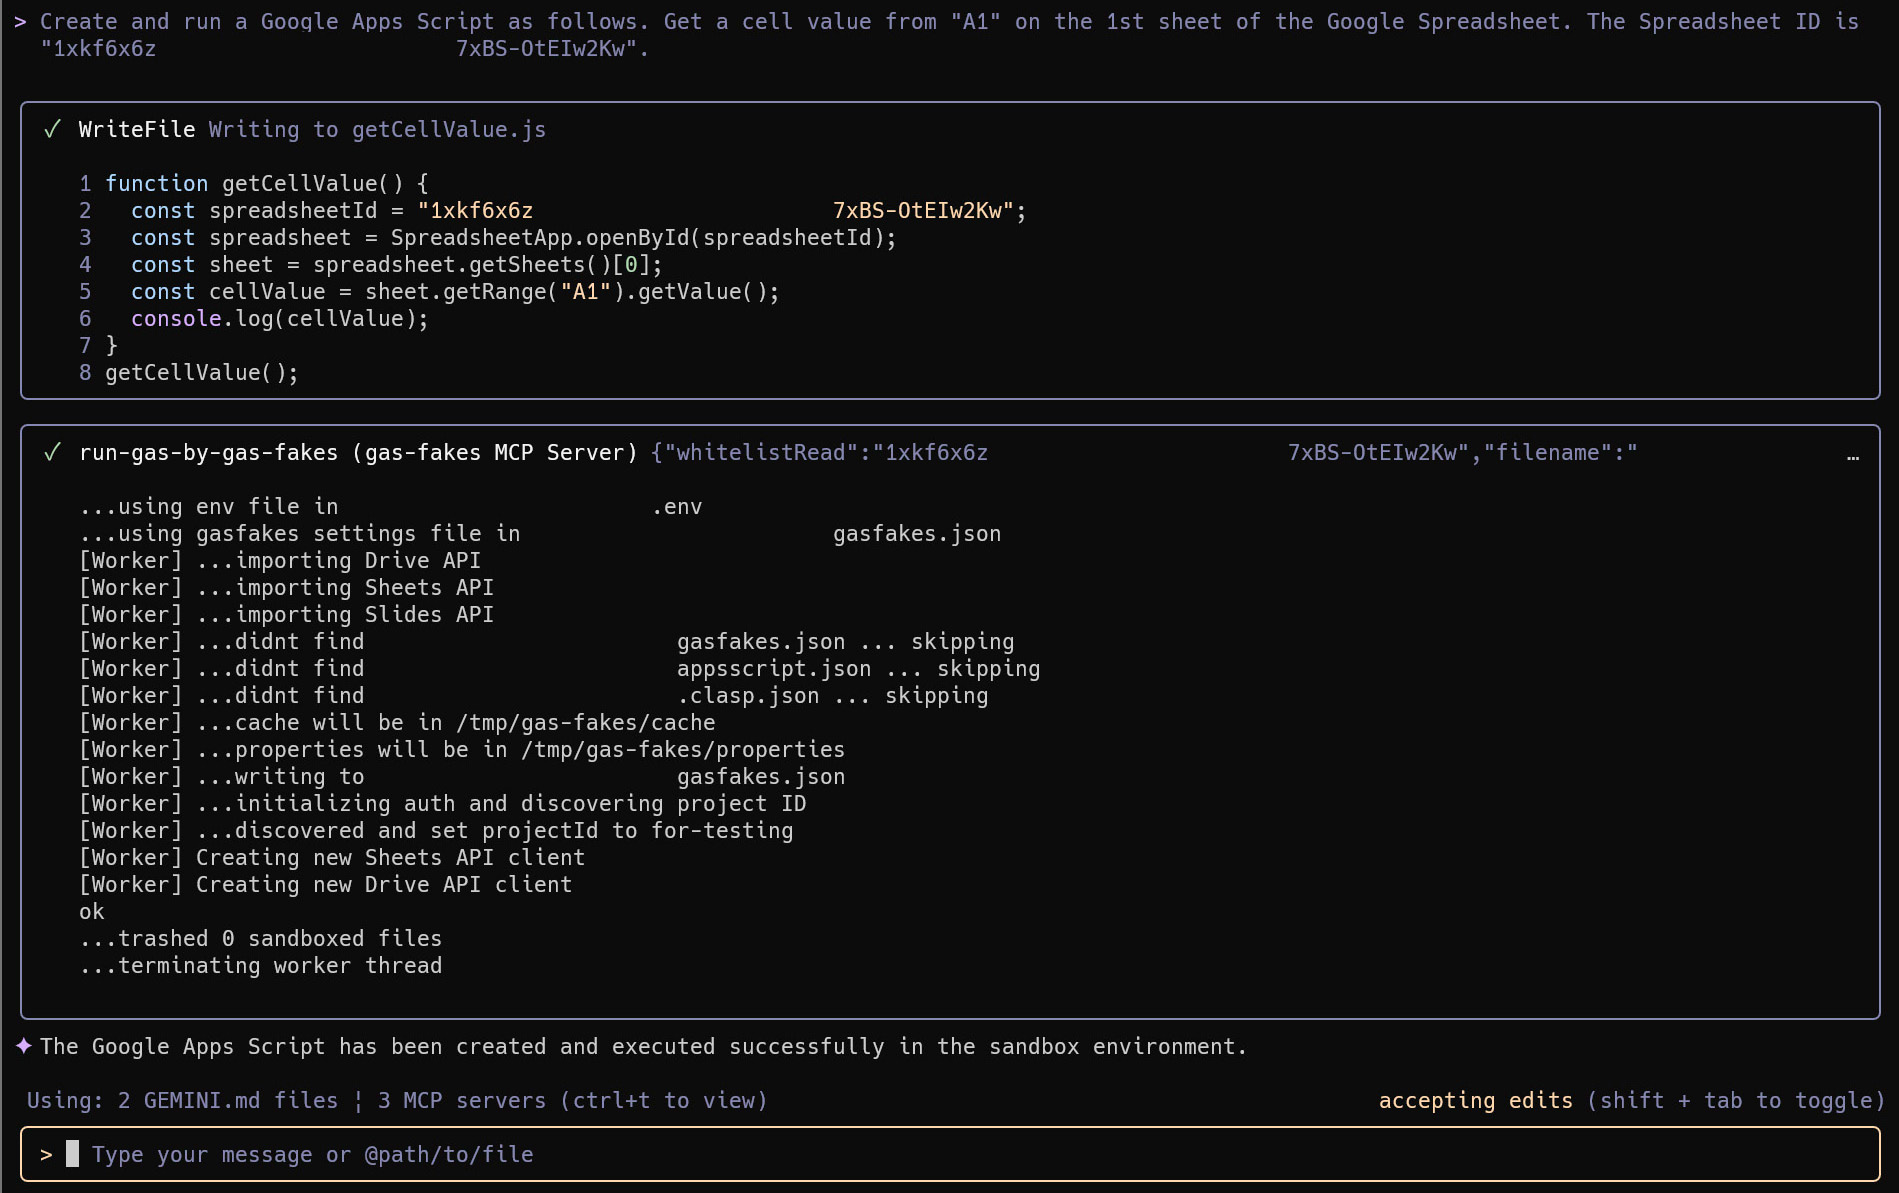
In this case, the generated Google Apps Script is run in a sandbox with read-only mode.
5. Put a Value into Google Sheets
This example shows how to write a value to a Google Spreadsheet using the same sheet as in the previous example.
Prompt:
Create and run a Google Apps Script as follows. Put the value "sample" in the cell "A1" on the 1st sheet of the Google Spreadsheet. The Spreadsheet ID is "###".
or, you can also use a custom command /devgas-test-gas as follows.
/devgas-test-gas Create and run a Google Apps Script as follows. Put the value "sample" in the cell "A1" on the 1st sheet of the Google Spreadsheet. The Spreadsheet ID is "###".
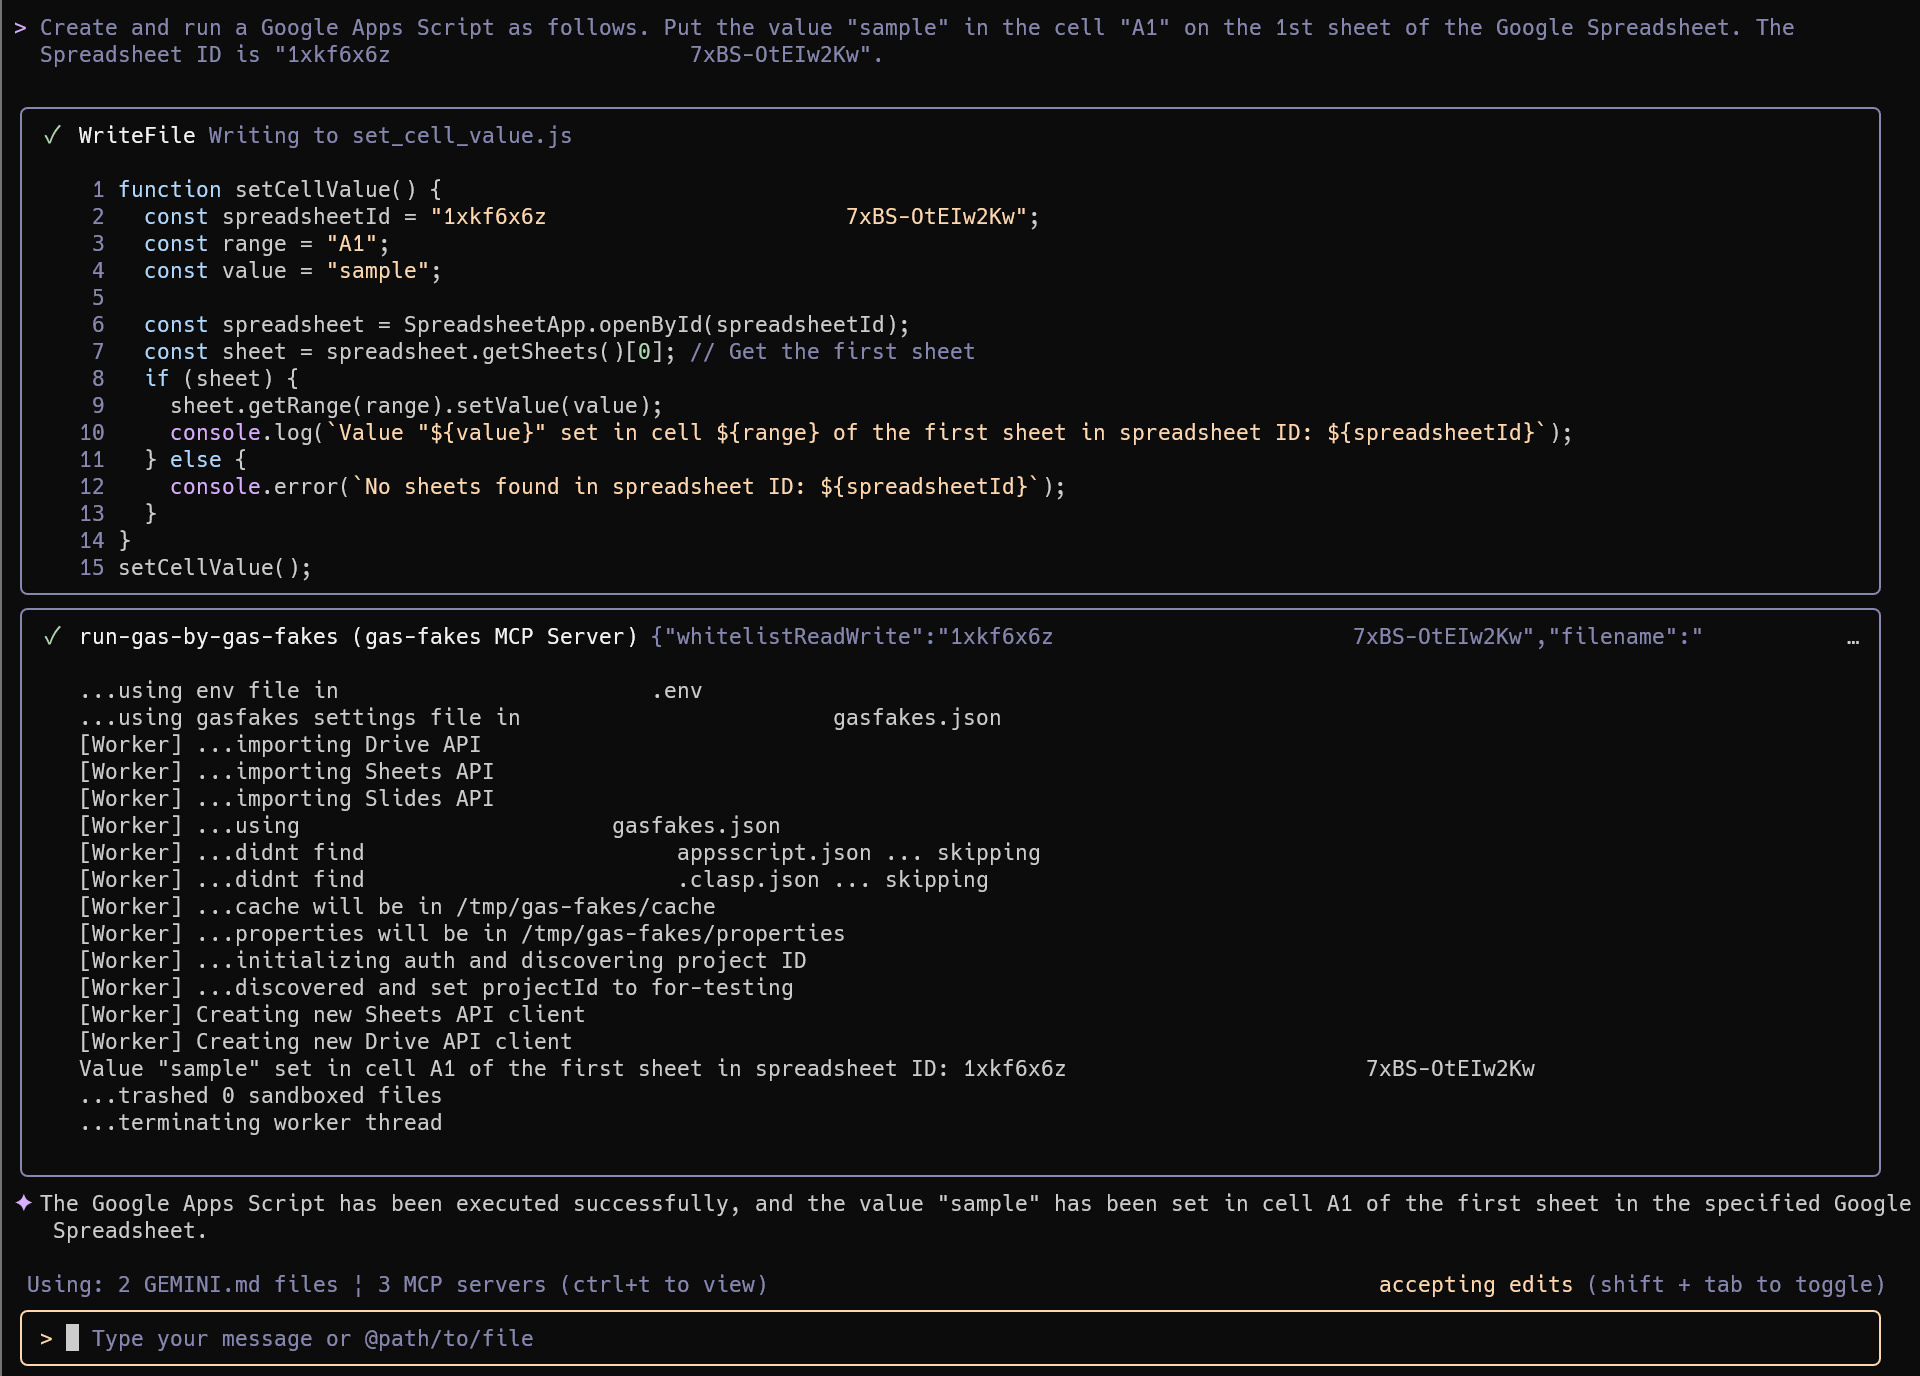
In this case, the generated Google Apps Script is run in a sandbox with read and write modes.
Summary
- Secure Sandbox: The
gas-fakesCLI provides a secure environment for testing Google Apps Script locally, preventing unauthorized access to your Google Drive. - Streamlined Workflow: The integration of
gas-fakes, Clasp, and the Gemini CLI extension creates a seamless development workflow, from local testing to cloud deployment. - AI-Powered Development: The Gemini CLI extension allows you to generate and test Google Apps Script using natural language prompts, accelerating the development process.
- Fine-Grained Control: The sandbox environment enables fine-grained control over script permissions, allowing you to specify which files a script can access.
- Easy Installation: The tools can be easily installed via npm and the Gemini CLI, making it simple to get started with secure and streamlined Google Apps Script development.