
Abstract
This guide explores a powerful, next-level workflow for Google Apps Script (GAS) development by integrating Gemini CLI Extensions with Visual Studio Code (VSCode). This combination streamlines the entire development process, from script creation and local testing in a secure sandbox to deploying and managing projects, all within a unified and efficient environment.
Introduction
Visual Studio Code (VSCode) is widely recognized as a premier source code editor. The release of the Gemini CLI has dramatically transformed script development by bringing advanced AI capabilities directly into the terminal. In particular, combining Gemini CLI with VSCode creates a powerful development ecosystem, highly effective for languages typically executed locally, such as Python, Node.js, Go and so on. Beyond coding, this setup streamlines content creation, including articles and papers, by leveraging AI for drafting and editing. Ref For cloud-based Google Apps Script (GAS) development, the standard approach involves using VSCode alongside Clasp to manage projects locally. Ref Integrating Gemini CLI into this established workflow promises significant synergistic effects. A recent update has further expanded these possibilities by enabling Clasp to function experimentally as a Model Context Protocol (MCP) server, allowing LLMs to directly interact with GAS project structures. Ref Furthermore, to address security concerns when executing AI-generated GAS code, I have introduced a “fake sandbox” environment for safer testing. Ref and Ref With the recent release of Gemini CLI Extensions, which allow for custom AI tools and specialized workflows, combining these assets creates a vastly superior developer environment. In this article, I will introduce next-level Google Apps Script development by leveraging the combined power of Gemini CLI Extensions and VSCode.
Repository of “dev-gas-extension” of Gemini CLI Extension
https://github.com/tanaikech/dev-gas-extension
Prerequisites and Installation
It is assumed that you have VSCode installed. If not, you can download it from the official website.
1. Install Gemini CLI
First, install the Gemini CLI using npm:
npm install -g @google/gemini-cli
Next, you will need to authorize the CLI. Follow the instructions provided in the official documentation.
2. Install Clasp
Install Clasp, the command-line tool for Google Apps Script:
npm install -g @google/clasp
Authorize Clasp by following the instructions on the official GitHub repository.
Clasp can now be used as an MCP server. While you can configure it directly in your settings.json, the Gemini CLI Extension in this guide will handle this for you.
3. Install gas-fakes
The gas-fakes package is required for local testing and should be installed in your working directory.
1. Create a working directory
makedir sample
cd sample
In this article, this working directory is used.
2. Install gas-fakes
npm install @mcpher/gas-fakes
3. Authorization
You can see how to authorize at https://github.com/brucemcpherson/gas-fakes/blob/main/GETTING_STARTED.md.
4. Install dev-gas-extension
Install the Gemini CLI extension for GAS development:
gemini extensions install https://github.com/tanaikech/dev-gas-extension
For managing Google Workspace as well, you can install the ToolsForMCPServer-extension.
5. Testing the Installation
1. Open VSCode
In the working directory “sample”, run VSCode.
Of course, this extension can be used both on the terminal with and without VSCode.
2. Launch Gemini CLI
Launch the Gemini CLI from the VSCode terminal:
gemini
3. Verify the installed MCP servers with the following command in the Gemini CLI:
/mcp
When dev-gas-extension could be correctly installed, the following response can be seen.
Configured MCP servers:

🟢 gas-fakes-mcp (from dev-gas-extension) - Ready (1 tool)
  Tools:
  - run_gas_with_gas-fakes

🟢 clasp (from dev-gas-extension) - Ready (5 tools)
  Tools:
  - clone_project
  - create_project
  - list_projects
  - pull_files
  - push_files

🟢 workspace-developer (from dev-gas-extension) - Ready (2 tools)
  Tools:
  - fetch_workspace_docs
  - search_workspace_docs
The workspace-developer tool is from the Use Large Language Models (LLMs) to develop on Google Workspace guide.
Sample Workflows
Here are two sample workflows demonstrating the power of this integrated development environment.
Using a New Script
This workflow illustrates how to create, test, and deploy a new Google Apps Script project from scratch.
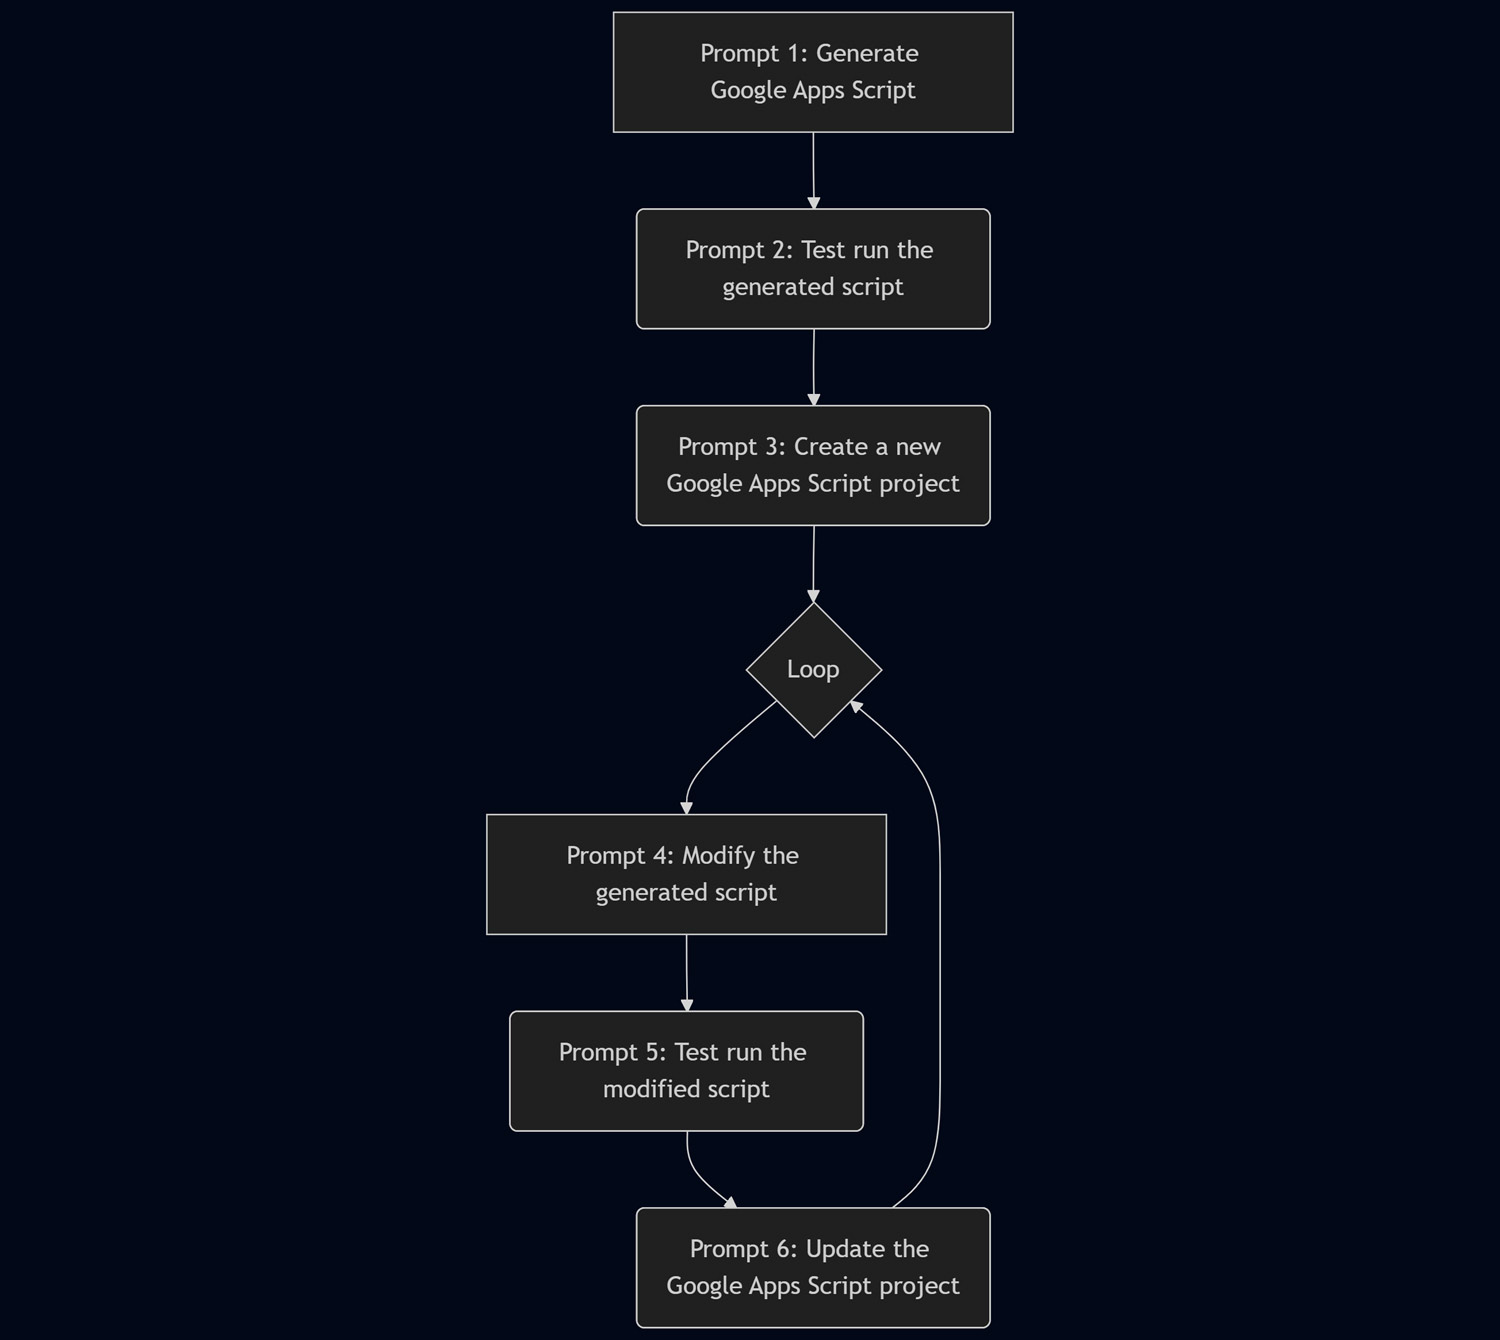
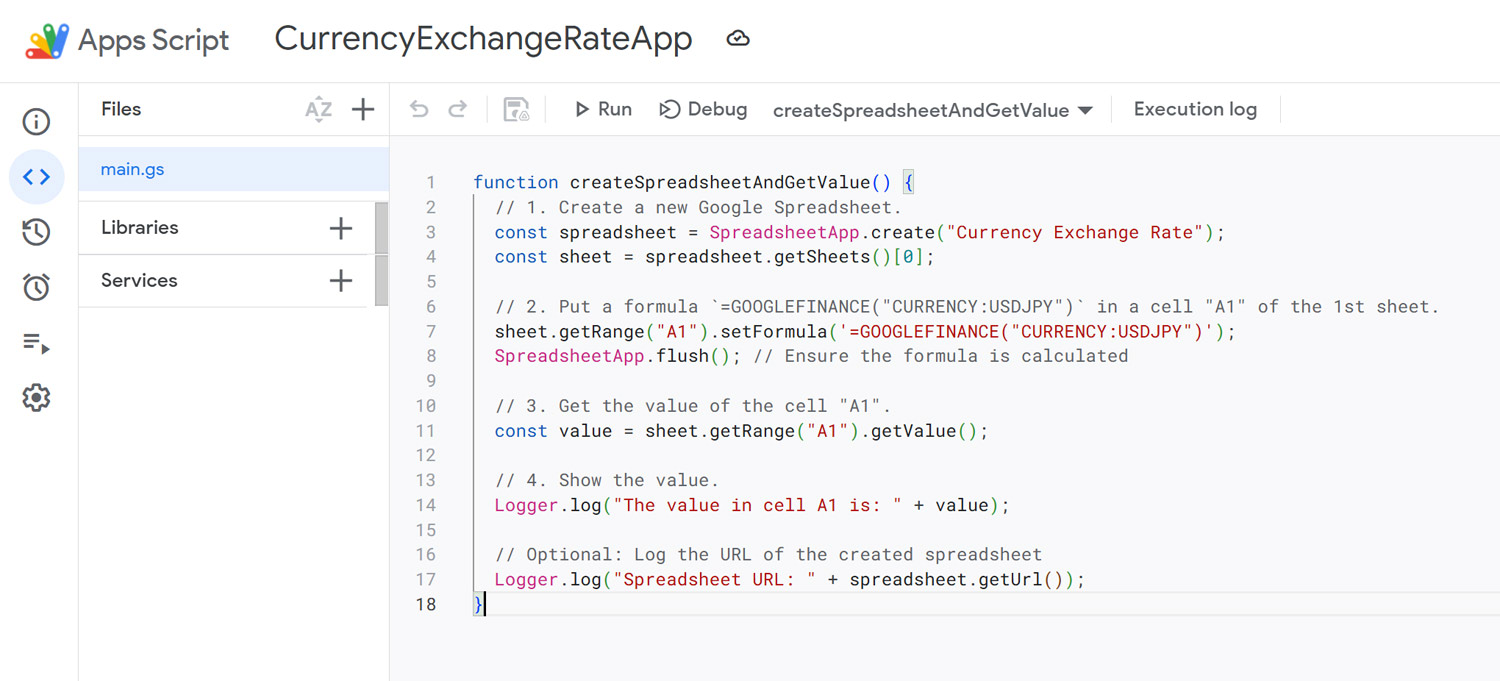
Prompt 1: Generate Google Apps Script
Follow the following mission in order.

## Mission
Create a Google Apps Script for achieving the following steps. Here, the script is not required to be run and save it as a file. Just show the created script.

1. Create a new Google Spreadsheet.
2. Put a formula `=GOOGLEFINANCE("CURRENCY:USDJPY")` in a cell "A1" of the 1st sheet in a Google Spreadsheet.
3. Get the value of the cell "A1".
4. Show the value.
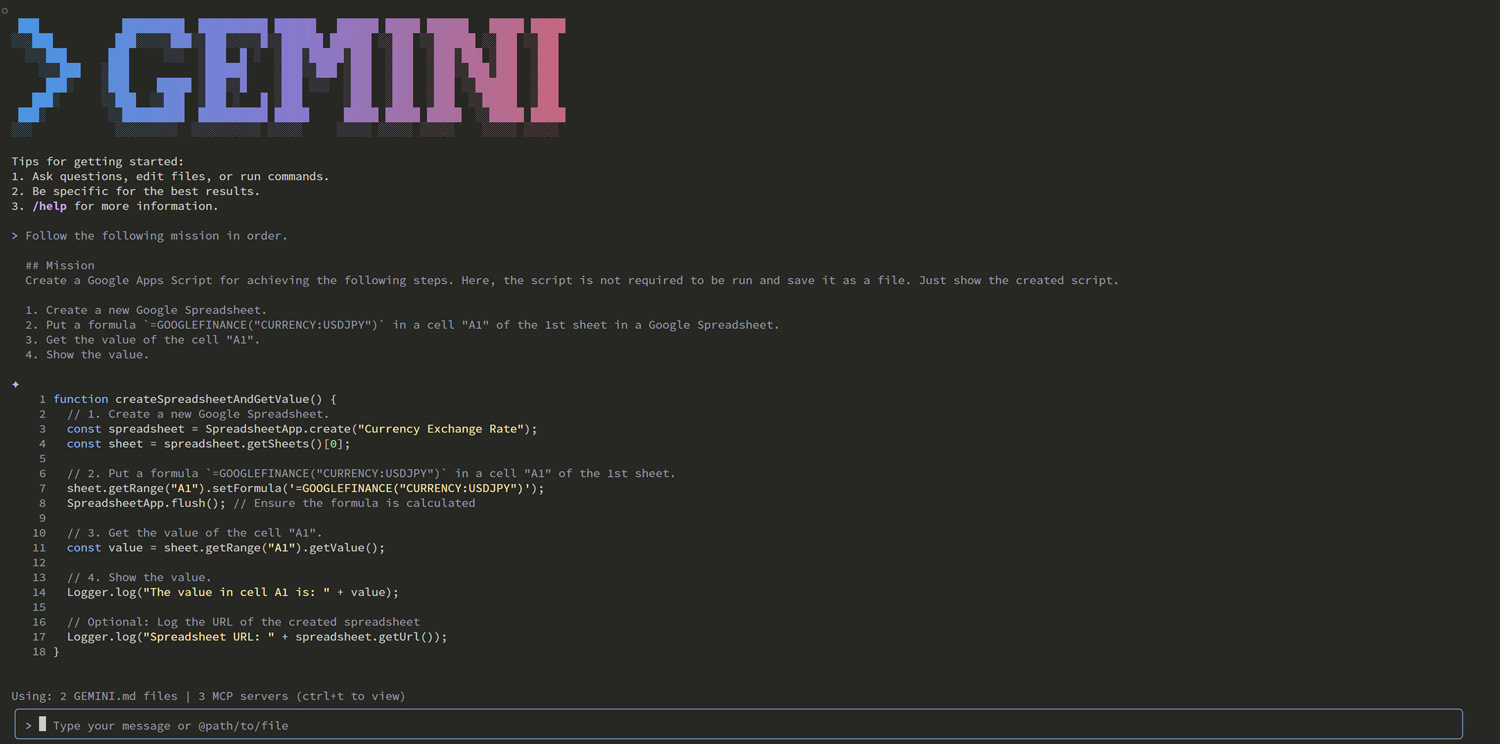
Generated Script:
function createSpreadsheetAndGetValue() {
  // 1. Create a new Google Spreadsheet.
  const spreadsheet = SpreadsheetApp.create("Currency Exchange Rate");
  const sheet = spreadsheet.getSheets()[0];

  // 2. Put a formula `=GOOGLEFINANCE("CURRENCY:USDJPY")` in a cell "A1" of the 1st sheet.
  sheet.getRange("A1").setFormula('=GOOGLEFINANCE("CURRENCY:USDJPY")');
  SpreadsheetApp.flush(); // Ensure the formula is calculated

  // 3. Get the value of the cell "A1".
  const value = sheet.getRange("A1").getValue();

  // 4. Show the value.
  Logger.log("The value in cell A1 is: " + value);

  // Optional: Log the URL of the created spreadsheet
  Logger.log("Spreadsheet URL: " + spreadsheet.getUrl());
}
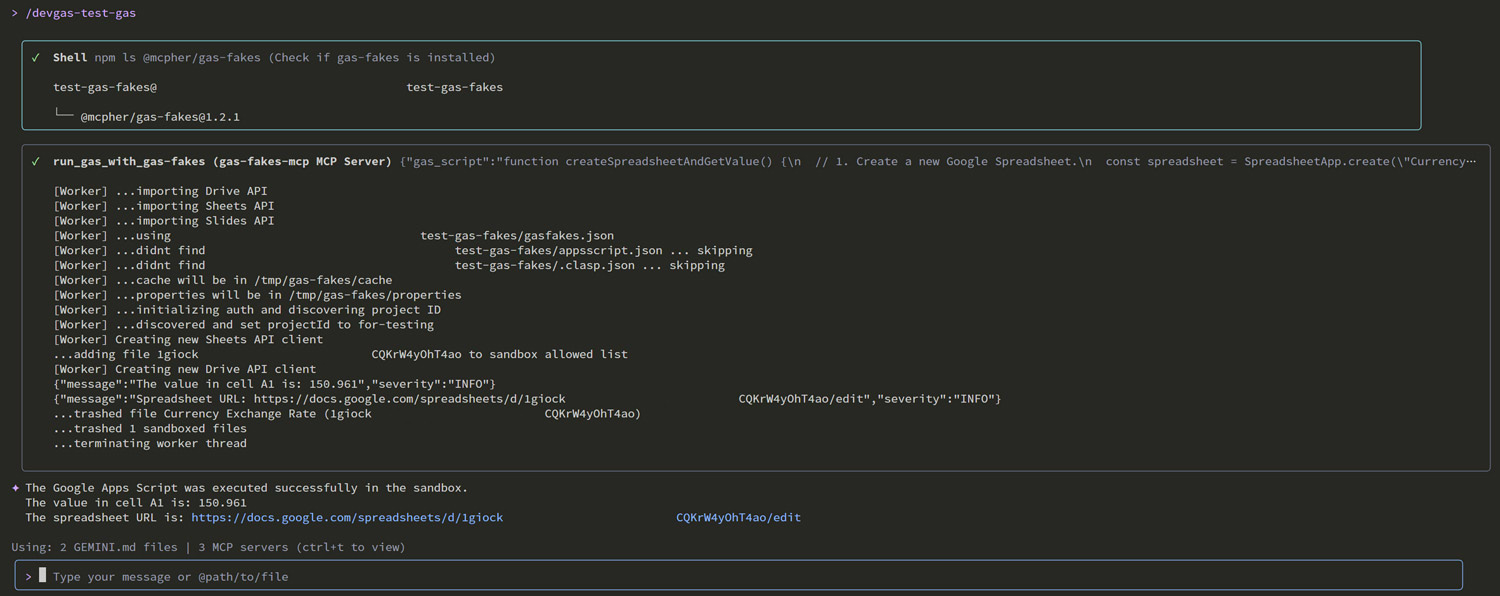
Prompt 2: Test the Script
Use a custom command to test the script in the gas-fakes sandbox:
/devgas-test-gas
Prompt 3: Create a New Project
Push the script to a new Google Apps Script project on Google Drive:
/devgas-create-new-gas
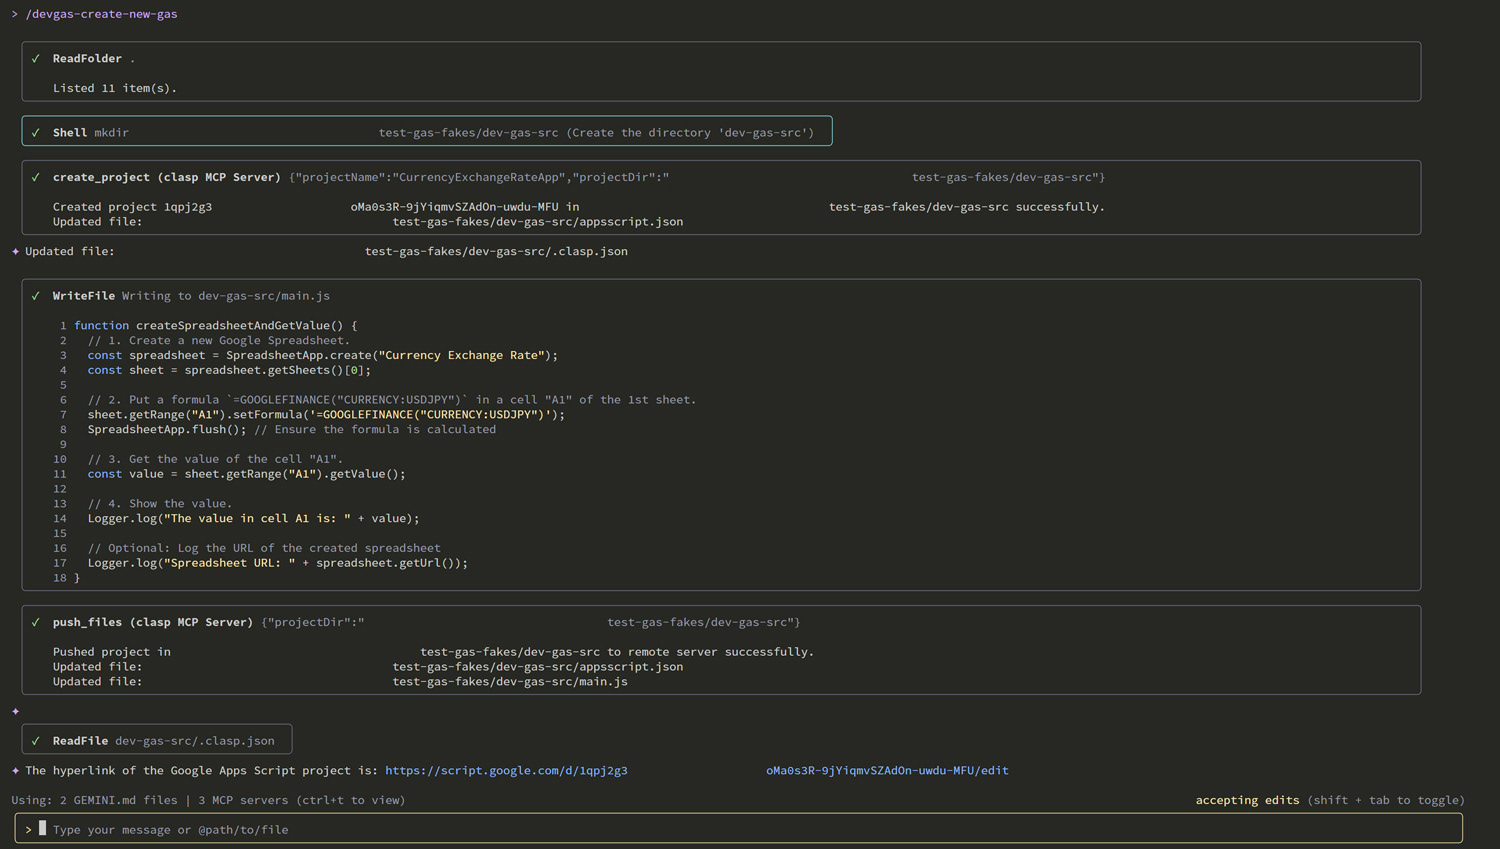
This will create a new GAS project with your script.
Prompt 4: Modify the Script
Modify the script locally:
Modify the script by updating the formula to `=GOOGLEFINANCE("CURRENCY:EURJPY")` at the local file. Don't still update Google Apps Script project on Google Drive.

Prompt 5: Test the Modified Script
Test the updated script in the sandbox:
/devgas-test-gas

Prompt 6: Update the Project
Update the Google Apps Script project with the modified script:
/devgas-update-gas

The project on Google Drive will be updated.

Using an Existing Script
This workflow shows how to clone, modify, and update an existing Google Apps Script project.
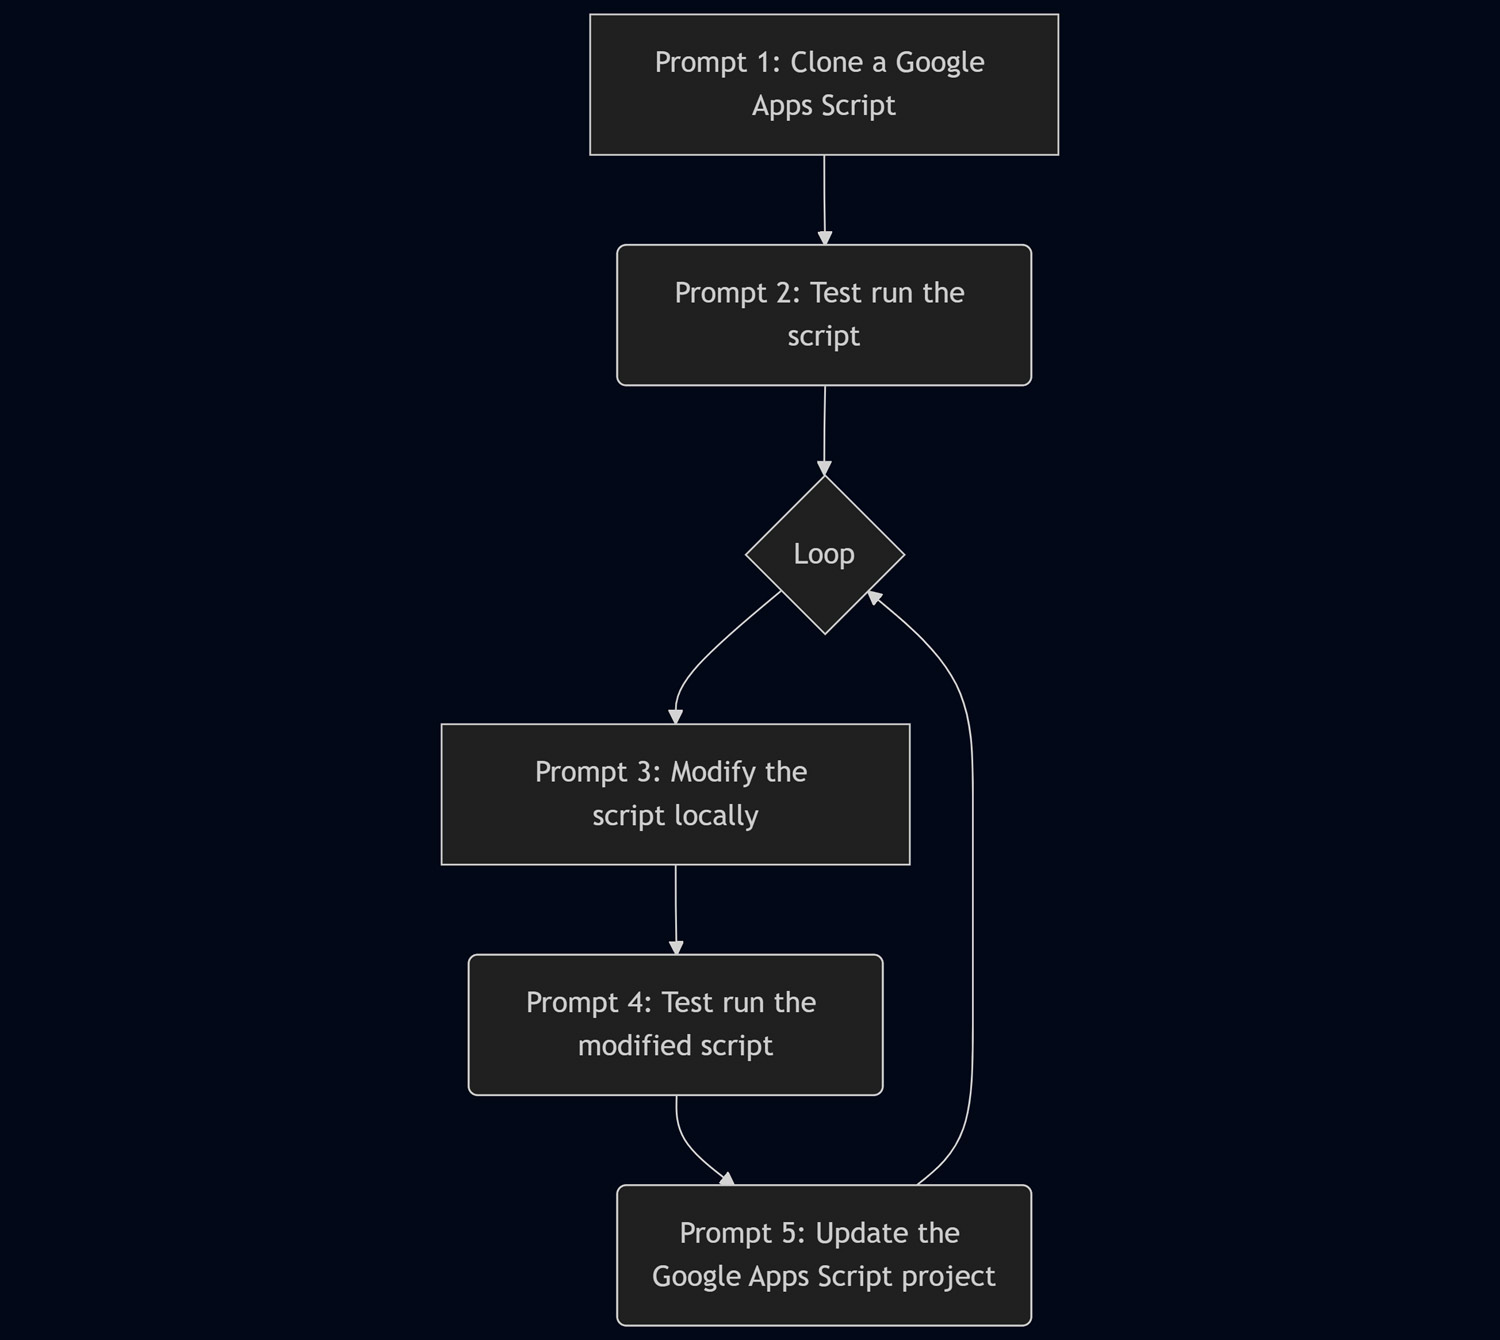
Prompt 1: Clone a Google Apps Script Project
The prepared Google Apps Script project on Google Drive is as follows.
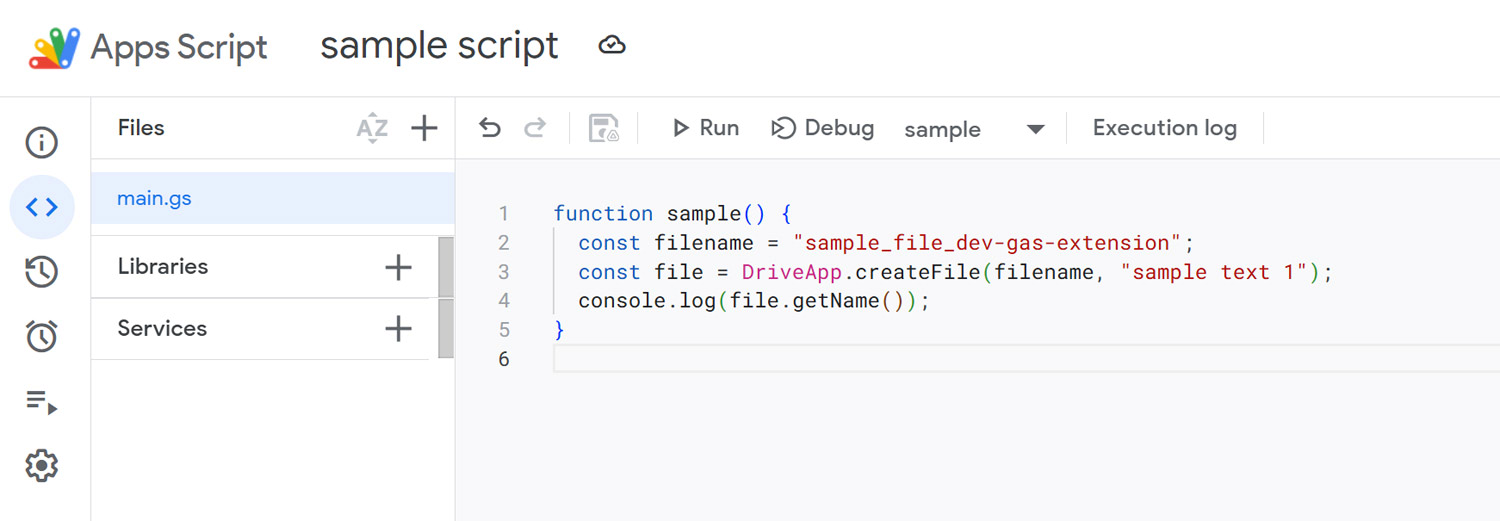
Clone an existing project using its URL (and script ID):
/devgas-load-gas The URL of Google Apps Script project is "https://script.google.com/home/projects/1qpj2g3pDYfzGUwa-NKERde1Ie3oMa0s3R-9jYiqmvSZAdOn-uwdu-MFU/edit".
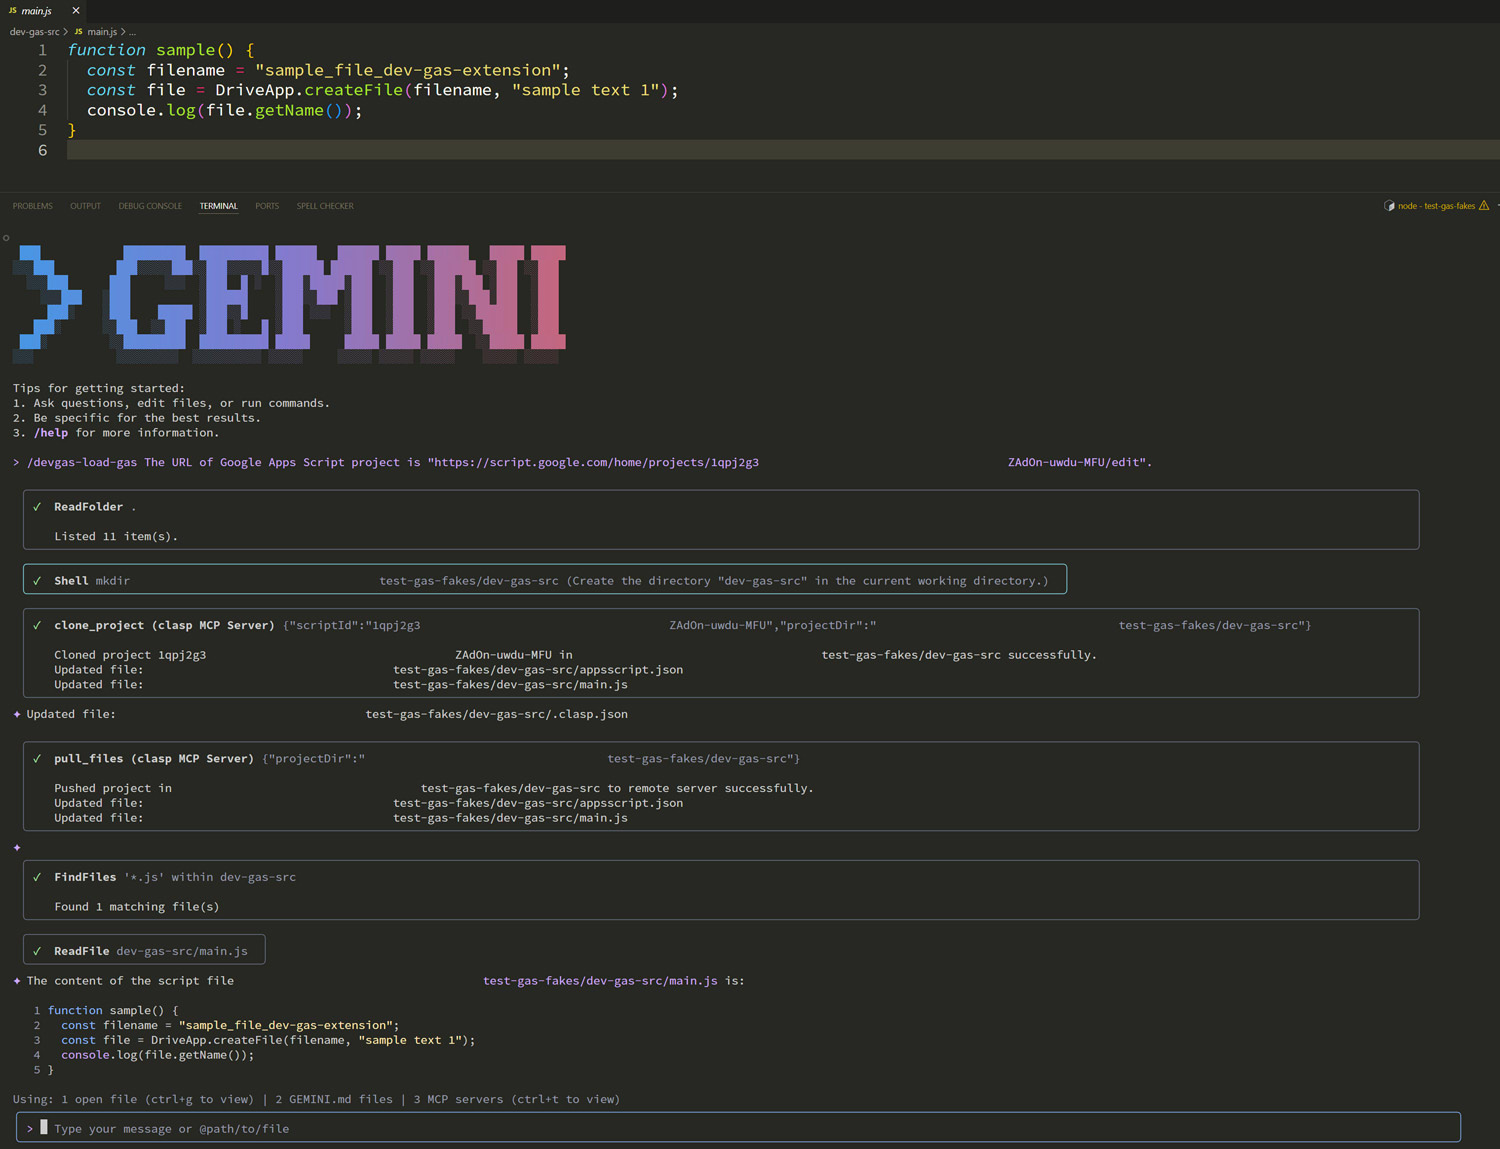
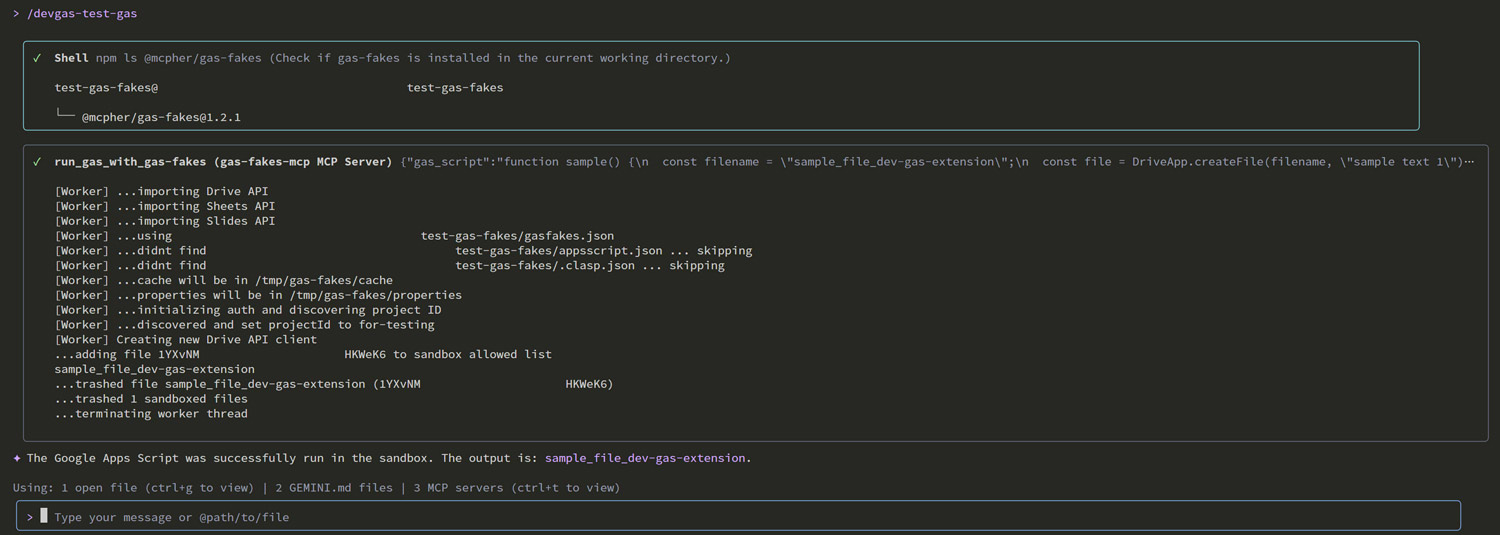
Prompt 2: Test the Cloned Script
Run the cloned script in the gas-fakes sandbox:
/devgas-test-gas
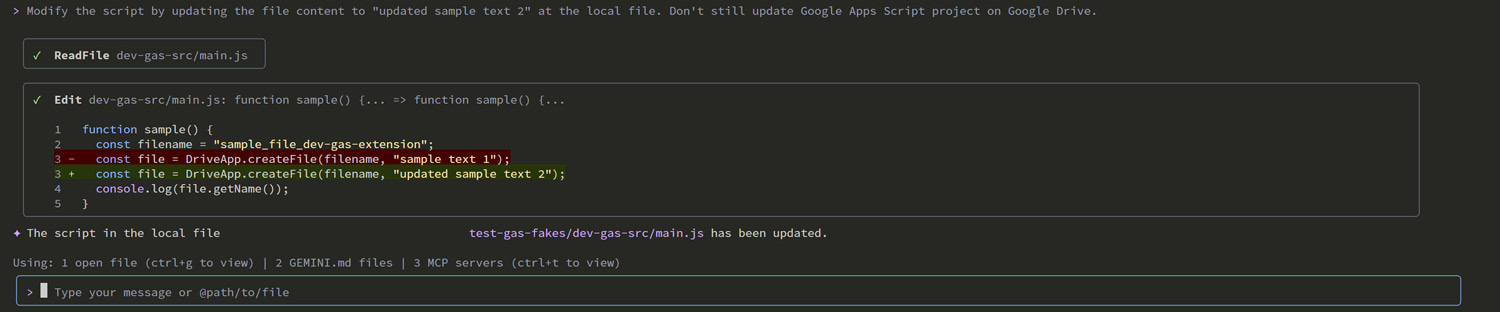
Prompt 3: Modify the Script
Modify the script locally:
Modify the script by updating the file content to "updated sample text 2" at the local file. Don't still update Google Apps Script project on Google Drive.
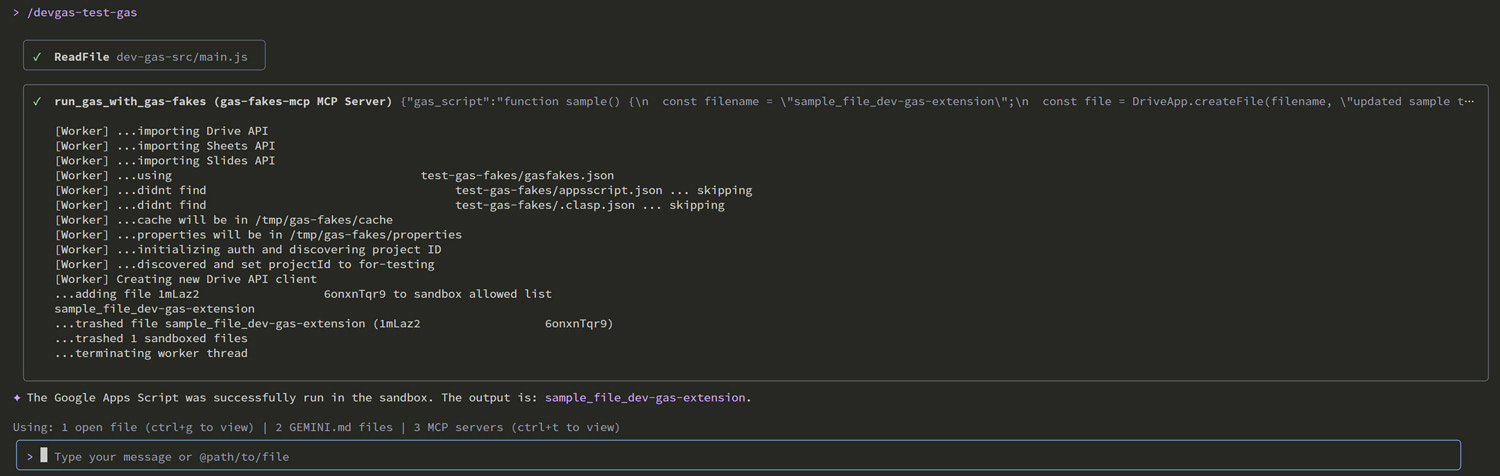
Prompt 4: Test the Modified Script
Test the changes in the sandbox:
/devgas-test-gas
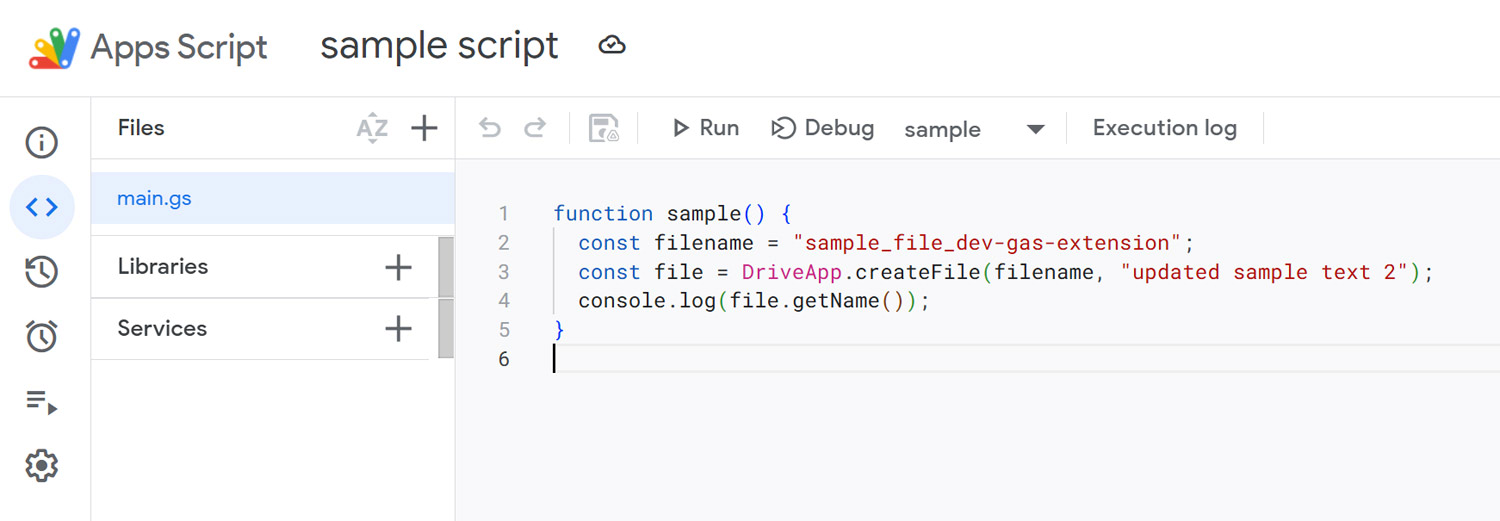
Prompt 5: Update the Project
Update the Google Apps Script project with your changes:
/devgas-update-gas

The project on Google Drive is now updated.
Summary
This guide demonstrates a powerful and efficient workflow for Google Apps Script development. By combining Gemini CLI Extensions, VSCode, Clasp, and gas-fakes, you can significantly enhance your development process. Here are the key takeaways:
- Unified Environment: Manage your entire GAS development lifecycle, from coding to deployment, within VSCode and the command line.
- AI-Powered Development: Leverage the Gemini CLI to generate, modify, and manage your GAS projects using natural language prompts.
- Secure Local Testing: The
gas-fakessandbox provides a safe environment for testing AI-generated or modified scripts before deploying them. - Streamlined Workflows: Custom Gemini CLI commands automate common tasks like creating, cloning, testing, and updating projects.
- Comprehensive Prompts: While this guide demonstrates workflows using individual custom commands, it’s also possible to execute multiple steps at once with a single, detailed prompt, since the necessary tools are available on the MCP server.
- Extensibility: The integration of these tools allows for further customization, such as adding GitHub repository management to the workflow.