
Abstract
This guide offers a comprehensive walkthrough of the essential steps and key considerations for developing Gemini CLI extensions. It covers setting up a sample project, configuring the gemini-extension.json file, local testing, and automating dependency management with GitHub Actions, providing developers with the foundational knowledge to create their own custom tools.
Introduction
After the release of Gemini CLI Extensions, a growing community of users is developing a wide range of extensions to enhance their command-line workflows. Ref and Ref This trend is expected to continue and strengthen. As the ecosystem expands, knowing how to develop these extensions becomes increasingly valuable for users who want to create their own custom tools. Many useful articles for understanding Gemini CLI Extensions have already been published. In particular, the articles by Romin Irani are very helpful. Ref In this article, I would like to introduce the core parts I paid attention to when I developed my own extensions (Ref). I hope this article proves useful. As a sample tool in this article, the current time is returned using Node.js.
Sample repository
https://github.com/tanaikech/sample-gemini-cli-extension
Prerequisites
This guide assumes that you have both Node.js and the Gemini CLI already installed on your system.
Core Concepts of Gemini CLI Extension Development
Sample Extension Package
The file structure for a sample Gemini CLI extension is as follows:
/top-dir/
├── .gemini/
│   ├── some files
├── .gitignore
├── gemini-extension.json
├── GEMINI.md
├── node_modules/
│   ├── some files
├── package-lock.json
├── package.json
└── sample-mcp-server.js
Of course, you can add a commands directory.
.gitignore
.gemini/
node_modules/
GEMINI.md
You are an AI agent on Gemini CLI. You are knowledgeable about Gemini CLI, Gemini CLI Extensions, and Model Context Protocol (MCP).
package.json
{
  "name": "sample",
  "version": "1.0.0",
  "description": "",
  "main": "sample-mcp-server.js",
  "scripts": {
    "test": "echo \"Error: no test specified\" && exit 1"
  },
  "keywords": [],
  "author": "",
  "license": "ISC",
  "type": "module",
  "dependencies": {
    "@modelcontextprotocol/sdk": "^1.20.0",
    "zod": "^3.25.76"
  }
}
sample-mcp-server.js: Returns only the current date and time.
import { McpServer } from "@modelcontextprotocol/sdk/server/mcp.js";
import { StdioServerTransport } from "@modelcontextprotocol/sdk/server/stdio.js";

const server = new McpServer({
  name: "sample-mcp-server1",
  version: "1.0.0",
});

const { name, schema, func } = {
  name: "sample_tool",
  schema: {
    description: "Use this to show the current time.",
    inputSchema: {},
  },
  func: (object = {}) => ({
    content: [{ type: "text", text: new Date().toISOString() }],
  }),
};

server.registerTool(name, schema, func);

const transport = new StdioServerTransport();
await server.connect(transport);
Understanding gemini-extension.json
The gemini-extension.json file is crucial for defining your extension’s behavior. The extensionPath and workspacePath variables are particularly important for determining the execution context of your scripts. Ref Let’s explore three different configurations.
Configuration 1: Using extensionPath
{
  "name": "sample-mcp-server1",
  "version": "1.0.0",
  "mcpServers": {
    "sample-mcp-server1": {
      "command": "node",
      "args": ["${extensionPath}${/}sample-mcp-server.js"],
      "cwd": "${extensionPath}"
    }
  }
}
When this extension is installed, the script is executed from within the extension’s installation directory (e.g., /home/user1/.gemini/extensions/sample-mcp-server1).
Configuration 2: Using workspacePath
{
  "name": "sample-mcp-server2",
  "version": "1.0.0",
  "mcpServers": {
    "sample-mcp-server2": {
      "command": "node",
      "args": ["${workspacePath}${/}sample-mcp-server.js"],
      "cwd": "${workspacePath}"
    }
  }
}
In this case, the script is executed from the user’s workspace directory (e.g., /home/user1/).
Configuration 3: No Specified Path
{
  "name": "sample-mcp-server3",
  "version": "1.0.0",
  "mcpServers": {
    "sample-mcp-server3": {
      "command": "node",
      "args": ["sample-mcp-server.js"]
    }
  }
}
Here, the script is executed from the current working directory where the gemini command is run.
Local Development and Testing
To test your extension locally, you can install it from your development directory. For this example, we’ll assume the following directory structure:
/top-dir/
└── sample-gemini-cli-extension/
    ├── .gemini/
    ├── .gitignore
    ├── gemini-extension.json
    ├── GEMINI.md
    ├── node_modules/
    ├── package-lock.json
    ├── package.json
    └── sample-mcp-server.js
The files are the same as in the “Sample Extension Package” section, and we’ll use the first gemini-extension.json configuration.
Navigate to the sample-gemini-cli-extension directory and run:
gemini extensions install .
You’ll see the following prompt:
Installing extension "sample-mcp-server1".
**Extensions may introduce unexpected behavior. Ensure you have investigated the extension source and trust the author.**
This extension will run the following MCP servers:
  * sample-mcp-server1 (local): node /home/user1/sample-gemini-cli-extension/sample-mcp-server.js
Do you want to continue? [Y/n]: y
Extension "sample-mcp-server1" installed successfully and enabled.
To verify the installation, list the installed extensions:
gemini extensions list
The output should look like this:
✓ sample-mcp-server1 (1.0.0)
 Path: /home/user1/.gemini/extensions/sample-mcp-server1
 Source: /home/user1/sample-gemini-cli-extension (Type: local)
 Enabled (User): true
 Enabled (Workspace): true
 Context files:
  /home/user1/.gemini/extensions/sample-mcp-server1/GEMINI.md
 MCP servers:
  sample-mcp-server1
You can now test your sample_tool in the Gemini CLI. To remove the extension, run:
gemini extensions uninstall sample-mcp-server1
Automating Dependency Installation with GitHub Actions
When you push your extension to a GitHub repository, the node_modules directory is typically excluded by .gitignore. This can cause an ERR_MODULE_NOT_FOUND error when users install the extension. The official documentation recommends using a GitHub Actions workflow to automate the installation of required packages. Ref
To set this up, update your project structure as follows:
/top-dir/
├── .github/
│   └── workflows/
│       └── sample.yml
├── .gemini/
│   └── some files
├── .gitignore
├── gemini-extension.json
├── GEMINI.md
├── node_modules/
│   └── some files
├── package-lock.json
├── package.json
└── sample-mcp-server.js
Here’s a sample GitHub Actions workflow (sample.yml). You can adapt this to your needs or even generate it with Gemini.
name: Sample Release Extension

on:
  push:
    tags:
      - "v*"

jobs:
  release:
    runs-on: ubuntu-latest
    permissions:
      contents: write
    steps:
      - uses: actions/checkout@v3

      - name: Set up Node.js
        uses: actions/setup-node@v3
        with:
          node-version: "20"

      - name: Install dependencies
        run: npm ci

      - name: Create release assets
        run: |
          mkdir -p temp
          tar --exclude='./temp' -czvf temp/sample.tar.gz .

      - name: Create GitHub Release
        uses: softprops/action-gh-release@v1
        with:
          files: |
            temp/sample.tar.gz
After pushing these files to your repository (e.g., https://github.com/tanaikech/sample-gemini-cli-extension), create a new release by tagging a version:
git tag -a v1.0.0 -m "version 1.0.0"
git push origin v1.0.0
This will trigger the GitHub Actions workflow, and you’ll find a sample.tar.gz file on your repository’s “Releases” page. Now, users can install the extension with:
gemini extensions install https://github.com/tanaikech/sample-gemini-cli-extension
The Gemini CLI installed this sample extension is as follows.
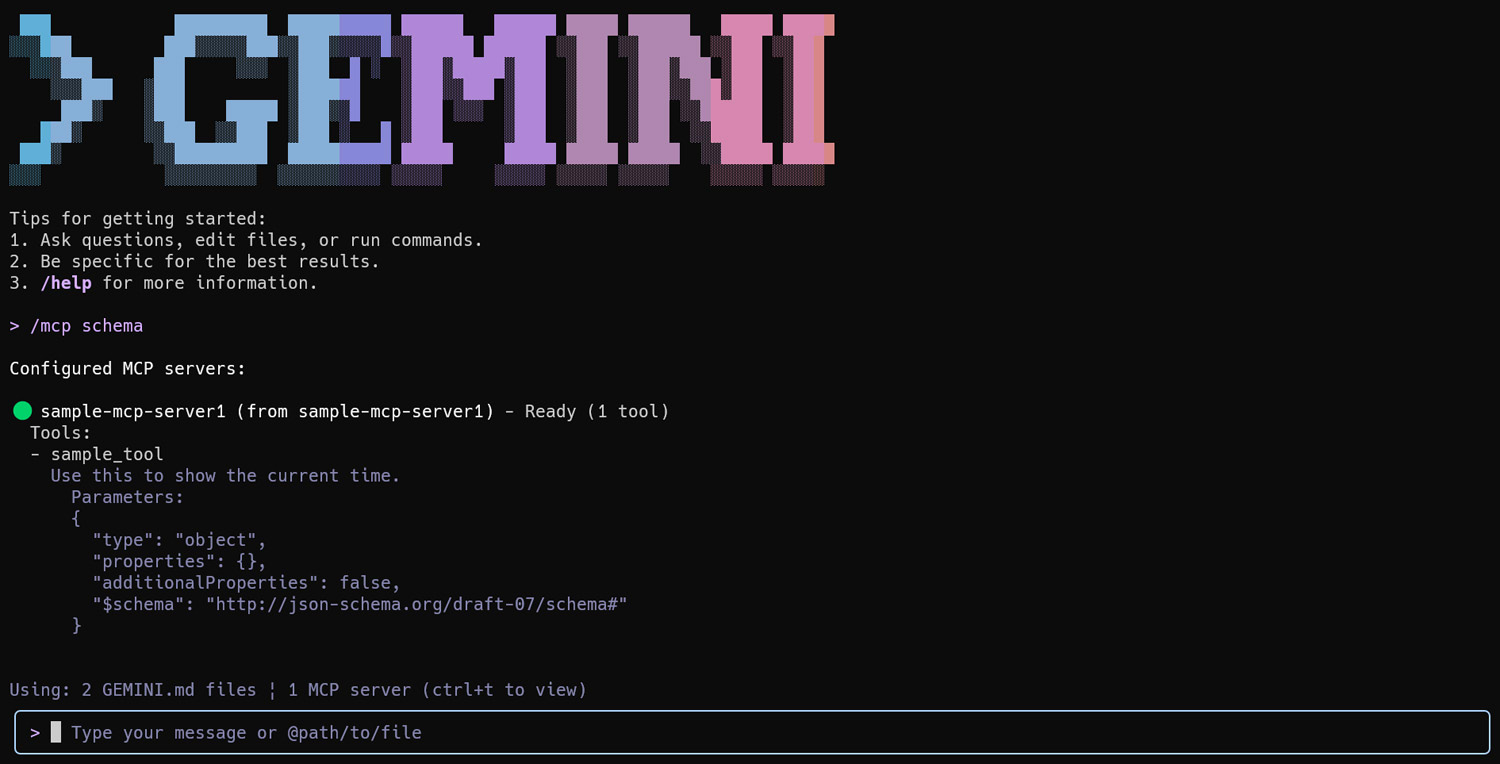
This repository https://github.com/tanaikech/sample-gemini-cli-extension is published. You can see it.
Important Considerations for Private Repositories
When installing from a public GitHub repository, the Gemini CLI correctly downloads the release asset created by the GitHub Action. However, with private repositories, the command appears to download the source code archive directly, which may not include the necessary dependencies from package.json. When testing your extension using a private repository, please be cautious.
Summary
- File Structure: A Gemini CLI extension consists of several key files, including
gemini-extension.json,GEMINI.md, and your MCP server script. gemini-extension.json: This file is the heart of your extension, defining its name, version, and how the MCP server is executed.- Path Variables: The
${extensionPath}and${workspacePath}variables ingemini-extension.jsonare critical for controlling the execution context of your scripts. - Local Testing: You can install and test your extension directly from a local directory, which is essential for an efficient development workflow.
- Dependency Management: For public repositories, use GitHub Actions to automate the installation of dependencies and ensure a smooth user experience.