
Abstract
This article presents a method for optimizing Google Workspace automation by dynamically converting frequently used, AI-generated Google Apps Scripts into permanent, reusable tools. By integrating the Gemini CLI with a gas-fakes sandbox via an MCP server, we demonstrate how to securely add and manage these custom tools, reducing operational costs and improving efficiency.
Introduction
When using generative AI to create scripts, ensuring the secure execution of the generated code is critical. This is especially true for applications that manage cloud resources like Google Workspace, where it is paramount to prevent unintended data access or modification. The standard permission model for Google Apps Script often requires broad access, creating a significant security risk when running code from untrusted sources.
To address this, a “fake-sandbox” environment was developed using the gas-fakes library, which allows for the safe, local execution of AI-generated Google Apps Script in Node.js. Ref This library emulates the Apps Script environment by translating GAS calls into direct, underlying Google API requests, enabling the use of more granular, file-specific permissions to enhance security.
To make this sandbox accessible to AI agents, an MCP (Model Context Protocol) server was created. Ref This setup allows the Gemini CLI to generate and execute Google Apps Script within the gas-fakes sandbox for safe and conversational Google Workspace automation.
Initially, generated scripts were treated as disposable. However, repeatedly generating the same script for frequent tasks is inefficient and increases costs. This article explores a solution: automatically adding frequently used, AI-generated scripts to the MCP server as permanent tools. This makes them instantly and perpetually available for secure execution, optimizing both cost and efficiency.
Repository
The scripts for the MCP server used in this article are available at this GitHub repository: https://github.com/tanaikech/gas-fakes-mcp.
Prerequisites
Before you begin, ensure you have the following installed on your system:
- Node.js and npm: Required to run the
gas-fakeslibrary and the MCP server. - Gemini CLI: The AI agent used to generate and execute the Google Apps Script.
Setup and Configuration
Follow these steps to set up the environment.
Step 1: Install gas-fakes
In your working directory (e.g., a new folder named sample), install gas-fakes. You can find detailed instructions at the official gas-fakes GitHub repository by Bruce. A crucial step is to correctly authorize the necessary scopes for gas-fakes to interact with Google services.
npm install @mcpher/gas-fakes
Step 2: Install and Configure the MCP Server
Next, install the required modules for the MCP server in the same directory.
npm install @modelcontextprotocol/sdk zod
Then, from the gas-fakes-mcp repository, copy the following files into the root of your project directory:
gas-fakes-mcp.jsgas-fakes-mcp-tools.js
This script defines the base tools and a sample tool that the Gemini CLI will use.
Step 3: Install the Gemini CLI
If you haven’t already, install the Gemini CLI. Instructions are available at the official Gemini CLI GitHub repository.
Step 4: Configure the Gemini CLI
To connect the Gemini CLI to your MCP server, modify its settings.json file, which is located in your .gemini directory. Add the mcpServers configuration as shown below.
{
  "security": {
    "auth": {
      "selectedType": "### your setting ###"
    }
  },
  "ui": {
    "theme": "Default"
  },
  "mcpServers": {
    "gas-fakes": {
      "command": "node",
      "args": ["./gas-fakes-mcp.js"]
    }
  }
}
Step 5: Verify Your Directory Structure
After completing the setup, your project directory should have the following structure:
/sample/
├── .env
├── gas-fakes-mcp.js
├── gas-fakes-mcp-tools.js
├── gasfakes.json
├── package-lock.json
├── package.json
├── .gemini/
│   ├── settings.json
└── node_modules/
Demonstration
With everything configured, launch the Gemini CLI from your project directory.
gemini
Here are two sample scenarios demonstrating how to dynamically create and manage tools.
Sample 1: Creating a Currency Conversion Tool
In this sample, we will generate a Google Apps Script to retrieve the current USD-to-JPY exchange rate and add it as a permanent tool to the MCP server.
Prompt 1: Generate and Test the Script
Follow the following mission in order.

## 1. Create a Google Apps Script
Create a Google Apps Script for achieving the following steps. Here, the script is not required to be run. Just show the created script.

1. Create a new Google Spreadsheet.
2. Put a formula `=GOOGLEFINANCE("CURRENCY:USDJPY")` in a cell "A1" of the 1st sheet in a Google Spreadsheet.
3. Get the value of the cell "A1".
4. Show the value.

## 2. Run script.
Run the script in a sandbox.
The Gemini CLI will generate the script and test it in the sandbox.

Prompt 2: Add the Script as a New Tool
Now that the script is confirmed to work, add it to the MCP server as a new tool.
Add the generated Google Apps Script as a tool of the MCP server by removing "console.log" by following the tool "explanation_add_gas_to_mcp".
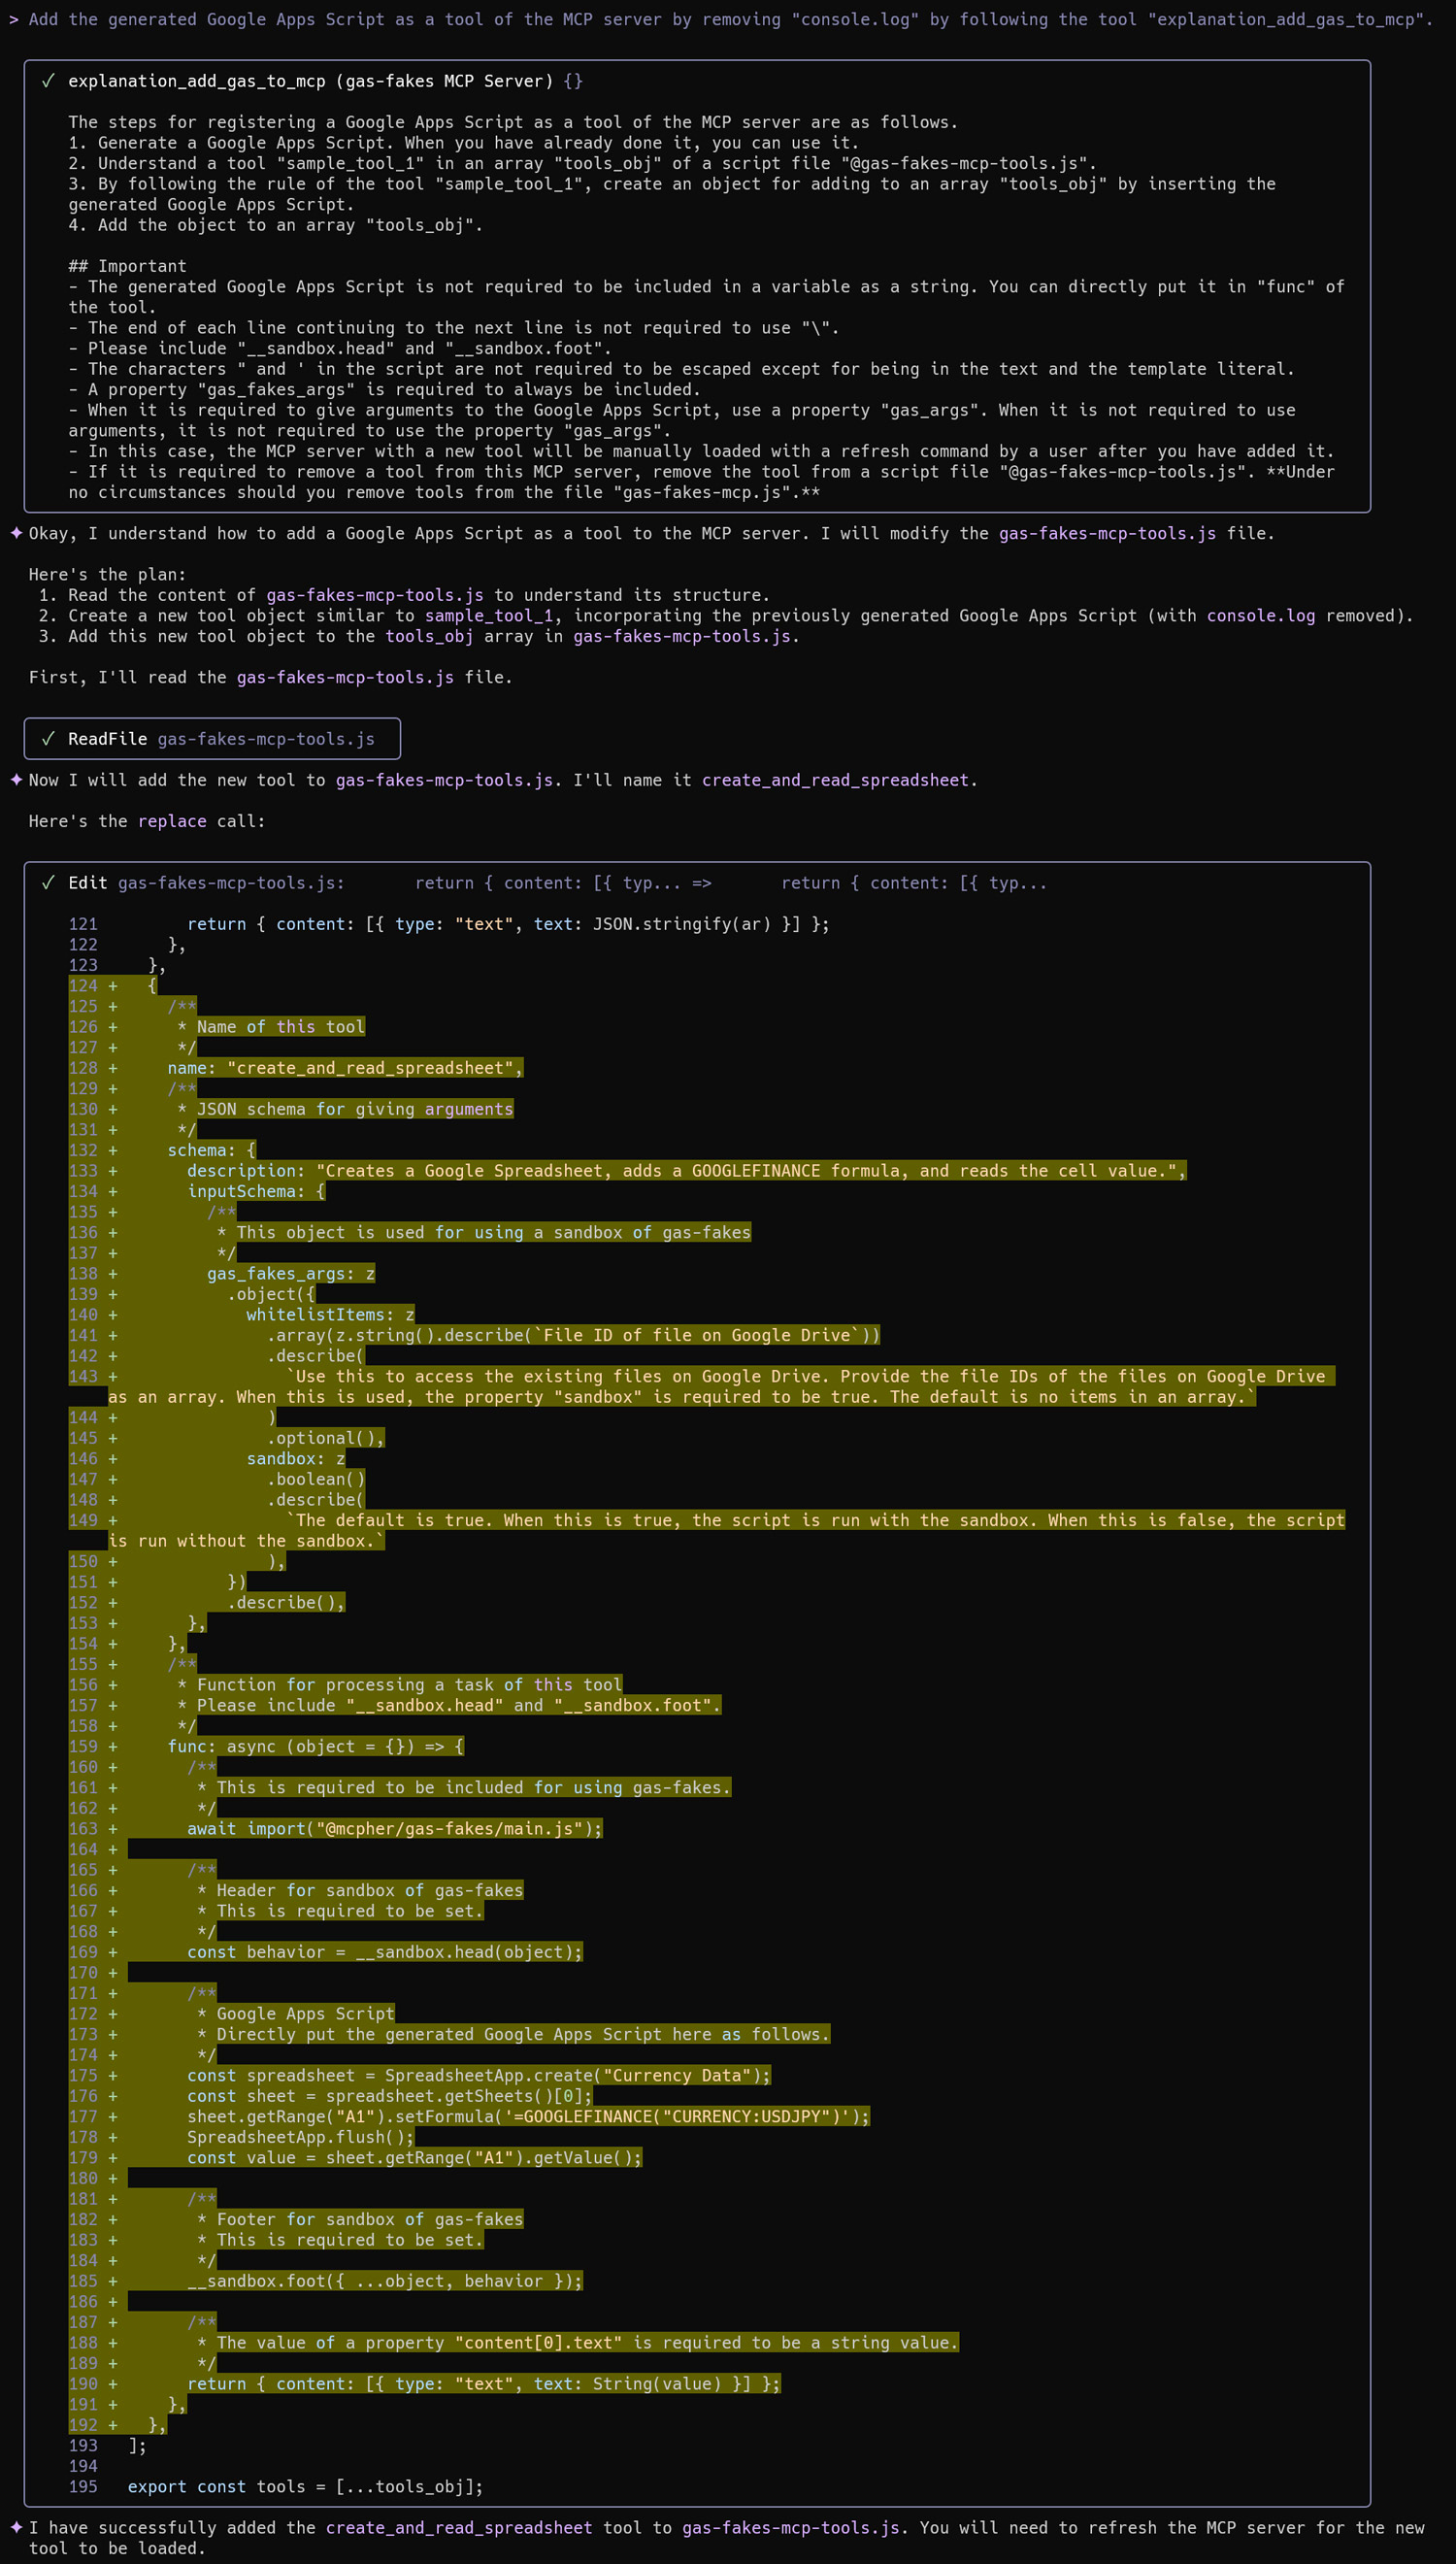
This action adds the following code block to the MCP server script:
  {
    /**
     * Name of this tool
     */
    name: "create_and_read_spreadsheet",
    /**
     * JSON schema for giving arguments
     */
    schema: {
      description: "Creates a Google Spreadsheet, adds a GOOGLEFINANCE formula, and reads the cell value.",
      inputSchema: {
        /**
         * This object is used for using a sandbox of gas-fakes
         */
        gas_fakes_args: z
          .object({
            whitelistItems: z
              .array(z.string().describe(`File ID of file on Google Drive`))
              .describe(
                `Use this to access the existing files on Google Drive. Provide the file IDs of the files on Google Drive as an array. When this is used, the property "sandbox" is required to be true. The default is no items in an array.`
              )
              .optional(),
            sandbox: z
              .boolean()
              .describe(
                `The default is true. When this is true, the script is run with the sandbox. When this is false, the script is run without the sandbox.`
              ),
          })
          .describe(),
      },
    },
    /**
     * Function for processing a task of this tool
     * Please include "__sandbox.head" and "__sandbox.foot".
     */
    func: async (object = {}) => {
      /**
       * This is required to be included for using gas-fakes.
       */
      await import("@mcpher/gas-fakes/main.js");

      /**
       * Header for sandbox of gas-fakes
       * This is required to be set.
       */
      const behavior = __sandbox.head(object);

      /**
       * Google Apps Script
       * Directly put the generated Google Apps Script here as follows.
       */
      const spreadsheet = SpreadsheetApp.create("Currency Data");
      const sheet = spreadsheet.getSheets()[0];
      sheet.getRange("A1").setFormula('=GOOGLEFINANCE("CURRENCY:USDJPY")');
      SpreadsheetApp.flush();
      const value = sheet.getRange("A1").getValue();

      /**
       * Footer for sandbox of gas-fakes
       * This is required to be set.
       */
      __sandbox.foot({ ...object, behavior });

      /**
       * The value of a property "content[0].text" is required to be a string value.
       */
      return { content: [{ type: "text", text: String(value) }] };
    },
  },
The main script of this tool is Google Apps Script. So, you can also simply update.
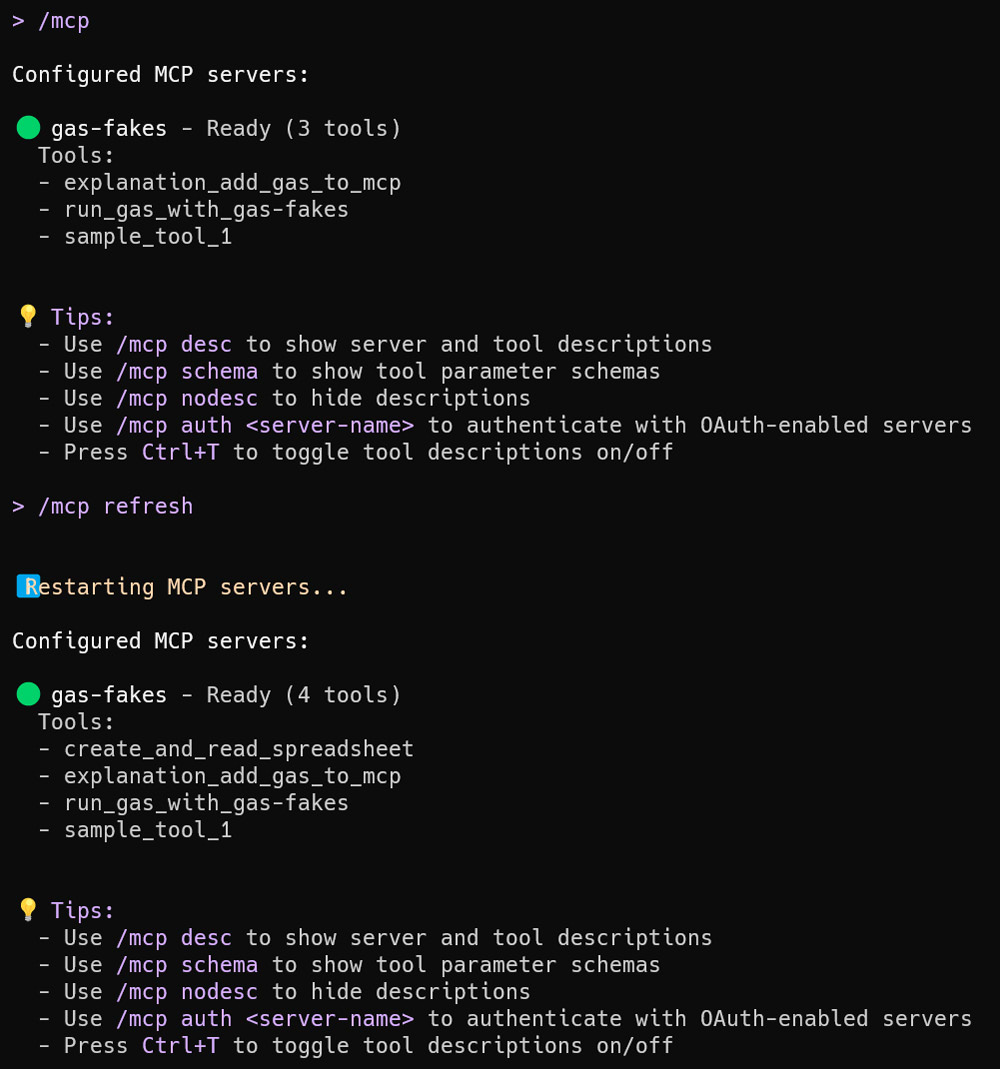
Prompt 3: Refresh and Verify the Tool List
Confirm that the tool was added successfully.
/mcp
/mcp refresh
Prompt 4: Test the New Tool
You can now use the newly created tool with a simple, natural language prompt.
Get the current USD to JPY exchange rate.

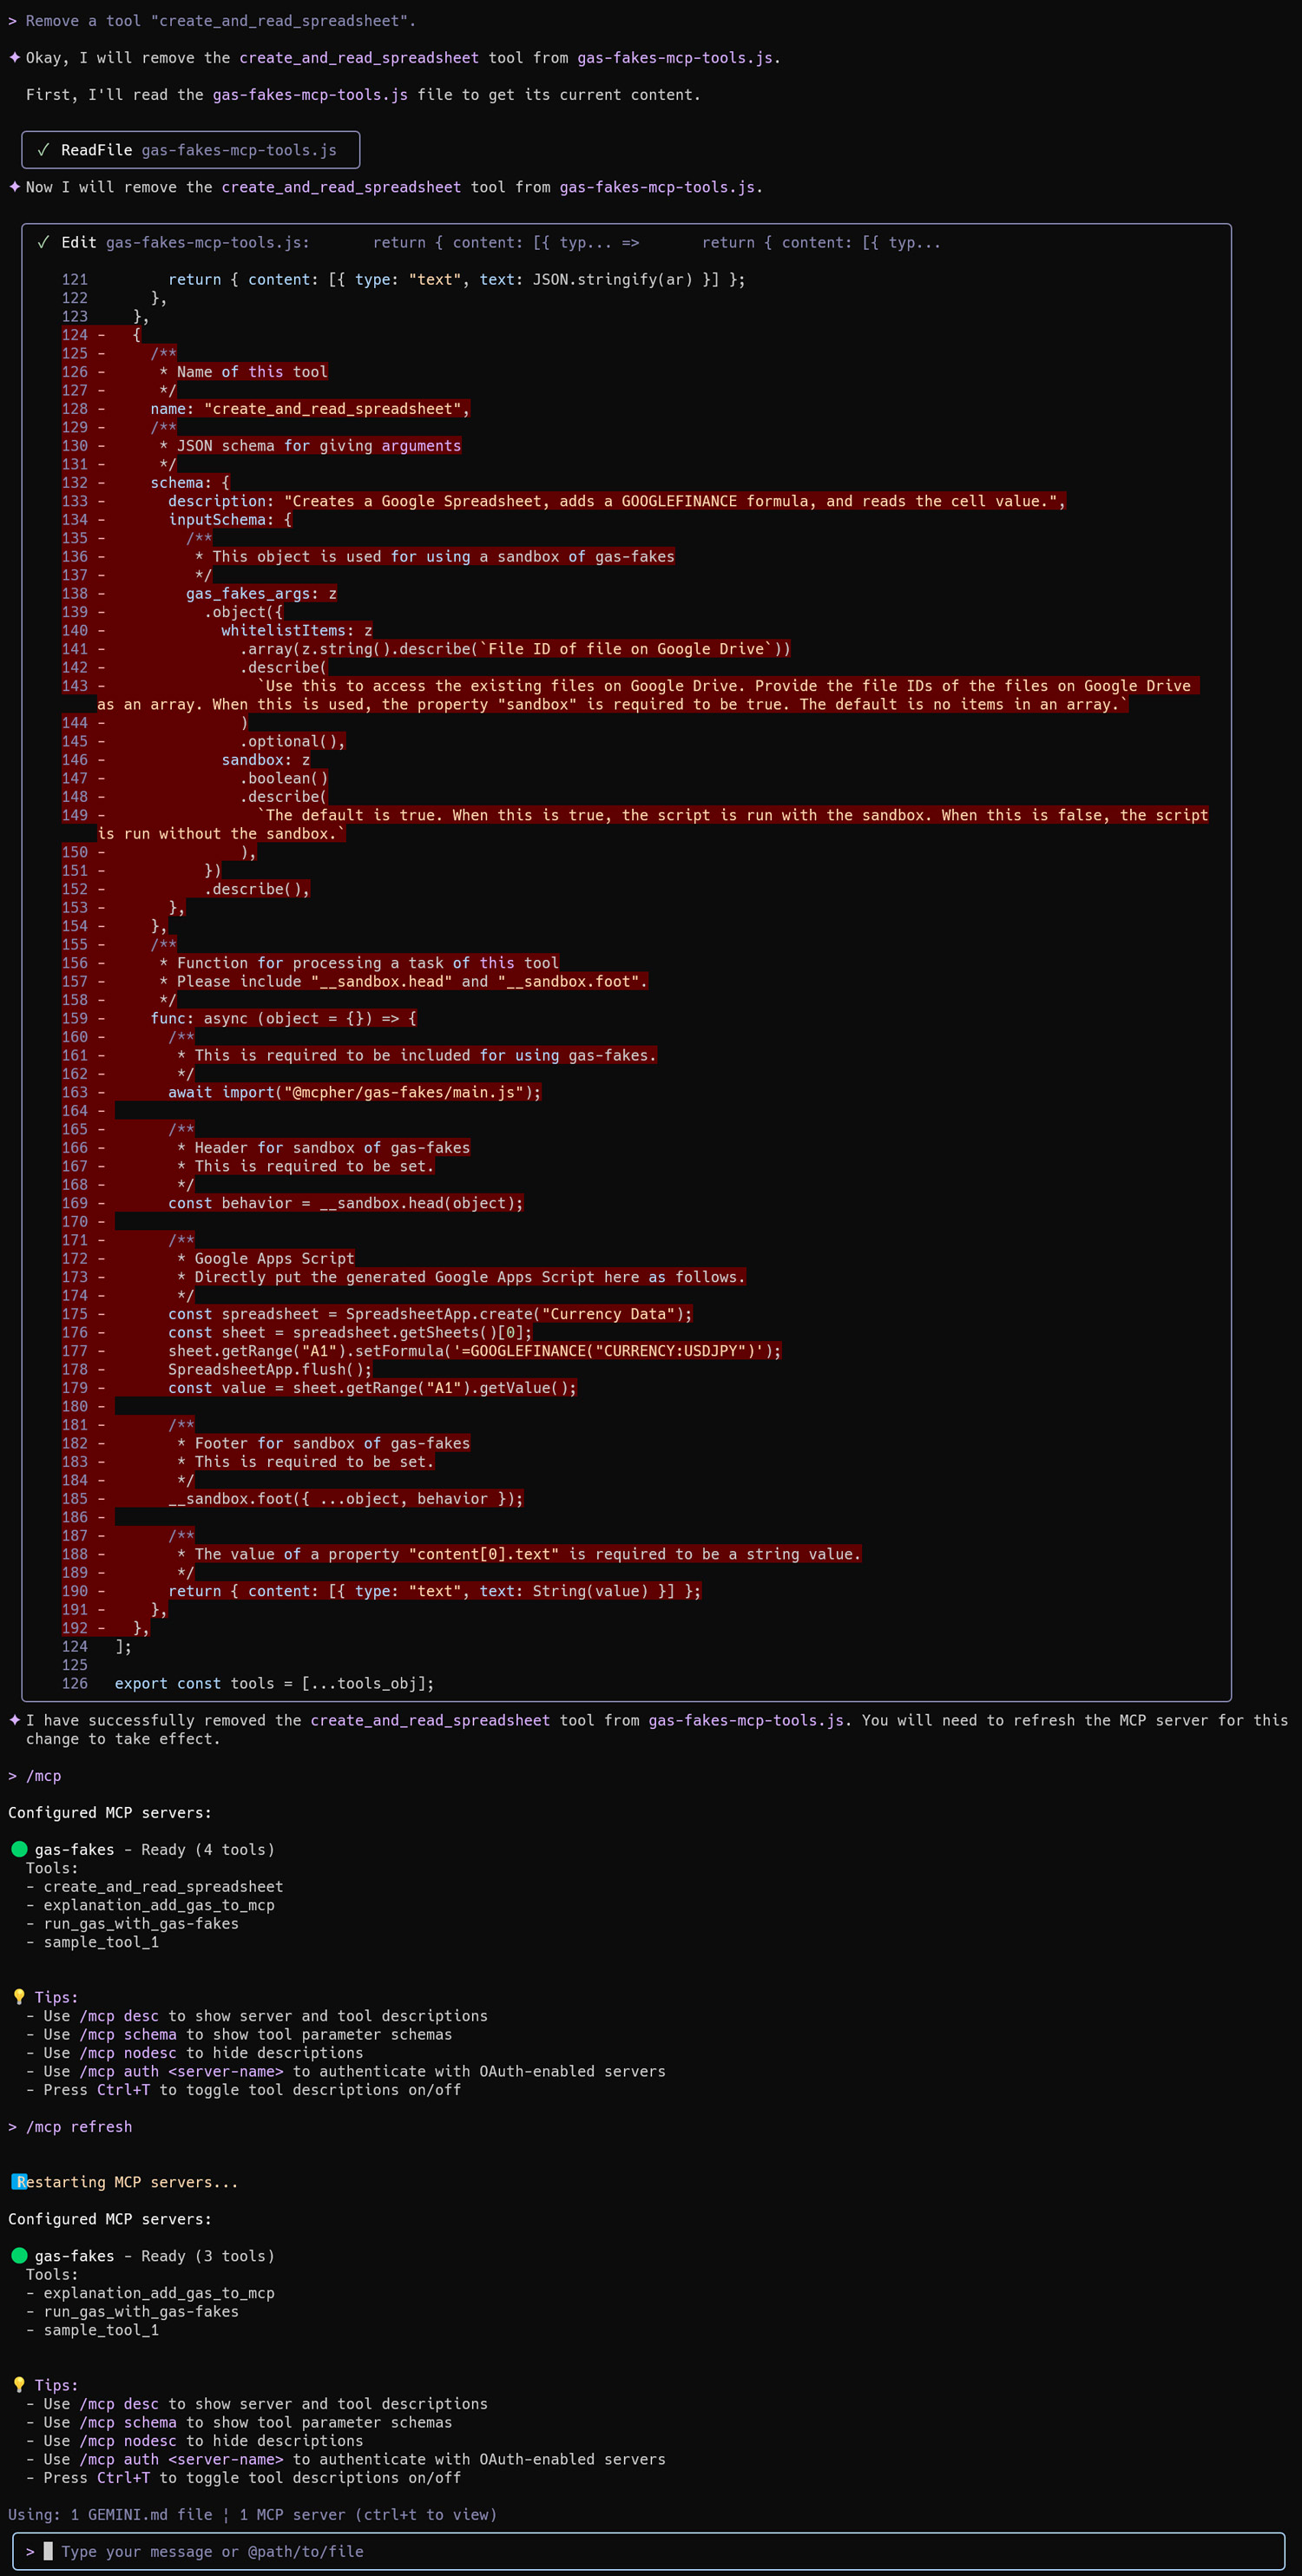
Prompt 5: Remove the Tool
You can also remove tools when they are no longer needed.
Remove a tool "create_and_read_spreadsheet".
Sample 2: Creating a Tool to Read from a Specific Spreadsheet
This sample demonstrates creating a tool to retrieve data from an existing Google Sheet.
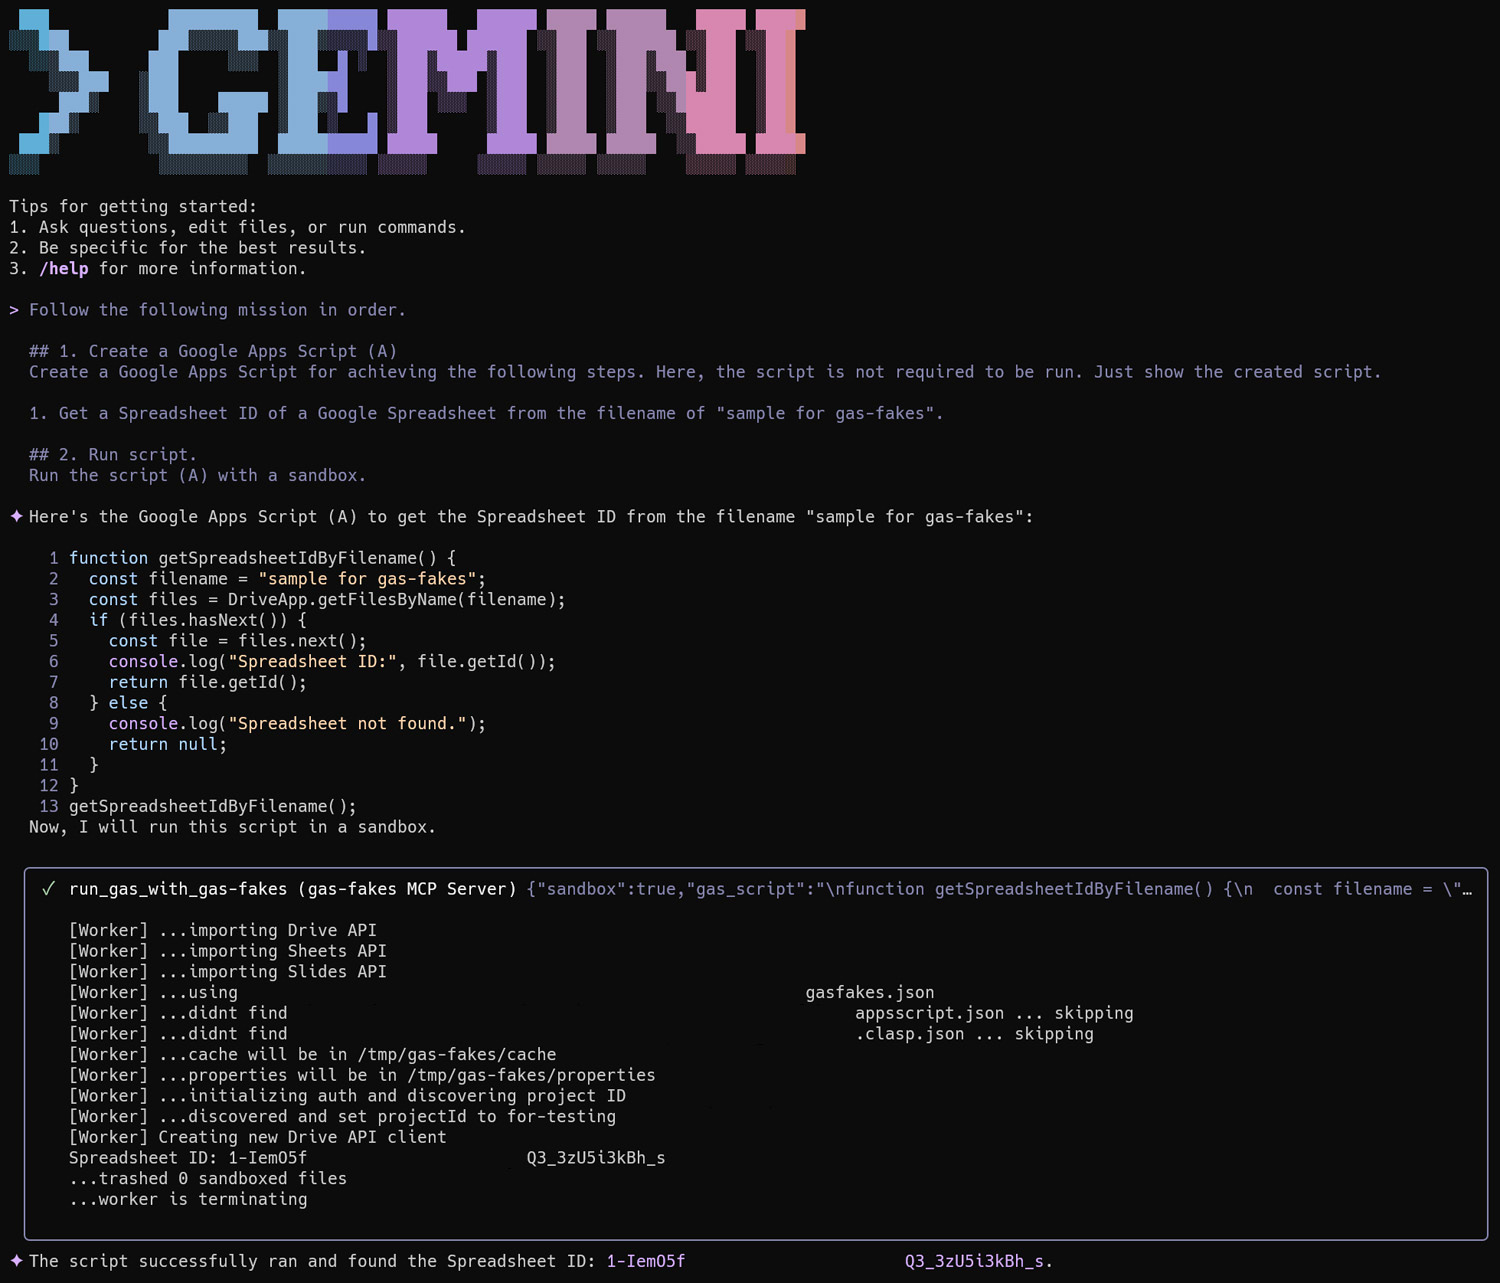
Prompt 1: Get the Spreadsheet ID
First, retrieve the ID of the target spreadsheet.
Follow the following mission in order.

## 1. Create a Google Apps Script (A)
Create a Google Apps Script for achieving the following steps. Here, the script is not required to be run. Just show the created script.

1. Get a Spreadsheet ID of a Google Spreadsheet from the filename of "sample for gas-fakes".

## 2. Run script.
Run the script (A) with a sandbox.
Prompt 2: Read Data from the Spreadsheet
Next, generate a script to retrieve values from the sheet using the obtained ID.
Follow the following mission in order.

## 1. Create a Google Apps Script (B)
Create a Google Apps Script for achieving the following steps. Here, the script is not required to be run. Just show the created script.

1. Retrieve values from the "Sheet1" sheet in the Google Spreadsheet using the Spreadsheet ID obtained by Google Apps Script (A).
2. Show the retrieved values.

## 2. Run script.
Run the script (B) with a sandbox including the retrieved Spreadsheet ID in the whitelist.
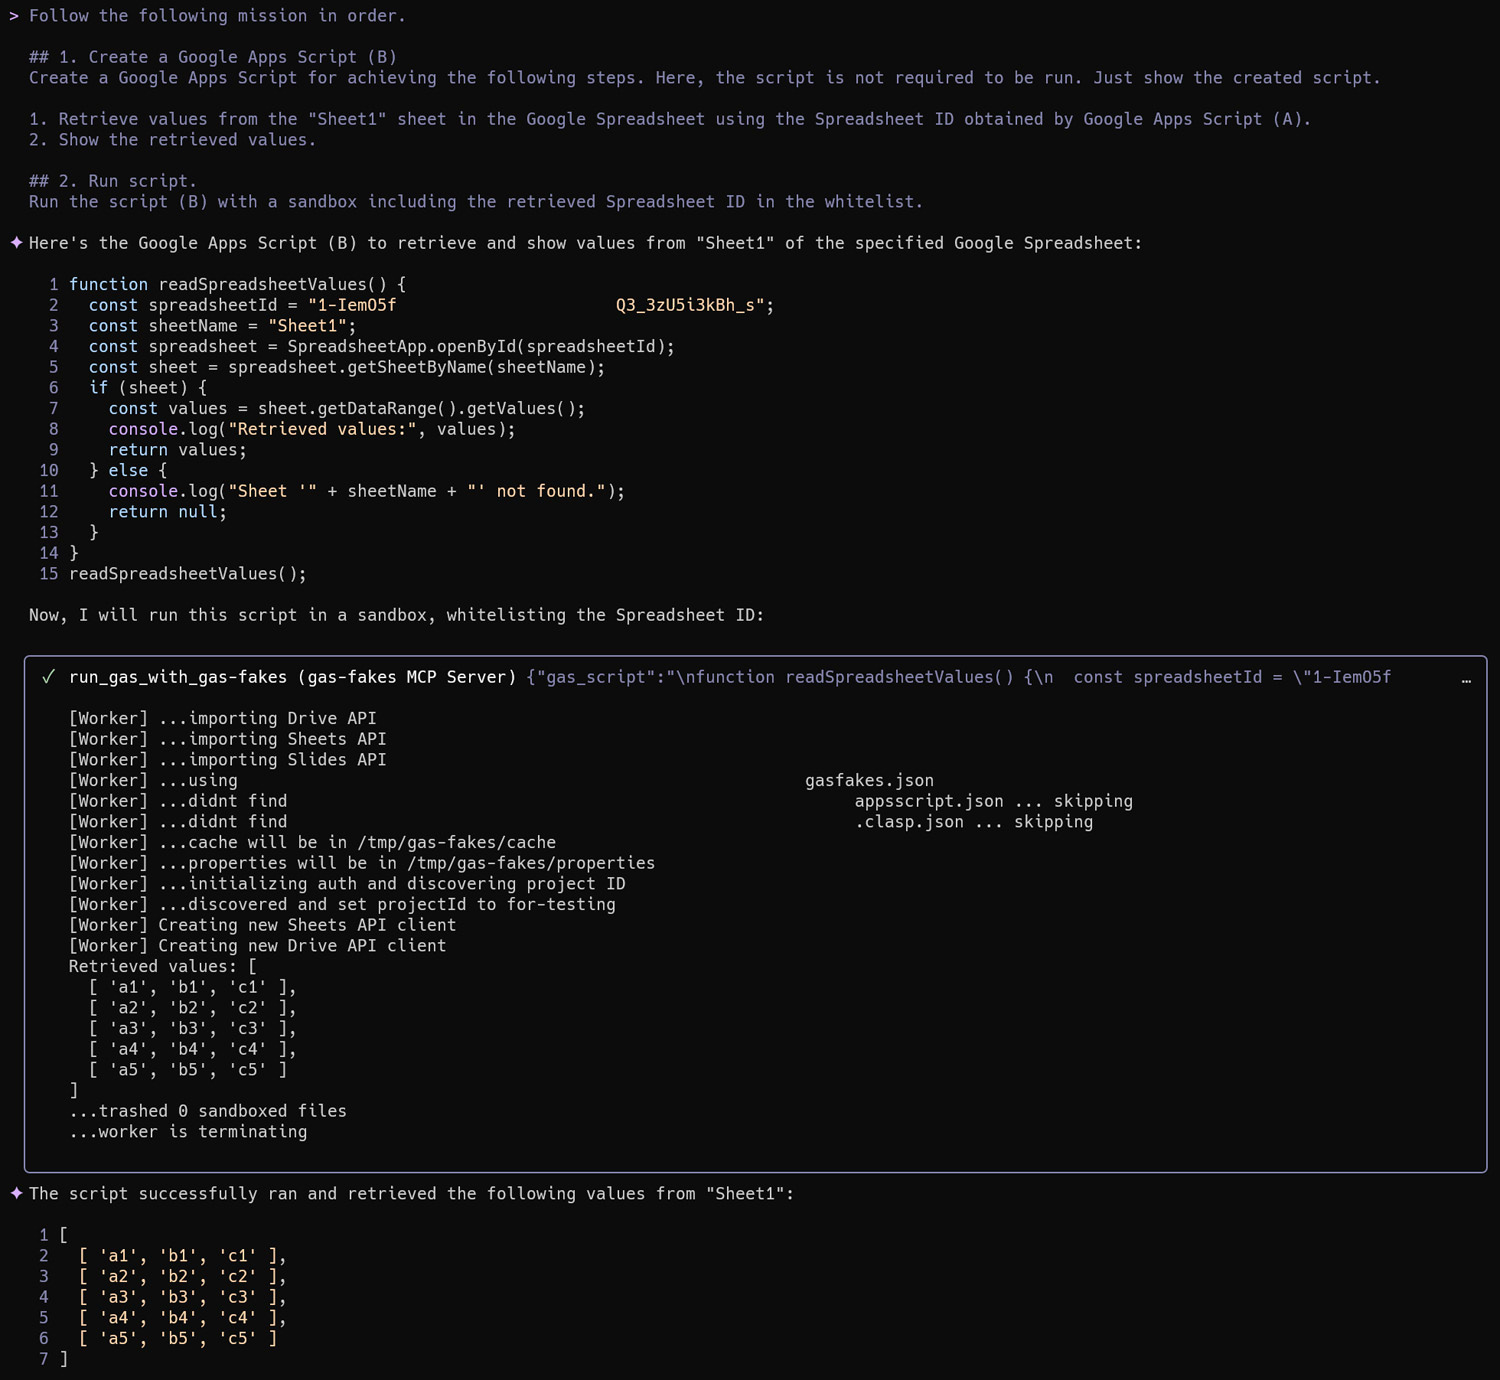
Prompt 3: Add the Script as a New Tool
Add the script for reading the sheet as a new tool on the MCP server.
Add Google Apps Script (B) as a tool of the MCP server by following the "explanation_add_gas_to_mcp". At that time, include that the Spreadsheet title of the retrieved Spreadsheet ID is "sample for gas-fakes" in the description of the tool. Remove "console.log".

The following tool definition, with the Spreadsheet ID hardcoded as a default value, is added to the MCP server script:
  {
    name: "read_spreadsheet_sheet1",
    schema: {
      description:
        "Retrieve values from the 'Sheet1' sheet in the Google Spreadsheet with the Spreadsheet ID '1-IemO5f______________________Q3_3zU5i3kBh_s'. The Spreadsheet title is 'sample for gas-fakes'.",
      inputSchema: {
        gas_fakes_args: z
          .object({
            whitelistItems: z
              .array(z.string().describe(`File ID of file on Google Drive`))
              .describe(
                `Use this to access the existing files on Google Drive. Provide the file IDs of the files on Google Drive as an array. When this is used, the property \"sandbox\" is required to be true. The default is no items in an array.`
              )
              .default(["1-IemO5f______________________Q3_3zU5i3kBh_s"]),
            sandbox: z
              .boolean()
              .describe(
                `The default is true. When this is true, the script is run with the sandbox. When this is false, the script is run without the sandbox.`
              )
              .default(true),
          })
          .describe(),
      },
    },
    func: async (object = {}) => {
      await import("@mcpher/gas-fakes/main.js");
      const behavior = __sandbox.head(object);

      const spreadsheetId = "1-IemO5f______________________Q3_3zU5i3kBh_s";
      const sheetName = "Sheet1";
      const spreadsheet = SpreadsheetApp.openById(spreadsheetId);
      const sheet = spreadsheet.getSheetByName(sheetName);
      let values = null;
      if (sheet) {
        values = sheet.getDataRange().getValues();
      }

      __sandbox.foot({ ...object, behavior });
      return { content: [{ type: "text", text: JSON.stringify(values) }] };
    },
  },
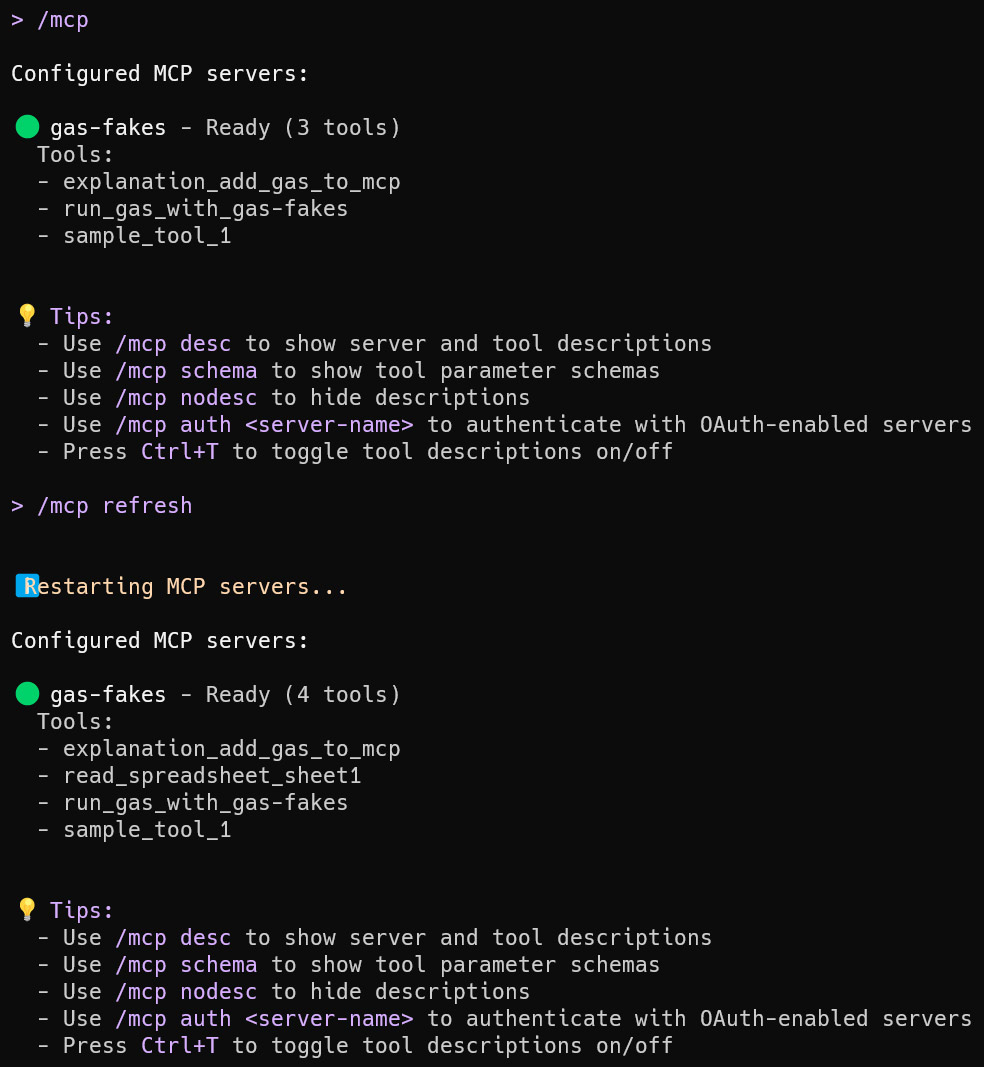
Prompt 4: Refresh and Verify the Tool List
/mcp
/mcp refresh
Prompt 5: Test the New Tool
Finally, test the new tool with a simple prompt.
Show the values from the "Sheet1" sheet in the Google Spreadsheet of "sample for gas-fakes".
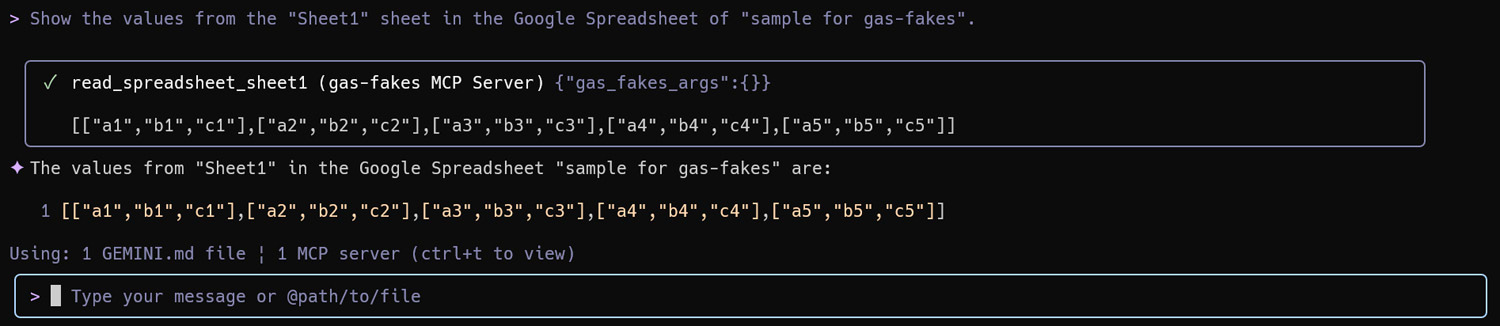
The values are retrieved correctly, demonstrating that adding frequently used scripts as permanent tools is a powerful and cost-effective method for automating Google Workspace tasks.
Important
During testing, it was noted that a tool might not be added correctly on the first attempt. If this occurs, running the command again should resolve the issue and allow the tool to be added successfully.
Summary
- Secure Execution: The
gas-fakeslibrary provides a secure sandbox to run AI-generated Google Apps Script with granular permissions, mitigating the risks of broad-access scopes. - AI Integration: An MCP server makes this sandbox environment accessible to AI agents like the Gemini CLI, enabling conversational automation of Google Workspace.
- Cost and Efficiency: Repeatedly generating the same script for common tasks is inefficient and costly. This method addresses that by creating permanent, reusable tools.
- Dynamic Tool Creation: Users can dynamically add, test, use, and remove AI-generated scripts as tools directly from the Gemini CLI, creating a flexible automation workflow.
- Practical Automation: This approach makes it practical to build a robust library of custom tools for Google Workspace, streamlining repetitive tasks and enhancing productivity.
Additional information
While this article focuses on adding tools built with Google Apps Script via gas-fakes to safely manage Google Workspace, the method is not limited to this use case. Tools built directly with Node.js can also be added by adhering to the tools_obj structure in the gas-fakes-mcp-tools.js script.
The demonstration in this article uses a single MCP server with two base tools and one sample tool. In practice, the Gemini CLI can be configured to work with numerous tools across multiple MCP servers. (As a sample, it’s ToolsForMCPServer) The dynamic tool creation process described here is especially useful in such complex setups, particularly when a task cannot be completed with the existing tools.