Description
At Google Spreadsheet, the cells can be merged as one cell. But, when the Spreadsheet including the merged cells is used with Google Apps Script, the script becomes a bit complicated. Also, I sometimes find some questions like this situation on Stackoverflow. In this report, I would like to introduce a technique for easily using the Spreadsheet including the merged cells with Google Apps Script.
Principle
Before it introduces the sample scripts, I would like to introduce the principle for using the Spreadsheet for the merged cells. You can understand the principle of this method from the following sample input and output images.
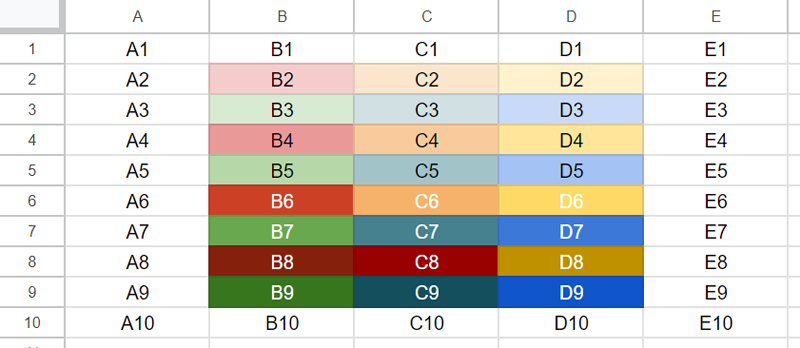 Fig 1. Sample input situation.
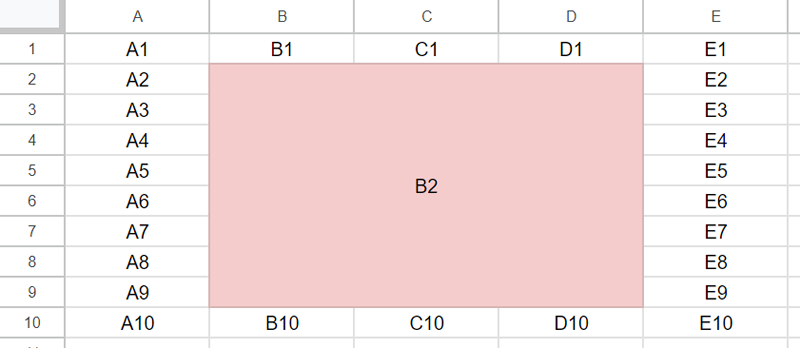 Fig 2. Sample output situation.
About the above sample input situation in Fig. 1, when cells “B2:D9” are merged, the output situation is in Fig. 2. From these images, it is found that when the cells are merged, the top left value and style are kept and those are used in the merged cell. And, even when the merged cell of “B2:D9” is unmerged, the values of C2 to D9 are not recovered and the background color of all cells “B2:D9” is the same as that of the merged cell. Namely, it is found that when there has already been a merged cell, the cell value of the merged cell is the same as the cell value of the top left cell. In this report, this situation is used.
Sample 1
The sample situation is shown in Fig. 3. In this case, a range of “Sheet1!A1:D8” including merged cells is expanded at “Sheet2!A1:D8”.
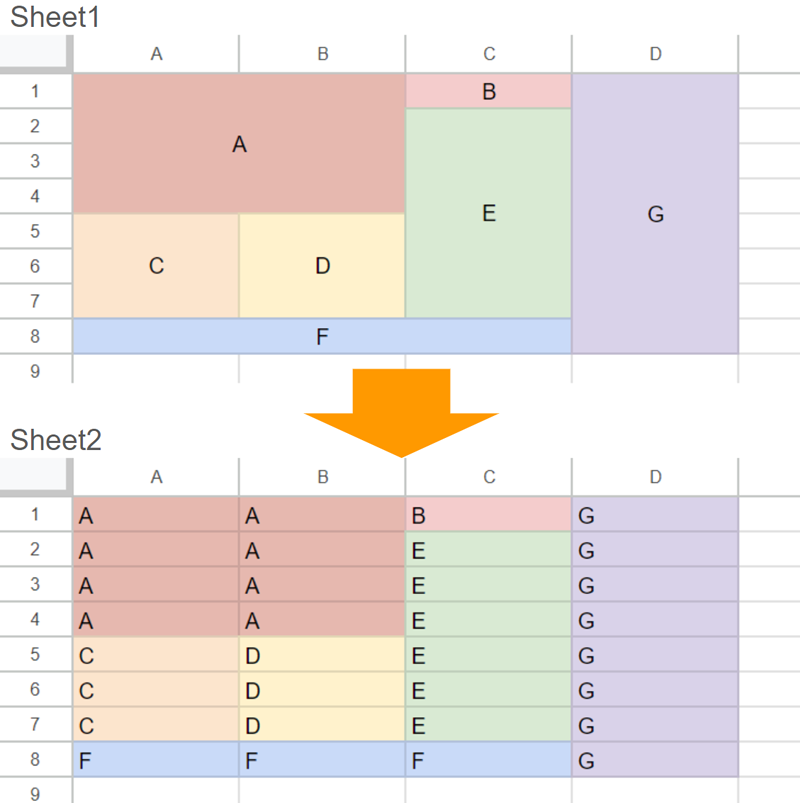 Fig 3. Sample input and output situations.
The sample script is as follows.
function sample1() {
  const srcSheetName = "Sheet1"; // Please set your source sheet name.
  const dstSheetName = "Sheet2"; // Please set your destination sheet name.

  // Retrieve current values and backgrounds from the merged cells.
  const ss = SpreadsheetApp.getActiveSpreadsheet();
  const srcRange = ss.getSheetByName(srcSheetName).getDataRange();
  const values = srcRange.getValues();
  const backgrounds = srcRange.getBackgrounds();

  // Expanding values and backgrounds.
  srcRange.getMergedRanges().forEach((r) => {
    const startRow = r.getRow() - 1;
    const endRow = startRow + r.getNumRows() - 1;
    const startCol = r.getColumn() - 1;
    const endCol = startCol + r.getNumColumns() - 1;
    const v = values[startRow][startCol];
    const b = backgrounds[startRow][startCol];
    for (let r = startRow; r <= endRow; r++) {
      for (let c = startCol; c <= endCol; c++) {
        if (!values[r]) {
          values[r] = [];
        }
        if (!backgrounds[r]) {
          backgrounds[r] = [];
        }
        values[r][c] = v;
        backgrounds[r][c] = b;
      }
    }
  });

  // Put expanded values and backgrounds into destination sheet.
  const dstRange = ss
    .getSheetByName(dstSheetName)
    .getRange(1, 1, values.length, values[0].length);
  dstRange.setValues(values).setBackgrounds(backgrounds);
}
In this script, the cells are not unmerged on the Spreadsheet. The cell values and cell backgrounds are unmerged in the script. The merged cells are expanded in an array. And, the result values and backgrounds are put into the destination sheet “Sheet2”.
When the values of values and backgrounds before the loop of srcRange.getMergedRanges().forEach(r => {,,,}, those are as follows.
[
  ["A","","B","G"],
  ["","","E",""],
  ["","","",""],
  ["","","",""],
  ["C","D","",""],
  ["","","",""],
  ["","","",""],
  ["F","","",""]
]
[
  ["#e6b8af","#ffffff","#f4cccc","#d9d2e9"],
  ["#ffffff","#ffffff","#d9ead3","#ffffff"],
  ["#ffffff","#ffffff","#ffffff","#ffffff"],
  ["#ffffff","#ffffff","#ffffff","#ffffff"],
  ["#fce5cd","#fff2cc","#ffffff","#ffffff"],
  ["#ffffff","#ffffff","#ffffff","#ffffff"],
  ["#ffffff","#ffffff","#ffffff","#ffffff"],
  ["#c9daf8","#ffffff","#ffffff","#ffffff"]
]
When the values of values and backgrounds after the loop of srcRange.getMergedRanges().forEach(r => {,,,}, those are as follows.
[
  ["A","A","B","G"],
  ["A","A","E","G"],
  ["A","A","E","G"],
  ["A","A","E","G"],
  ["C","D","E","G"],
  ["C","D","E","G"],
  ["C","D","E","G"],
  ["F","F","F","G"]
]
[
  ["#e6b8af","#e6b8af","#f4cccc","#d9d2e9"],
  ["#e6b8af","#e6b8af","#d9ead3","#d9d2e9"],
  ["#e6b8af","#e6b8af","#d9ead3","#d9d2e9"],
  ["#e6b8af","#e6b8af","#d9ead3","#d9d2e9"],
  ["#fce5cd","#fff2cc","#d9ead3","#d9d2e9"],
  ["#fce5cd","#fff2cc","#d9ead3","#d9d2e9"],
  ["#fce5cd","#fff2cc","#d9ead3","#d9d2e9"],
  ["#c9daf8","#c9daf8","#c9daf8","#d9d2e9"]
]
You can see the expanded values in the array. I think that this method will be useful in a situation where the individual cells of the merged cell are required to be used.
Sample 2
The sample situation is shown in Fig. 4. In this sample, the total values and the background colors are retrieved as the keys of columns “header1” and “header3”. For example, in the case of “sample1” of “header1”, {"key":"sample1","value":34,"background":"#85200c"} is the expected result.
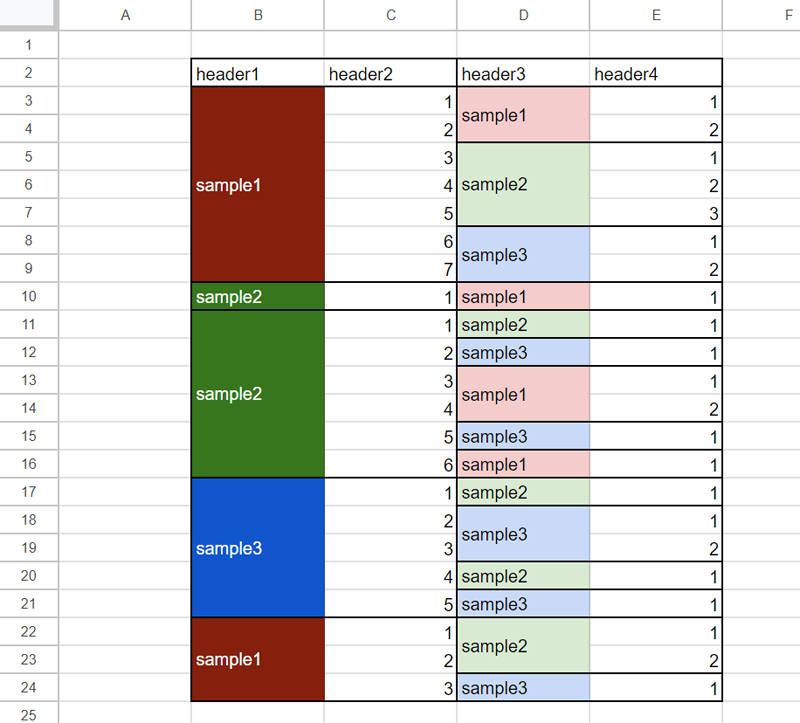 Fig 4. Sample input situation.
The sample script for achieving this goal is as follows.
function sample2() {
  const sheetName = "Sheet1"; // Please set your sheet name.

  const sheet = SpreadsheetApp.getActiveSpreadsheet().getSheetByName(sheetName);
  const srcRange = sheet.getRange("B3:E" + sheet.getLastRow());
  const offsetR = srcRange.getRow() - 1;
  const offsetC = srcRange.getColumn() - 1;
  const values = srcRange.getValues();
  const backgrounds = srcRange.getBackgrounds();
  srcRange.getMergedRanges().forEach((r) => {
    const startRow = r.getRow() - 1 - offsetR;
    const endRow = startRow + r.getNumRows() - 1;
    const startCol = r.getColumn() - 1 - offsetC;
    const endCol = startCol + r.getNumColumns() - 1;
    const v = values[startRow][startCol];
    const b = backgrounds[startRow][startCol];
    for (let r = startRow; r <= endRow; r++) {
      for (let c = startCol; c <= endCol; c++) {
        if (!values[r]) {
          values[r] = [];
        }
        if (!backgrounds[r]) {
          backgrounds[r] = [];
        }
        values[r][c] = v;
        backgrounds[r][c] = b;
      }
    }
  });
  const res = [
    ...values
      .reduce((m, r, i) => {
        [
          [0, 1],
          [2, 3],
        ].forEach(([a, b]) => {
          const key = `${r[a]}_${backgrounds[i][a]}`;
          m.set(
            key,
            m.has(key)
              ? { ...m.get(key), value: m.get(key).value + r[b] }
              : { key: r[a], value: r[b], background: backgrounds[i][a] }
          );
        });
        return m;
      }, new Map())
      .values(),
  ];

  console.log(res);
}
In this case, the data range is not used. Instead of the data range, const srcRange = sheet.getRange("B3:E" + sheet.getLastRow()); is used as the range. In this case, the offset is required to be reflected in the array coordinates using offsetR and offsetC. Please be careful about this.
When this script is run with the situation of Fig. 4, the following result is obtained.
[
  {"key":"sample1","value":34,"background":"#85200c"},
  {"key":"sample1","value":8,"background":"#f4cccc"},
  {"key":"sample2","value":12,"background":"#d9ead3"},
  {"key":"sample3","value":10,"background":"#c9daf8"},
  {"key":"sample2","value":22,"background":"#38761d"},
  {"key":"sample3","value":15,"background":"#1155cc"}
]
From this result array, you can see that the values in each element have a specific key and a specific background color.
If this report brought you help understanding processing Google Spreadsheets including the merged cells, I’m glad.