Abstract
This report introduces the method for easily implementing HTML forms with a Google Spreadsheet as a database using Google Apps Script. There are 2 patterns for the HTML form using Google Apps Script. One is that an HTML form is put into the same Google Apps Script project. Another is that an HTML form is put to a different server from a Google Apps Script project. In this report, the methods for easily implementing both patterns are introduced using the sample scripts.
Introduction
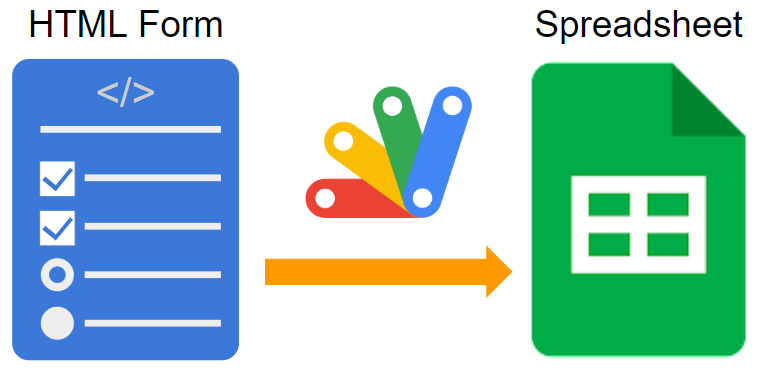
You might have a situation that is required to populate the data to a database using an HTML form. In this case, an HTML form with a Google Spreadsheet as a database using Google Apps Script will be useful. There are 2 patterns for the HTML form using Google Apps Script as shown in Figs. 1 and 2.
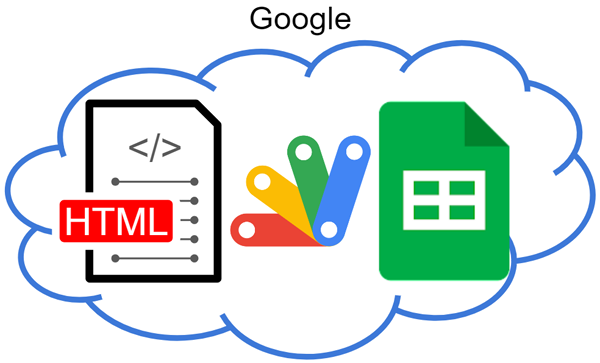
Fig 1. An HTML form is put into the same Google Apps Script project.
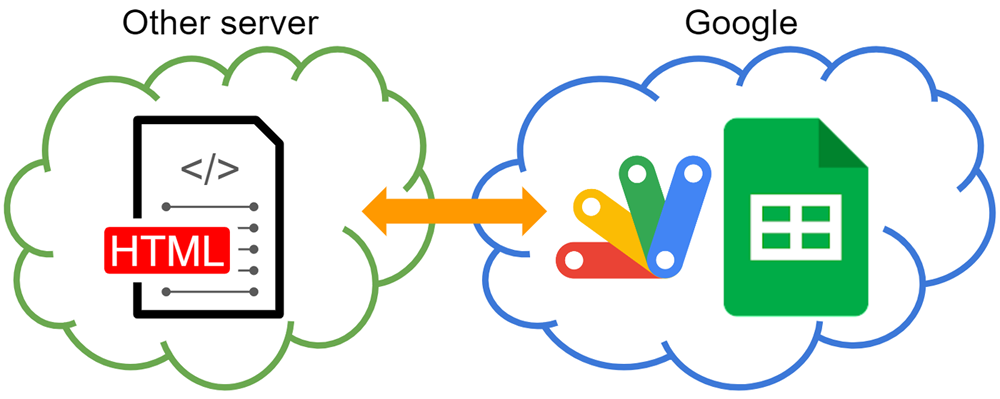
Fig 2. An HTML form is put to a different server from a Google Apps Script project.
In Fig. 1, the HTML form is included in the same Google Apps Script project. In this case, the HTML form can be loaded to the Web Apps, the dialog and the sidebar of Google Docs (Document, Spreadsheet, Slides, and so on). For example, when you want to make users input the values while they are working on a Google Spreadsheet, this pattern is suitable.
In Fig. 2, the HTML form is put to a different server from a Google Apps Script project. In this case, the HTML form is placed on a server outside of Google. For example, this pattern is suitable when you want to put the HTML form on your own site.
In the current stage, there are several official documents for HTML form. Ref1, Ref2, and Ref3 But, the detailed official documents related to the HTML form with a Google Spreadsheet as a database cannot be found. And, when I see questions on Stackoverflow, a lot of questions related to the HTML form can be seen. Furthermore, I personally have a lot of questions related to this from other users. As one more important point, in the current stage, the multiple files from the input tag with “multiple” cannot be parsed by “google.script.run”. Only 1st one file is retrieved. From this situation, it is considered that when the detailed document is published by including the sample scripts, it will be useful for a lot of developers. With this motivation, I have written this report.
I would like to introduce 2 sample scripts for both patterns in this report.
Sample HTML form
In this report, the following 2 sample situations are introduced.
- HTML form on a sidebar of Google Spreadsheet
- HTML form on a server outside of Google
Both HTML forms are the same. the 5 input tags of 2 text inputs, 1 dropdown list, 1 input file (multiple selections), and a submit button are included in the HTML form. When the values are inputted and the button is clicked, the inputted values are stored in a Google Spreadsheet.
Google Apps Script library and Javascript Library for managing HTML form
I’m worried that the script for managing the HTML form with Google Apps Script is complicated a little. I thought that this might be one of the reasons for the bottleneck that the users try to implement the HTML form. And, I thought that when the script is simple, it will help implement the HTML form by a lot of users. So, I created the following 2 libraries.
-
Google Apps Script library: HtmlFormApp
- Parsing the form object from the HTML form to the Google Spreadsheet.
-
Javascript library: HtmlFormObjectParserForGoogleAppsScript_js
- Parser for Sending HTML Form Object to Google Apps Script using google.script.run.
These libraries can lead to easily implementing HTML forms with simpler scripts.
HTML form on a sidebar of Google Spreadsheet
In order to test this sample script, please do the following flow.
1. Prepare Google Spreadsheet
Please create a new Google Spreadsheet. And, open the script editor.
2. Install a Google Apps Script library
Please install the Google Apps Script library (HtmlFormApp) with the script editor. You can see the method for installing the library in the official document.
The library key (Script ID shown in the official document) is as follows.
1uLJrVXGaI-ceHFl_VC1U5jcynKpR2qnNG2tNPd03QJZw1jCcKw2_Oiwh
3. Sample script
Please copy and paste the following Google Apps Script and HTML to the script editor.
Google Apps Script: Code.gs
// Please run this function. Sidebar is opened on Spreadsheet.
function openSidebar() {
  const html = HtmlService.createHtmlOutputFromFile("index");
  SpreadsheetApp.getUi().showSidebar(html);
}

// This function is run from the Javascript side.
function main(formData) {
  const spreadsheetId = SpreadsheetApp.getActiveSpreadsheet().getId();
  HtmlFormApp.appendFormData({ spreadsheetId, formData });
  return "Done";
}
HTML and Javascript: index.html
<!DOCTYPE html>
<html>
  <head>
    <base target="_top" />
  </head>

  <body>
    <form>
      Text1: <input type="text" name="sampleText1" /><br />
      Text2: <input type="text" name="sampleText2" /><br />
      <select name="sampleDropdown1">
        <option value="sampleOption1">sample1</option>
        <option value="sampleOption2">sample2</option>
        <option value="sampleOption3">sample3</option>
      </select>
      File: <input type="file" name="sampleFiles" multiple /><br />
      <input
        type="submit"
        name="button"
        value="submit"
        onclick="run(this);return false;"
      />
    </form>

    <script src="https://cdn.jsdelivr.net/gh/tanaikech/HtmlFormObjectParserForGoogleAppsScript_js/htmlFormObjectParserForGoogleAppsScript_js.min.js"></script>

    <script>
      async function run(e) {
        const obj = await ParseFormObjectForGAS(e.parentNode, null, null, true);
        google.script.run
          .withFailureHandler((err) => console.log(err.message))
          .withSuccessHandler((res) => console.log(res))
          .main(obj);
      }
    </script>
  </body>
</html>
4. Testing
In order to test this script, please run the function openSidebar with the script editor. By this, the sidebar is opened on the Google Spreadsheet.
When you input texts, select a dropdown list, and select files (less than 50 MB), and then, you click the button, the following flow is run.
- Parsing the inputted values using HtmlFormObjectParserForGoogleAppsScript_js.
- Send the parsed values to Google Apps Script using “google.script.run”.
- The values are put into the 1st tab in the Google Spreadsheet using HtmlFormApp.
The uploaded files are put into the root folder as the default. When you want to put the uploaded files into the specific folder, please add folderId: "###folderId###" like HtmlFormApp.appendFormData({ spreadsheetId, formData, folderId: "###folderId###" }). Ref
In the case of 1st submission, the header row is automatically created. After 2nd submission, the values are appended by following the header row. The sample output situation is as follows.
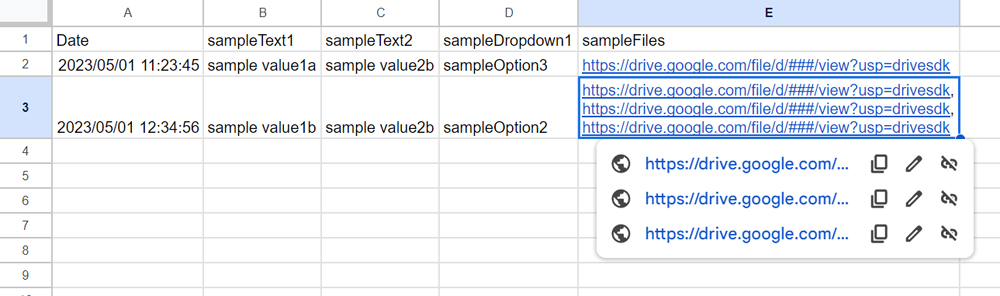
Fig 3. Sample result situation from HTML form.
HTML form on a server outside of Google
In order to test this sample script, please do the following flow.
1. Prepare Google Spreadsheet
Please create a new Google Spreadsheet. And, open the script editor.
2. Install a Google Apps Script library
Please install the Google Apps Script library (HtmlFormApp) with the script editor. You can see the method for installing the library in the official document.
The library key (Script ID shown in the official document) is as follows.
1uLJrVXGaI-ceHFl_VC1U5jcynKpR2qnNG2tNPd03QJZw1jCcKw2_Oiwh
3. Sample script 1
Please copy and paste the following Google Apps Script and HTML to the script editor.
Google Apps Script: Code.gs
function doPost(formData) {
  const spreadsheetId = SpreadsheetApp.getActiveSpreadsheet().getId();
  const res = HtmlFormApp.appendFormData({ formData, spreadsheetId });
  return ContentService.createTextOutput(
    JSON.stringify({ message: "Done", row: res.range.getRow() })
  );
}
4. Deploy Web Apps
Please set this using the script editor as follows. Detailed information can be also seen in the official document.
- On the script editor, at the top right of the script editor, please click “click Deploy” -> “New deployment”.
- Please click “Select type” -> “Web App”.
- Please input the information about the Web App in the fields under “Deployment configuration”.
- Please select “Me” for “Execute as”.
- Please select “Anyone” for “Who has access”.
- In this case, this setting is used as a simple test.
- Please click “Deploy” button.
- When “The Web App requires you to authorize access to your data.” is shown, please click “Authorize access” button. And, please authorize the scopes.
- Copy the URL of the Web App. It’s like
https://script.google.com/macros/s/###/exec. This URL is used for your HTML.
By this flow, doPost can be accessed by the HTTP request from outside.
5. Sample script 2
Please create a new text file by including the following HTML. This is not required to be included in the Google Apps Script project. The inputted values are sent to the Web Apps created by Google Apps Script using the fetch API of Javascript. In this sample, as a test, the HTML is opened by your own browser.
HTML and Javascript: index.html
<!DOCTYPE html>
<html>
  <head>
    <base target="_top" />
  </head>

  <body>
    <form>
      Text1: <input type="text" name="sampleText1" /><br />
      Text2: <input type="text" name="sampleText2" /><br />
      <select name="sampleDropdown1">
        <option value="sampleOption1">sample1</option>
        <option value="sampleOption2">sample2</option>
        <option value="sampleOption3">sample3</option>
      </select>
      File: <input type="file" name="sampleFiles" multiple /><br />
      <input
        type="submit"
        name="button"
        value="submit"
        onclick="run(this);return false;"
      />
    </form>

    <script src="https://cdn.jsdelivr.net/gh/tanaikech/HtmlFormObjectParserForGoogleAppsScript_js/htmlFormObjectParserForGoogleAppsScript_js.min.js"></script>

    <script>
      async function run(e) {
        const url = "https://script.google.com/macros/s/###/exec"; // Please set your Web Apps URL here.

        const obj = await ParseFormObjectForGAS(e.parentNode, null, null, true);
        fetch(url, { method: "POST", body: JSON.stringify(obj) })
          .then((res) => res.json())
          .then((res) => console.log(res));
      }
    </script>
  </body>
</html>
6. Testing
In order to test this script, please open the HTML with your browser.
When you input texts, select a dropdown list, and select files (less than 50 MB), and then, you click the button, the same flow with the above section is run. There is only one different point from the above section. In this sample, the parsed values are sent to Google Apps Script using the fetch API of Javascript. This makes placing the HTML outside of Google possible. The sample output situation is the same as in Fig. 3.
Limitation
In the case of the above sample scripts, there are several limitations.
- The maximum number of concurrent accesses to Web Apps is 30. Ref When LockService is used, it is 60. Ref But, in this case, it depends on the processing time of the script. In this report, LockService is not used. When you want to use it, please modify the script.
- The maximum file size is 50 MB.
Note
- These sample scripts are simple scripts. Please modify them to your actual situation.
- When you modified the Google Apps Script of Web Apps, please modify the deployment as a new version. By this, the modified script is reflected in Web Apps. Please be careful about this.
- You can see the detail of this in my report “Redeploying Web Apps without Changing URL of Web Apps for new IDE”.
- HtmlFormApp has several useful options. You can use the options.
References
- Web Apps
- Taking advantage of Web Apps with Google Apps Script
- HtmlFormApp of Google Apps Script library
- HtmlFormObjectParserForGoogleAppsScript_js of Javascript library
- Benchmark: Concurrent Writing to Google Spreadsheet using Form