
Overview
Google Sheets now supports managing smart chips via its API, enabling retrieval and placement with Apps Script and other languages.
Description
Smart chips in Google Sheets and Docs are a powerful feature designed to enhance collaboration and information sharing. While there historically haven’t been built-in Google Apps Script methods to manage these chips, a workaround was previously developed to address this limitation (Ref).
However, Google has recently introduced direct methods for managing smart chips within the Google Sheets API (Ref). This report provides sample Google Apps Script code that demonstrates how to get and put smart chips on Google Sheets using these new API methods. Although these methods are currently exclusive to Google Sheets, their availability via the Sheets API means they can also be utilized with other programming languages, not just Google Apps Script. It will be anticipated that similar functionality will be extended to Google Docs in future updates.
Usage
1. Prepare Google Sheets
Please create a new Google Sheets. And, open the script editor.
2. Enable API
Please enable the Sheets API at Advanced Google services on the script editor. Ref
3. Script
Please copy and paste the following script into the script editor.
function insertChips() {
  const ss = SpreadsheetApp.getActiveSpreadsheet();
  const sheet = ss.getSheets()[0].setName("Sheet1");

  // Prepare smart chips.
  const stringValue = `Email is @\nSample spreadsheet is @\nSample image file is @`;
  const imageFileId = "###"; // Please set your file ID.
  const ar = [
    {
      personProperties: {
        email: Session.getActiveUser().getEmail(),
        displayFormat: "DEFAULT",
      },
    },
    { richLinkProperties: { uri: ss.getUrl() } },
    { richLinkProperties: { uri: DriveApp.getFileById(imageFileId).getUrl() } },
  ];
  const chipRuns = [...stringValue.matchAll(/@/g)].map((e, i) => ({
    startIndex: e.index,
    chip: ar[i],
  }));

  // Create request body for Sheets API.
  const requests = [
    {
      updateCells: {
        rows: [{ values: [{ userEnteredValue: { stringValue }, chipRuns }] }],
        range: {
          sheetId: sheet.getSheetId(),
          startRowIndex: 0,
          startColumnIndex: 0,
        },
        fields: "userEnteredValue,chipRuns",
      },
    },
  ];

  // Request Sheets API.
  Sheets.Spreadsheets.batchUpdate({ requests }, ss.getId());
}
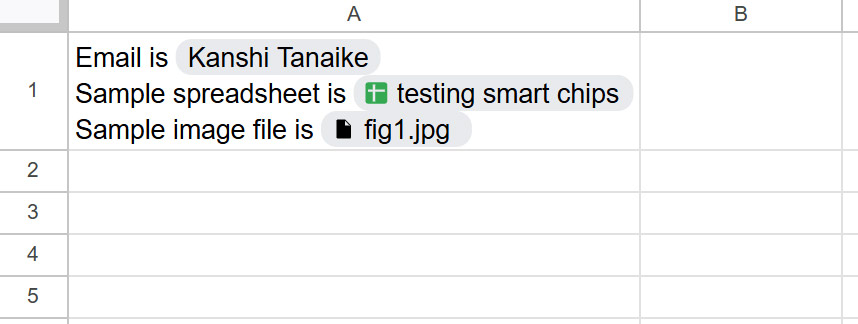
When this script is run, the following result is obtained.
In order to retrieve the data from the smart chips, the following sample script can be used. Please copy and paste the following script to the same script editor and run the function.
function getChips() {
  const ss = SpreadsheetApp.getActiveSpreadsheet();
  const a1Notation = "'Sheet1'!A1";
  const obj = Sheets.Spreadsheets.get(ss.getId(), {
    ranges: [a1Notation],
    fields: "sheets(data(rowData(values(userEnteredValue,chipRuns))))",
  });
  const res = obj.sheets[0].data[0].rowData.map(({ values }) =>
    values.map(({ userEnteredValue: { stringValue }, chipRuns }) => {
      return {
        text: stringValue,
        links: chipRuns.flatMap(
          ({ chip }) =>
            chip?.personProperties?.email || chip?.richLinkProperties?.uri || []
        ),
      };
    })
  );
  console.log(res);
}
When this script is run, the following result is obtained.
[
  [
    {
      "text": "Email is Kanshi Tanaike\nSample spreadsheet is testing smart chips\nSample image file is fig1.jpg",
      "links": [
        "###@gmail.com",
        "https://docs.google.com/spreadsheets/d/###/edit",
        "https://drive.google.com/file/d/###/view?usp=drivesdk"
      ]
    }
  ]
]
Tips for Creating a Request Body
The official Google Sheets API documentation provides guidance on using chipRuns Ref. This additional information aims to further clarify how to construct the request body for smart chips.
When creating the request body for the Sheets API, the following points are important:
The startIndex property is defined as:
The zero-based character index where this run starts, in UTF-16 code units.
When you manually insert a smart chip into a cell, @ is used as a placeholder. The startIndex indicates the position of this placeholder, and it appears that @ is the required placeholder character.
Let’s consider a scenario where you want to insert an email smart chip. The following request body can be used:
{
  "requests": [
    {
      "updateCells": {
        "rows": [
          {
            "values": [
              {
                "userEnteredValue": {
                  "stringValue": "@"
                },
                "chipRuns": [
                  {
                    "startIndex": 0,
                    "chip": {
                      "personProperties": {
                        "email": "###@gmail.com", // sample email address
                        "displayFormat": "DEFAULT"
                      }
                    }
                  }
                ]
              }
            ]
          }
        ],
        "range": {
          "sheetId": 0,
          "startRowIndex": 0,
          "startColumnIndex": 0
        },
        "fields": "userEnteredValue,chipRuns"
      }
    }
  ]
}
In this example, the startIndex of @ is 0. When startIndex is 0 in the Sheets API, this property can be omitted.
Here’s another example demonstrating how to include multiple smart chips within a single cell:
	{
  "requests": [
    {
      "updateCells": {
        "rows": [
          {
            "values": [
              {
                "userEnteredValue": {
                  "stringValue": "Email is @\nSample spreadsheet is @\nSample image file is @"
                },
                "chipRuns": [
                  {
                    "startIndex": 9,
                    "chip": {
                      "personProperties": {
                        "email": "###@gmail.com",
                        "displayFormat": "DEFAULT"
                      }
                    }
                  },
                  {
                    "startIndex": 33,
                    "chip": {
                      "richLinkProperties": {
                        "uri": "https://docs.google.com/spreadsheets/d/###/edit"
                      }
                    }
                  },
                  {
                    "startIndex": 56,
                    "chip": {
                      "richLinkProperties": {
                        "uri": "https://drive.google.com/file/d/###/view?usp=drivesdk"
                      }
                    }
                  }
                ]
              }
            ]
          }
        ],
        "range": {
          "sheetId": 0,
          "startRowIndex": 0,
          "startColumnIndex": 0
        },
        "fields": "userEnteredValue,chipRuns"
      }
    }
  ]
}
In this request body, the cell text is "Email is @\nSample spreadsheet is @\nSample image file is @". The positions of the @ placeholders are 9, 33, and 56, respectively. Each @ will be replaced with its corresponding smart chip.