These are sample scripts for putting an image into a cell of a Spreadsheet using Google Apps Script.
Sample 1
In this sample, the image is put into a cell using thumbnailLink retrieved by Drive API. So, when you test this, please enable Drive API at Advanced Google services. The image is put into cell “A1”.
function sample1() {
  const fileId = "###"; // Please set the file ID of the PNG image file on Google Drive.

  const url = Drive.Files.get(fileId).thumbnailLink.replace("=s220", "=s1000");
  const image = SpreadsheetApp.newCellImage().setSourceUrl(url).build();
  const range = SpreadsheetApp.getActiveSheet().getRange("A1");
  range.setValue(image);

  const value = range.getValue();
  console.log(value.getUrl()); // ---> null
  console.log(value.getContentUrl()); // --> Exception: Unexpected error while getting the method or property getContentUrl on object SpreadsheetApp.CellImage.
}
Sample 2
In this sample, the image is put into a cell using the data URL. The image is put into cell “A1”. In this case, I believe that when the data URL is used, this method will be able to be used for various situations.
function sample2() {
  const fileId = "###"; // Please set the file ID of the PNG image file on Google Drive.

  const bytes = DriveApp.getFileById(fileId).getBlob().getBytes();
  const url = `data:image/png;base64,${Utilities.base64Encode(bytes)}`;
  const image = SpreadsheetApp.newCellImage().setSourceUrl(url).build();
  const range = SpreadsheetApp.getActiveSheet().getRange("A1");
  range.setValue(image);

  const value = range.getValue();
  console.log(value.getUrl()); // ---> null
  console.log(value.getContentUrl()); // --> Exception: Unexpected error while getting the method or property getContentUrl on object SpreadsheetApp.CellImage.
}
Sample 3
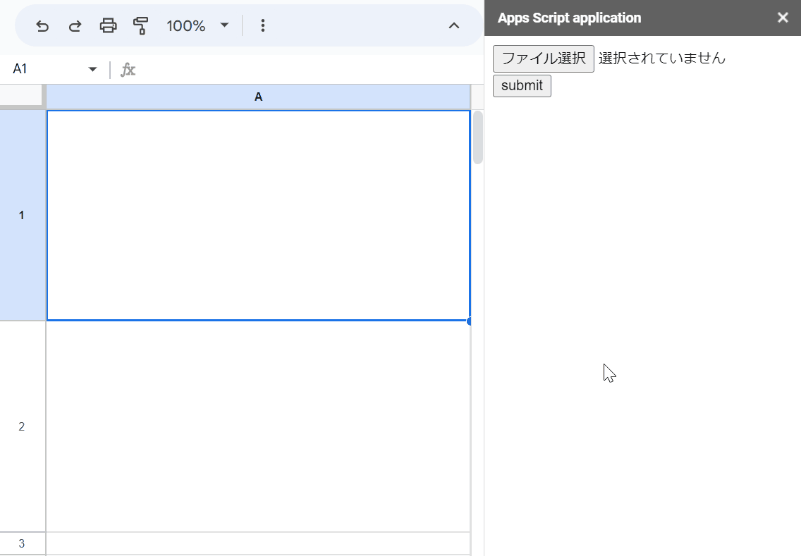
In this sample, the images are uploaded and put them into cells.
HTML side: index.html
Here, I used a Javascript library for parsing the values of HTML form. Ref
<script src="https://cdn.jsdelivr.net/gh/tanaikech/HtmlFormObjectParserForGoogleAppsScript_js/htmlFormObjectParserForGoogleAppsScript_js.min.js"></script>
<form>
  <input type="file" name="sampleFiles" multiple /><br />
  <input type="submit" name="button" value="submit" onclick="main(this);return false;" />
</form>
<script>
async function main(e) {
  const obj = await ParseFormObjectForGAS(e.parentNode);
  google.script.run.withSuccessHandler(res => console.log(res)).main(obj.sampleFiles);
}
</script>
Google Apps Script side: Code.gs
function main(e) {
  if (!e) {
    SpreadsheetApp.getUi().showSidebar(HtmlService.createHtmlOutputFromFile("index"));
    return;
  }
  if (e[0].files.length == 0) return;
  const values = e[0].files.map(f => [SpreadsheetApp.newCellImage().setSourceUrl(`data:${f.mimeType};base64,${Utilities.base64Encode(f.bytes)}`).setAltTextTitle(f.filename).build()]);
  SpreadsheetApp.getActiveSheet().getRange(1, 1, values.length).setValues(values);
  return "Done.";
}
- When you test this script, please run
main. By this, a sidebar is opened. When you select files and click the submit button, the selected images are put into the cells. You can see the demonstration at the top image in this post.
Note
-
In the current stage, it seems that
getUrl()andgetContentUrl()of Class CellImage cannot be used.
Reference:
- I answered the 2nd script to this thead on Stackoverflow.