This is a sample script for reducing the image data size using Google Apps Script. You might have a situation where you might want to reduce the data size of image data using Google Apps Script. Here, using Google Apps Script, I would like to introduce a sample script for reducing the data size of the image data by reducing the image quality.
Limitations
In the current stage, by the specification of Google side, there are the following limitations.
-
Maximum image size of the output file is 1600 pixels in width, while you can use the large image as the input image.
-
Output mimeType is
image/png. So, when a Jpeg file is used, the file size might be larger. -
When the thumbnail image is retrieved from Google Slides using Slides API, the maximum size is 1600 pixels in the width.
-
When
thumbnailLinkof Drive API is used, the image size can be reduced. But, the image size cannot be increased.
Please be careful about the above limitations.
Usage
1. Prepare Google Apps Script project.
Please create a standalone Google Apps Script project. Ref Also, you can use the container-bound script of Google Docs (Document, Spreadsheet, Slides and so on).
2. Install Google Apps Script libraries.
This sample script uses the following 2 Google Apps Script libraries. Please install them at the script editor.
4. Enable Google APIs.
This sample script uses 2 APIs of Drive API and Slides API. So, please enable them at Advanced Google services. Ref
5. Sample script.
Please copy and paste the following sample script to the script editor. And, please set the output filename and the file ID of the image file on Google Drive or the direct link of the image data.
function myFunction() {
  const qarity = 50; // Unit is the percent. This value is used for reducing the image quarity (I think that in this case, it's the resolution.). For example, when an image is 1000 x 1000 pixels, when 50 % is used, the output image has 50 % low quarity.
  const outputImageFilename = "sample"; // Please set the filename of output image file.

  // 1. Retrieve blob of image.
  const sampleFileId = "###"; // Please set the file ID of the file on your Google Drive.
  const blob = DriveApp.getFileById(sampleFileId).getBlob();
  // Or, when you want to download the image, you can use the following script.
  // const url = "###";
  // const blob = UrlFetchApp.fetch(url).getBlob();

  // 2. Retrieve the image size of original image.
  const { width, height } = ImgApp.getSize(blob);
  const rWidth = width * (qarity / 100);
  const rHeight = height * (qarity / 100);

  // 3. Create the original image as a file.
  const file1 = DriveApp.createFile(blob);

  // 4. Retrieve the image reduced the quarity
  var link1 = Drive.Files.get(file1.getId()).thumbnailLink.replace(
    /\=s.+/,
    "=s" + rWidth
  );

  // 5. Magnifying the reduced image to the original size using Google Slides.
  const object = {
    title: "temp",
    width: { unit: "pixel", size: width },
    height: { unit: "pixel", size: height },
  };
  const sId = DocsServiceApp.createNewSlidesWithPageSize(object);
  const s = SlidesApp.openById(sId);
  const slide = s.getSlides()[0];
  slide
    .insertImage(link1)
    .setWidth(width / 1.33333)
    .setHeight(height / 1.33333);
  s.saveAndClose();

  // 6. Retrieve result image. In the current stage, the maximum image size is 1600 pixels in width. And, the output mimeType is image/png.
  const link2 = Slides.Presentations.Pages.getThumbnail(
    sId,
    slide.getObjectId(),
    { "thumbnailProperties.thumbnailSize": "LARGE" }
  ).contentUrl;
  const blob2 = UrlFetchApp.fetch(link2)
    .getBlob()
    .setName(
      outputImageFilename.includes(".png")
        ? outputImageFilename
        : `${outputImageFilename}.png`
    );
  const file2 = DriveApp.createFile(blob2);
  const outputFileUrl = file2.getUrl();

  // 7. Remove the templral files.
  file1.setTrashed(true);
  DriveApp.getFileById(sId).setTrashed(true);

  // 8. Output the URL of the file.
  console.log(outputFileUrl);
}
- Please adjust the value of
qarityfor your image.
6. Testing.
When I tested the above script to the following sample image, the following result image is obtained. I thought that in this sample, the large change in the image quality cannot be confirmed. The image with reducing the image data size without largely changing the image quality could be obtained.
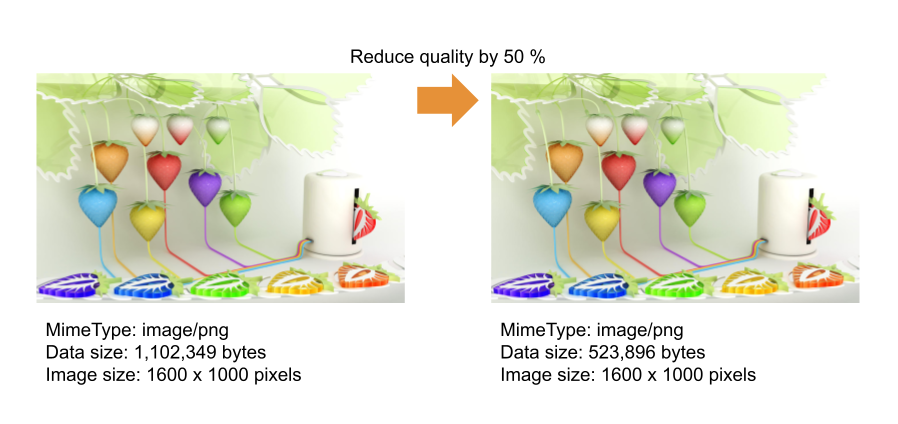
This sample image is from here.
References
- ImgApp
- DocsServiceApp
- I answered this sample script to this thread on Stackoverflow.